
How to keep your account from getting hacked
What for: So you don't get hacked.
If you use a short and simple password on Facebook, cybercriminals can guess it and hijack your account. A long and complex password is more secure. Use a strong password that:
- Is at least 8 and up to 20 characters long;
- Contains lowercase and uppercase letters, numbers, and special characters ($, @, etc.);
- Is not an actual word or easy-to-guess phrase;
- Is not the same as your passwords for any other accounts;
- Does not consist of information that strangers could easily find out (your name, date of birth, pet's name, and so forth — or those of your friends or relatives).
To change your password:
- Click your profile picture in the upper right corner of the screen;
- Select Settings & privacy;
- Click Settings;
- Select Accounts Center in the menu on the left;
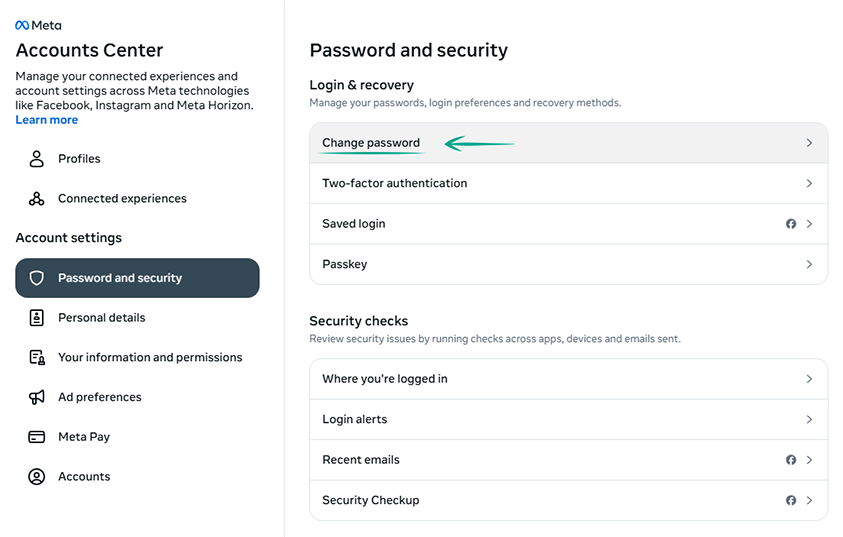
- Click Password and security in the menu on the left;
- Select Change password;
- Click your account name;
- Enter your current Facebook password;
- Enter a new strong password twice;
- Click Change password.
What for: So you definitely don't get hacked.
Facebook can be configured to request a one-time code or physical security key when you log in to your account. That way, even if cybercriminals learn your username and password, they will not be able to use them without the one-time code or security key. The code is sent to your specified phone number or generated in a dedicated application, and a security key is a small hardware device used to authorize your login.
To enable two-factor authentication:
- Click your profile picture in the upper right corner of the screen;
- Select Settings & privacy;
- Click Settings;
- Select Accounts Center in the menu on the left;
- Click Password and security in the menu on the left;
- Select Two-factor authentication;

- Click your account name;
- Enter the current password for your Facebook account;
- Click Continue;
- Select an authentication method:
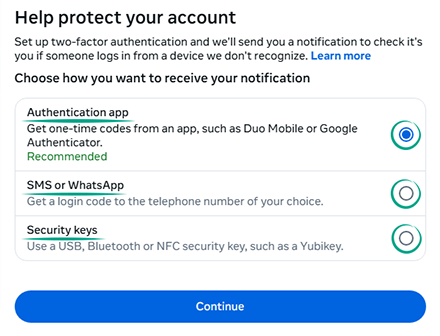
- Authentication app: download an authenticator app like Kaspersky Password Manager (if you have a subscription) or Google Authenticator. Scan the QR code or copy the key and enter the verification code from the app.
- SMS or WhatsApp: if you don't have a phone number linked to your Facebook account, you'll need to enter one and click Next. Then, enter the code you receive on your phone.
- Security keys: enter your Facebook password, insert the security key into your device, and click Register security key.
Note that selecting a code sent to your phone or WhatsApp as the two-factor authentication method links that phone number to your profile. Facebook will request permission to use the phone number for targeted ads and to display it on your profile. This will let users find you by phone number on Facebook, and the service will recommend people you may know based on your phone contacts.
With two-factor authentication enabled, you can sign in to your account even if you lose your phone. Use recovery codes for that. Each of the ten codes can be used only once. Download them, write them down, copy them, or take a screenshot, and keep the information in a safe place. To get your codes:
- Click your profile picture in the upper right corner of the screen;
- Select Settings & privacy;
- Click Settings;
- Select Accounts Center in the menu on the left;
- Click Password and security in the menu on the left;
- Select Two-factor authentication;
- Click your account name;
- Click Additional methods;
- Select Recovery codes;
- Select Download codes or Get new codes.
To add your device to the list of trusted devices, click Trust this device after entering your credentials to log in to your account. Be careful and don't do this if you are signing in to your account from someone else's device. If a device you've marked as trusted falls into someone else's hands, they'll be able to log in to your account, bypassing two-factor authentication.
To avoid this scenario, periodically check your trusted devices list and keep only those you are currently using:
- Click your profile picture in the upper right corner of the screen;
- Select Settings & privacy;
- Click Settings;
- Select Accounts Center in the menu on the left;
- Click Password and security in the menu on the left;
- Select Two-factor authentication;
- Click your account name;
- Click Trusted devices;
- This opens a list of all devices considered trusted. The list shows the login method, operating system, and login location and time. If you see a device you don't recognize, click to remove it;
- Click Remove device.
What for: To take timely security measures.
If you've logged in from someone else's device or you suspect that your account might have been hacked, you can review the activity log in your profile to see if a bad actor has done anything on your behalf and roll back all you find inappropriate. You can also review the list of active sessions and terminate the ones you believe are unauthorized, unwanted, or outdated.
To view your activity log:
- Click your profile picture in the upper right corner of the screen;
- Select Settings & privacy;
- Click Settings;
- Select Activity log in the menu on the left;
- To view information about your actions and account events, use the drop-down menus on the left:
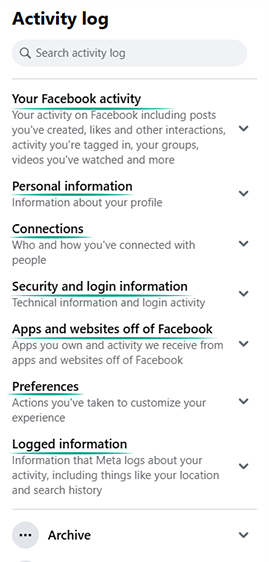
- Your Facebook activity;
- Personal information;
- Connections;
- Security and login information;
- Apps and websites off of Facebook;
- Preferences;
- Logged information.
To end unwanted active sessions:
- Select Security and login information under Activity log;
- Select Where you're logged in in the menu on the left; This shows all your active sessions;
- To log out, click the three dots next to the session details;
- Click Log out.
Another way to end leftover sessions is through the Accounts Center:
- Click your profile picture in the upper right corner of the screen;
- Select Settings & privacy;
- Click Settings;
- Select Accounts Center in the menu on the left;
- Click Password and security in the menu on the left;
- Click Where you're logged in;
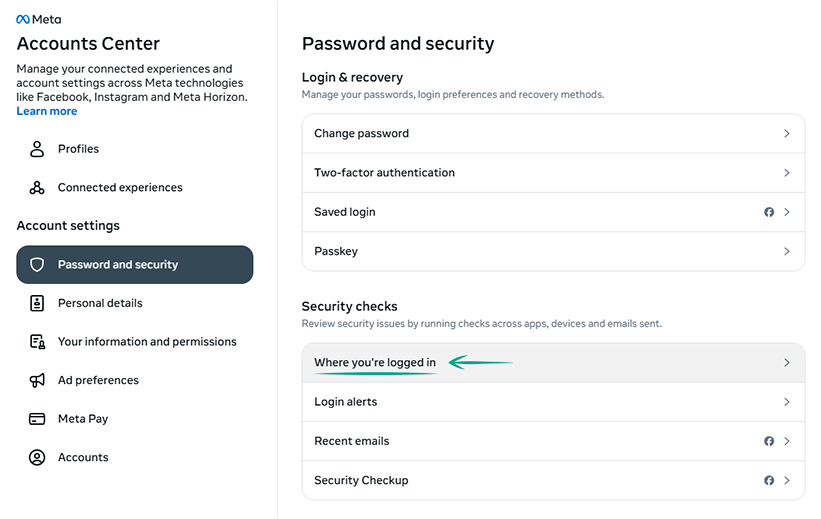
- Click the name of your Facebook account. This shows all your active sessions;
- To terminate a session, click Select devices to log out;
- Select the relevant session;
- Click Log out;
- Confirm your choice.
What for: To change your password promptly if you get hacked.
Facebook can notify you every time your username and password are entered in a new browser or on a new device. If someone logs in to your account, you'll learn about it and you can quickly end the unauthorized session and change your password. To this end, the social network will send you an e-mail or notification to a trusted device. We recommend activating both options so that you can receive alerts even if one of them is unavailable, for example if you lose your phone or your e-mail gets hacked.
To enable suspicious activity alerts:
- Click your profile picture in the upper right corner of the screen;
- Select Settings & privacy;
- Click Settings;
- Select Accounts Center in the menu on the left;
- Click Password and security in the menu on the left;
- Click Login alerts;
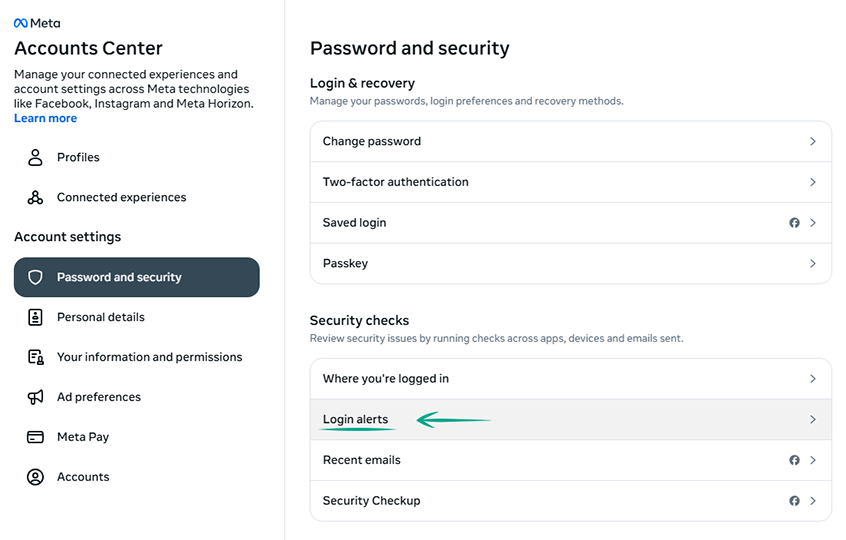
- Select your Facebook account name;
- Check In-app notifications and Email;
- Click Save changes.
What for: To reduce the risk of being hacked.
You can use the phone number linked to your account as the primary login or recovery method. However, linking your phone number exposes you to SIM swapping where attackers exploit your carrier to gain access to your data. If you consider this threat relevant, remove your phone number:
- Click your profile picture in the upper right corner of the screen;
- Select Settings & privacy;
- Click Settings;
- Select Accounts Center in the menu on the left;
- Click Profiles and personal details in the menu on the left;
- Select Contact info;
- Click your phone number;
- Select Delete number;
- Click Delete to confirm.
Downside: You'll no longer be able to use one-time codes sent to your phone as the primary login method or as one of the two-factor authentication methods.
How to protect your money
What for: To prevent data breaches and keep your money safe.
Facebook users can make in-app purchases, donate money to charity, or buy items, for example, on Facebook Marketplace. To this end, the social network requests and stores your bank card or PayPal account details as a payment method. That's convenient, but in the event of a leak or hack, your financial information could fall into the hands of cybercriminals. To avoid that, delete the information from the social network's database:
- Click your profile picture in the upper right corner of the screen;
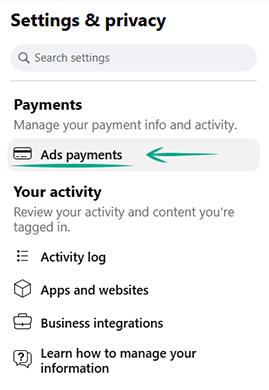
- Select Settings & privacy;
- Click Settings;
- Select Ads payments in the menu on the left;
- Under Payment Methods, you will see a list of bank cards and PayPal accounts linked to your Facebook account;
- For each card:
- Click the three dots icon next to the card number;
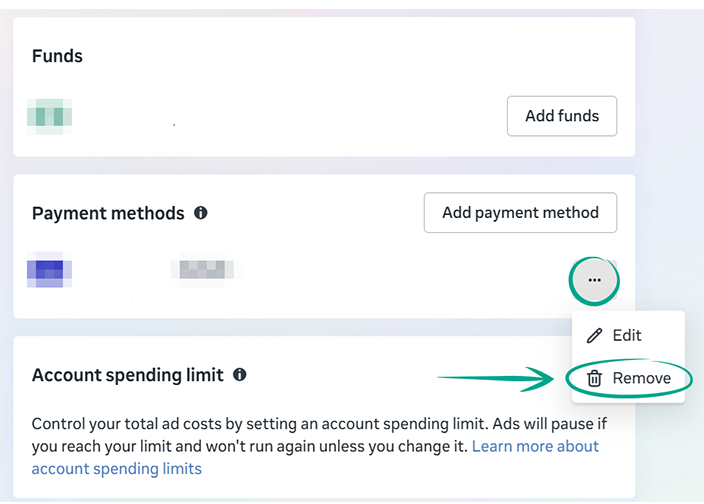
- Select Remove;
- Click Remove to confirm;
- Click Done.
- Click the three dots icon next to the card number;
Downside: If you're using a card to pay for ads, you'll need to close your Facebook ad account before you can remove this card. Besides, you can't purchase anything on Facebook without a saved payment method. You can still buy goods on Facebook store pages if they process payments on their own sites.
How to keep corporations out of your business
What for: To stop Facebook from tracking your activity outside the platform.
The social network's partners share information about your actions on their websites and in their mobile applications with Facebook. They also share your advertising ID and e-mail address or phone number — whichever they have access to. If these match your account, Facebook will use your purchase details to personalize ads targeting you. For instance, if you have looked for a hotel in another town using a lodging search application, Facebook will show you ads for airlines that sell flights to that town. This feature uses your online activity log. To clear the activity log and prevent Facebook from using information about your online activity for personalizing ads:
- Click your profile picture in the upper right corner of the screen;
- Select Settings & privacy;
- Click Settings;
- Click Accounts Center in the menu on the left;
- Select Your information and permissions in the menu on the left;
- Click Your activity off Meta technologies;
- Click Clear previous activity;
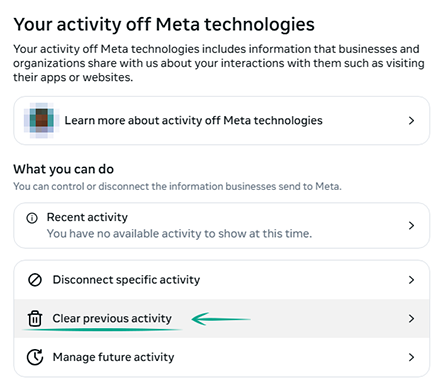
- Confirm your choice;
- Go back to Your activity off Meta technologies;
- Click Manage future activity;
- Select Disconnect future activity;
- Click Continue;
- Confirm your choice.
Note that the updated settings will take effect within two days. The amount of ads will remain unchanged, but they'll no longer consider your activity outside of Facebook. Facebook will still receive information about your online activity from partners, but it'll stop using it for ad targeting.
What for: To restrict what Facebook and its partners know about you.
Facebook and its advertising partners may use information about your activity on the platform, personal details in your profile, and other data to select ads specifically tailored to your interests. If targeted ads bother you, disable the use of your details and information about your actions on Facebook. To do so:
- Click your profile picture in the upper right corner of the screen;
- Select Settings & privacy;
- Click Settings;
- Select Accounts Center in the menu on the left;
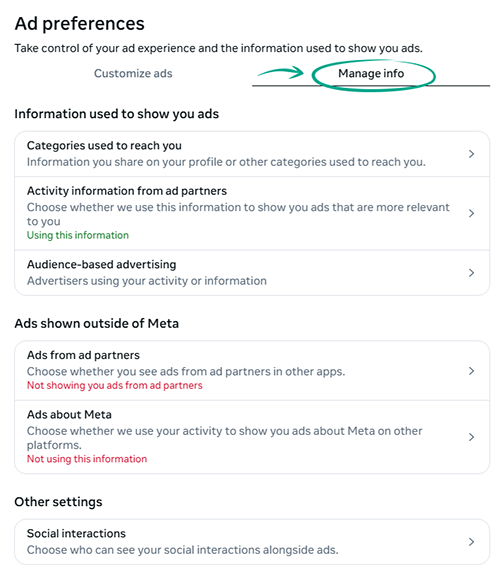
- Click Ad preferences in the menu on the left; You'll land on the Customize ads tab;
- Go to the Manage info tab;
- Under Information used to show you ads, click Categories used to reach you;
- Turn off Employer, Job title, Education and Relationship status;
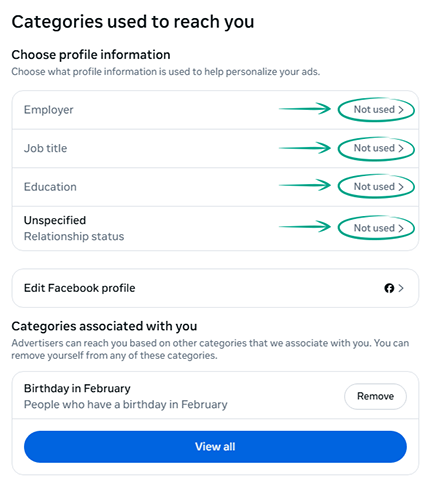
- Under Categories associated with you, remove the categories;
- Go back to the Manage info tab;
- Click Activity information from ad partners;
- Click Review settings;
- Select No, don’t make my ads more relevant by using this information;
- Click Confirm;
- You'll land back on the Manage info page;
- Select Audience-based advertising to see the list of advertisers who have included you in their target audience based on your personal information;
- For each advertiser individually:
- Click the advertiser;
- Click They uploaded or used a list to reach you;
- Click Don't allow.
- Go back to the Manage info tab;
- Under Ads shown outside of Meta, select Ads in other apps;
- Click Don't show me ads from ad partners;

- Close the Ads from ad partners in other apps window;
- Under Ads shown outside of Meta, select Ads about Meta;
- Select Don't use my activity to show me ads about Meta;
- Click Confirm.
Note that you'll still see ads, but they won't be based on your personal data.
How to defeat spammers and trolls
What for: To keep your peace of mind.
You can also block the app from showing comments containing certain keywords or hashtags in your profile. This hides potential offensive comments or other unwanted content.
To configure the filter:
- Click your profile picture in the upper right corner of the screen;
- Select Settings & privacy;
- Click Settings;
- Select Profile and tagging under Audience and visibility in the menu on the left;
- Under Viewing and sharing, select Hide comments containing certain words from your profile;
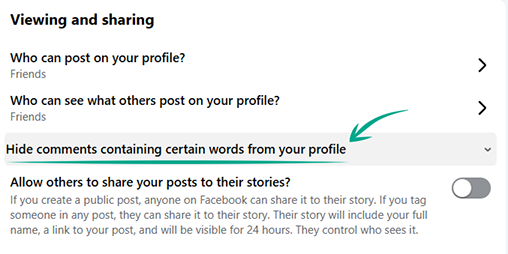
- In the input field, enter the words, phrases or emojis that you want to exclude from comments in your profile, separated by commas, and click the plus icon in the lower right corner;
- Click Save.
You can do the same in your content management menu:
- Click your profile picture in the upper right corner of the screen;
- Select Settings & privacy;
- Click Settings;
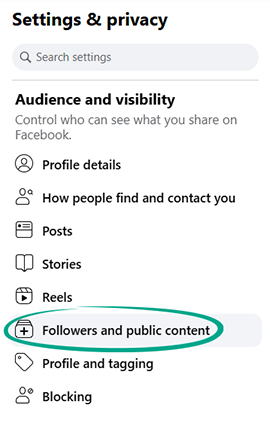
- Select Followers and public content in the menu on the left;
- Click Hide comments containing certain words from your profile;
- In the input field, enter the words, phrases or emojis that you want to exclude from comments in your profile, separated by commas, and click the plus icon in the lower right corner;
- Click Save.
Note that hidden comments will remain visible to those who wrote them and their friends.
What for: To prevent others from using your content for their own ends.
By default, any Facebook user can publish a story mentioning any of your posts. The story will be visible to the chosen audience for 24 hours. It'll include your name along with a link to your post. Spammers, trolls, or anyone else might exploit this — or you might be annoyed to see your content reused without your permission. To prevent this, disable the option to create stories based on your posts:
- Click your profile picture in the upper right corner of the screen;
- Select Settings & privacy;
- Click Settings;
- Select Profile and tagging under Audience and visibility in the menu on the left;
- Under Viewing and sharing, turn off Allow others to share your posts to their stories?
What for: To avoid becoming a victim of haters and trolls.
Facebook users can comment on your profile pictures, cover photo, and bio updates, and also like them or add emoji. If you see annoying comments or tags appearing under your personal details or photos, restrict access to your personal info:
- Click your profile picture in the upper right corner of the screen;
- Select Settings & privacy;
- Click Settings;
- Select Followers and public content in the menu on the left;
- Click Public profile info;
- Select one of the options:
- Friends of friends: only your friends and their friends can comment on your public profile info;
- Friends: only your friends can comment on your public profile info.
What for: So you can avoid running into unwanted people.
If a Facebook user is leaving offensive comments, sending you spam, or is otherwise annoying you, you can block that person. They won't be notified, but they'll be unable to view your profile, leave comments under your posts, or message you. To block a user:
- Open the profile of the user you wish to block;
- Click the three dots icon at the bottom right of their profile name;
- In the drop-down menu, select Block;
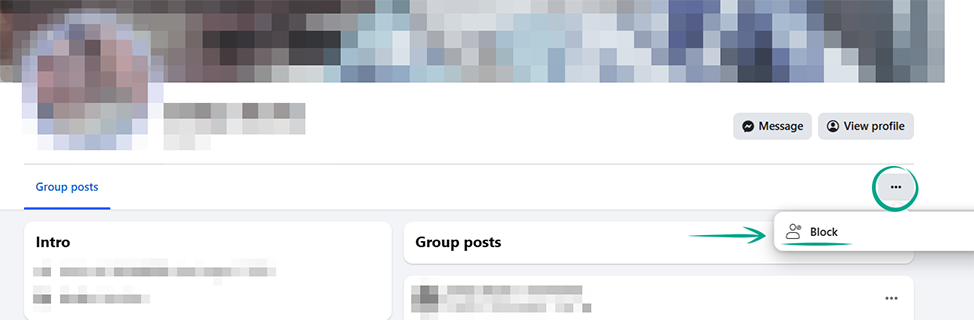
- Click Confirm;
- Click Close.
You can also manage the list of blocked users and restrict certain users from performing certain actions:
- Click your profile picture in the upper right corner of the screen;
- Select Settings & privacy;
- Click Settings;
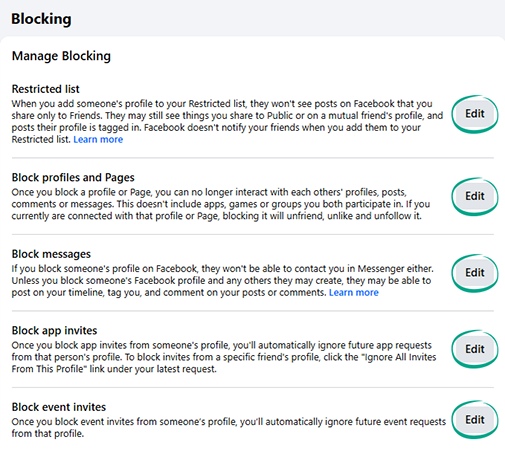
- Select Blocking in the menu on the left and select an option:
- Click Edit next to Restricted list to view or edit the list of friends to hide your posts from when creating posts or editing post visibility;
- Click Edit next to Block profiles and Pages to view the list of users you've blocked, add, or unblock someone;
- Click Edit next to Block messages to stop a certain user from messaging you or view a list of these users;
- Click Edit next to Block app invites to stop a certain user from inviting you to apps or view a list of these users;
- Click Edit next to Block event invites to stop a certain user from inviting you to events or view a list of these users.
What for: To remove irrelevant comments.
By default, all Facebook users can leave comments under your posts, an ability that spammers and trolls often abuse.
To allow only your friends and their friends to comment on your posts:
- Click your profile picture in the upper right corner of the screen;
- Select Settings & privacy;
- Click Settings;
- Select Followers and public content in the menu on the left;
- Click Who can comment on your public posts?
- Select Friends of friends or Friends;

- Click Save.
What for: To prevent your name from appearing next to offensive content.
Other Facebook users can tag you in their posts. By default, these posts can appear in your profile, your friends will be alerted about them, and they'll see those posts in their timeline and search results. But what if somebody tags you in an offensive or fraudulent post — or if your friends tag other people in your posts? The point is, tagging isn't always welcome. You can limit the visibility of the posts you're tagged in, and require your permission before others can tag you in their posts or tag other people in yours:
- Click your profile picture in the upper right corner of the screen;
- Select Settings & privacy;
- Click Settings;
- Select Profile and tagging in the menu on the left;

- Click Who can see posts you're tagged in on your profile?
- Select an option for who can see these posts on your Mentions tab:
- Everyone: posts you're tagged in will be visible even to users who aren't signed in;
- Friends of friends: posts you're tagged in will be visible to your friends and their friends;
- Friends: posts you're tagged in will be visible only to your friends;
- Friends except…: posts you're tagged in will be visible to all your friends except for those you specifically exclude;
- Specific friends: posts you're tagged in will be visible only to friends you select from the list;
- Custom: combine the options above and add exceptions as needed;
- Only me: posts you're tagged in will be visible only to you.
- Click Save;
- Click When you're tagged in a post, who do you want to add to the audience of the post if they can't already see it?
- Select an option to choose who can see these posts in their timeline and search results:
- Friends: posts you're tagged in will be visible only to your friends;
- Only me: posts you're tagged in will be visible only to you;
- Custom: select individuals in your friends list or add exceptions.
- Click Save;
- Turn on Review tags people add to your posts before the tags appear on Facebook?
- Turn on Review posts you're tagged in before the post appears on your profile?
To review posts with tags:
- Click your profile picture in the upper right corner of the screen;
- Select Settings & privacy;
- Click Settings;
- Select Activity log in the menu on the left;
- Under Profile, photo and tag review in the menu on the left, select:
- Review posts you're tagged in;
- Review tags on your posts.
To delete a tag in someone else's post you're tagged in:
- Click your profile picture in the upper right corner of the screen;
- Select Settings & privacy;
- Click Settings;
- Select Activity log in the menu on the left;
- Select Your Facebook activity in the menu on the left;
- Click Activity you're tagged in in the drop-down list below;
- Select Posts and comments you're tagged in or Photos and videos you're tagged in;
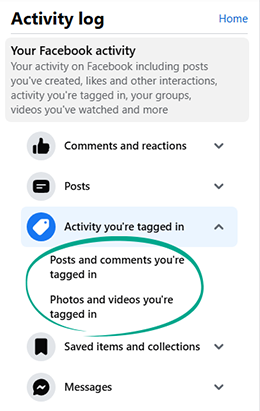
- Select the tags you wish to remove and click Remove tags;
- Confirm your choice.
What for: To fend off bothersome people.
By default, Facebook allows all users to send you friend requests. Spammers, scammers, and social media friend collectors sometimes take advantage of this. To keep your profile safe from strangers or suspicious accounts, you should limit who can send you friend requests:
- Click your profile picture in the upper right corner of the screen;
- Select Settings & privacy;
- Click Settings;
- Select How people find and contact you in the menu on the left;
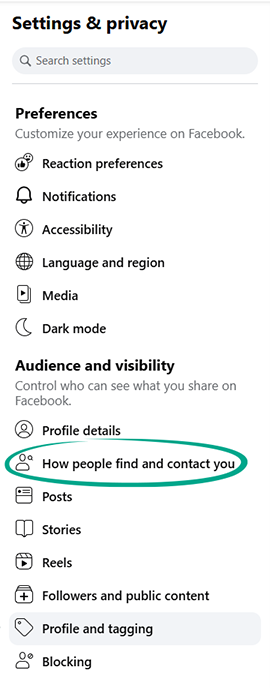
- Under Who can send you friend requests? select Friends of friends.
Downside: Your acquaintances will have a hard time locating your Facebook profile unless they are friends of your friends.
What for: To get rid of spam.
By default, people in your friends list can post on your wall. Sometimes, such "friendly" publications are anything but good, and if any of your friends' accounts get hacked you might see lots of unwanted posts on your profile.
To limit the ability to post to your profile:
- Click your profile picture in the upper right corner of the screen;
- Select Settings & privacy;
- Click Settings;
- Select Profile and tagging in the menu on the left;
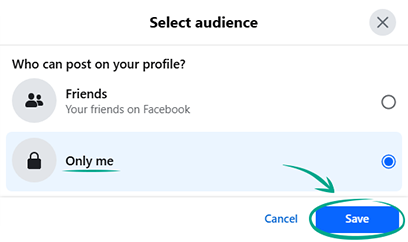
- Click Who can post on your profile?
- Select Only me in the drop-down list;
- Click Save.
If you want to keep the option for others to post on your profile, you can still control who sees those posts by limiting their visibility. To do so, do the following in the same section:
- Click Who can see what others post on your profile?
- Select Only me in the drop-down list;
- Click Save.
How to hide posts from unwanted people
What for: So your posts will be seen only by those for whom they are intended.
You can choose who will see your Facebook posts. By default, even users who are not logged in to Facebook can see them. This can be awkward if you're not comfortable sharing the details of your private life with strangers or people you don't like. Remember that information from your posts can be used against you. For example, information about your personal life can help telephone fraudsters to make up a convincing story in order to steal money from your bank accounts.
To adjust the visibility of your future posts:
- Click your profile picture in the upper right corner of the screen;
- Select Settings & privacy;
- Click Settings;
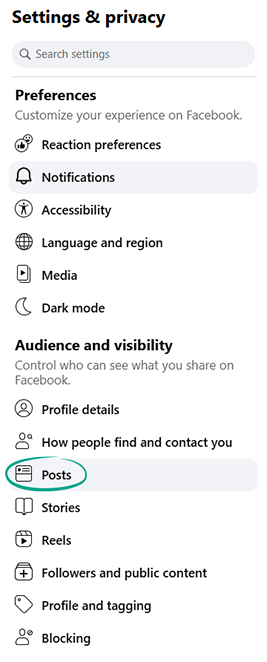
- Select Posts under Audience and visibility in the menu on the left;
- Click Who can see your future posts?
- Select those who will see your posts by default:
- Friends: only friends will see your posts;
- Friends except…: posts will be visible to all your friends except for those you specifically exclude;
- Specific friends: posts will be visible only to friends you select from the list;
- Custom: combine the options above and add exceptions as needed;
- Only me: posts will be visible only to you.
- Click Done.
Another way to manage the visibility of your future posts, including stories and reels:
- Click your profile picture in the upper right corner of the screen;
- Select Settings & privacy;
- Click Settings;
- Select Default audience settings under Tools and resources in the menu on the left;
- Select those who will see your posts by default:
- Friends: only friends will see your posts;
- Custom: you can select certain people, friends lists, or exclude certain users.
- Click Next;
- Confirm your choice;
- Click Done.
To limit the visibility of an individual post as you create it, without changing your default settings:
- Open the drop-down menu under your name at the top of the page.
- Specify the group of users who will see your post:
- Public: your posts will be visible to everyone on and off Facebook;
- Friends: your posts will be visible only to your friends;
- Friends except…: your posts will be visible to all your friends except for those you specifically exclude;
- Specific friends: your post will be visible only to the friends you select from the list;
- Custom: combine the options above and add exceptions as needed;
- Only me: your posts will be visible only to you.
- Click Done.
To configure the visibility of a previously published post:
- Click the three-dot icon to the right of the post title;
- Select Edit audience;
- Specify the group of users who will see your post:
- Public: your posts will be visible to everyone on and off Facebook;
- Friends: your posts will be visible only to your friends;
- Friends except…: your posts will be visible to all your friends except for those you specifically exclude;
- Specific friends: your post will be visible only to the friends you select from the list;
- Custom: combine the options above and add exceptions as needed;
- Only me: your posts will be visible only to you.
- Click Done.
To limit the visibility of all your previous posts and make them friends-only:
- Click your profile picture in the upper right corner of the screen;
- Select Settings & privacy;
- Click Settings;
- Select Posts under Audience and visibility in the menu on the left;
- Click Limit past posts;
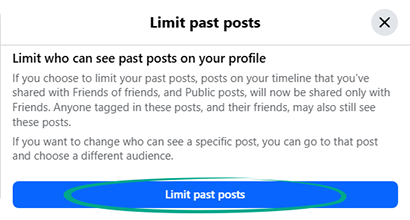
- In the window that opens, click Limit past posts and confirm.
Downside: Even when you limit the visibility of old posts, they remain visible to anyone tagged in them and their friends.
What for: So your stories are visible only to those for whom they are intended.
Other Facebook users can see your stories and share them with their friends. This could expose your personal information to strangers, and bad actors could use the details from your stories against you.
To limit who can see and use your future stories:
- Click your profile picture in the upper right corner of the screen;
- Select Settings & privacy;
- Click Settings;
- Select Stories under Audience and visibility in the menu on the left;
- Turn off Allow others to share your public stories to their own story?
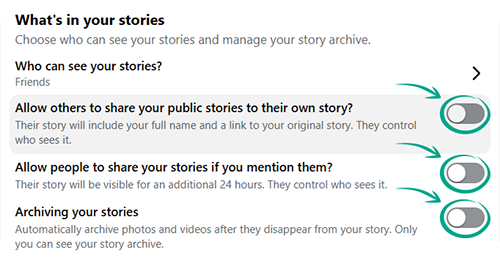
- Turn off Allow people to share your stories if you mention them?
- Click Who can see your stories?
- Specify the group of users who will see your stories:
- Friends: only your friends can view your stories;
- Custom: stories are visible only to the people you choose;
- Friends except…: your stories won't be visible to the people you select from your friends list.
To limit the visibility of a story when posting it:
- Click the cog next to Your story;
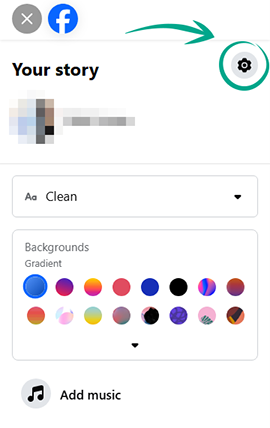
- Specify the group of users who will see your story:
- Friends: only your friends can view your story;
- Custom: your story will be visible only to the people you choose;
- Hide story from: your story won't be visible to the people you select from your friends list.
- Click Save.
To limit the visibility of a previously posted story:
- Click your profile picture in the upper right corner of the screen;
- Click the button with your name to go to your profile;
- Click your profile picture in the profile header on the left;
- Select View story;
- Click Settings under Stories in the top left part of the screen;
- Click the More tab and select Story privacy from the drop-down list;
- Specify the group of users who will see your story:
- Friends: only your Facebook friends can view your stories;
- Custom: stories are visible only to the people you choose;
- Hide story from: your story won't be visible to the people you select from your friends list.
- Click Save.
What for: So you don't show up in search engines.
If you post in public Facebook groups, a preview of those posts will be visible not only to all users on the platform but to everyone on the internet, including through search engines. Previews outside of Facebook may display your name, profile picture, and part of the post content. This can be pretty uncomfortable if you don't want to share your thoughts and personal details with strangers or people you'd rather avoid. Remember that information from your posts can be used against you.
To disable off-Facebook previews for your posts in public groups:
- Click your profile picture in the upper right corner of the screen;
- Select Settings & privacy;
- Click Settings;
- Select Followers and public content under Audience and visibility in the menu on the left;
- Turn off Off-Facebook previews.
What for: To prevent others from using your content for their own ends.
By default, Facebook settings allow other users to share your reels and use your original audio to create their own posts. If you don't want others using your original content, you can disable these options. You can also limit the visibility of your reels:
- Click your profile picture in the upper right corner of the screen;
- Select Settings & privacy;
- Click Settings;
- Select Reels in the menu on the left;
- Click Allow others to use your original audio and remix your future public reels?
- Select Don't allow;
- Click Save;
- Turn off Allow others to share your reels to their stories?
- Click Who can see your future posts?
- Choose who should be able to see your future reels:
- Public: your posts will be visible to everyone on and off Facebook;
- Friends: your posts will be visible only to your friends;
- Friends except…: your posts will be visible to all your friends except for those you specifically exclude;
- Specific friends: your post will be visible only to the friends you select from the list;
- Custom: combine the options above and add exceptions as needed;
- Only me: your posts will be visible only to you.
- Click Done.
What for: To avoid sharing the details of your private life with buyers and sellers.
If you use Marketplace to buy and sell, your followers there can see all your posts by default when they view your Facebook profile. If you'd rather prevent them from knowing too much about you or seeing content that has nothing to do with Marketplace, you can limit what they're able to see:
- Click Marketplace in the menu on the left;
- Click the cog in the Marketplace menu header on the left;
- Turn off Let people follow you.
How to prevent your personal data from being exposed
What for: To protect yourself from spammers and other shady people.
Bad actors can use information from your profile to establish contact, gain your trust, or manipulate the things that matter most to you. For instance, detailed information about your job or interests helps them contrive persuasive stories. and they can bombard your phone with spam calls or text messages if they know your number.
By default, your phone number is visible to all of your friends. Friends of your friends can see your date of birth. Meanwhile, information about your city, place of study, and work is public. To hide these and other details:
- Click your profile picture in the upper right corner of the screen;
- Click the button with your name to go to your profile;
- Click Edit profile under your cover photo or next to it;
- Scroll down and click Edit your About info;
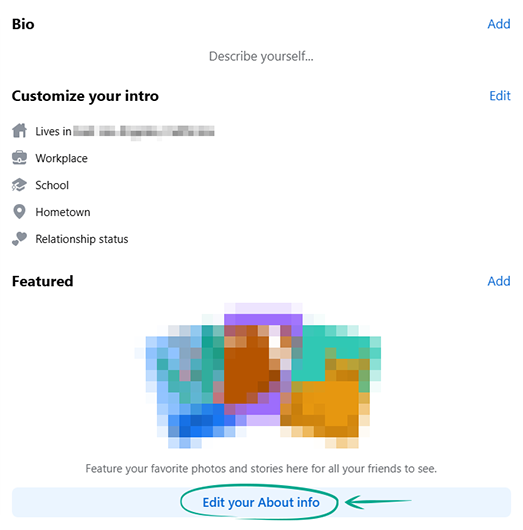
- To edit visibility, click the globe, lock, or people next to each personal info item, or click the three-dots icons and select Edit privacy;
- Select Only me;
- Click Save;
- Click Close to close the window.
After configuration, you can see how your profile looks to other users:
- Open your profile;
- Click the three dots in the lower right corner of the profile header;
- Select View as;
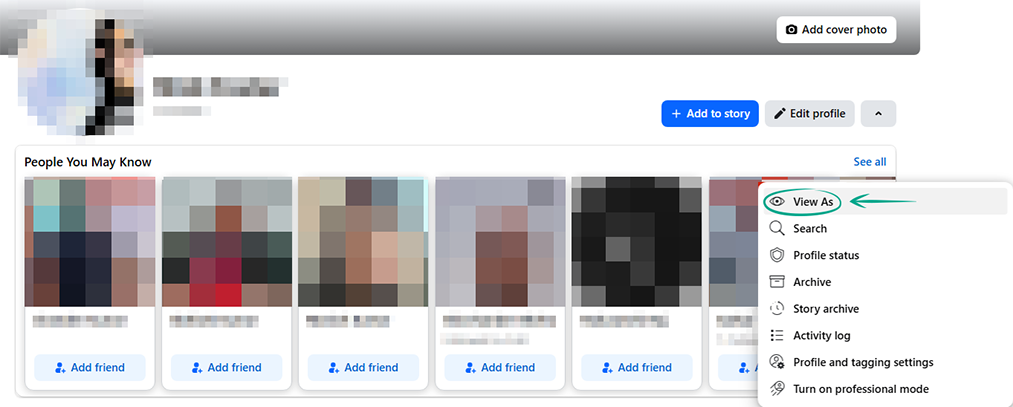
- Click Exit view as in the upper right corner to exit this viewing mode.
Downside: Your friends may have trouble locating your Facebook profile or contacting you by phone.
What for: To prevent strangers from finding out your interests.
By default, people, pages, and lists that you follow are visible to all users. This can be an issue if you'd prefer not to share your interests with strangers. Additionally, scammers can use this information to craft a more believable cover story. You can make these visible to all or some friends, or hide them from everyone but yourself:
- Click your profile picture in the upper right corner of the screen;
- Select Settings & privacy;
- Click Settings;
- Select Followers and public content in the menu on the left;
- Click Who can see the people and Pages you follow?
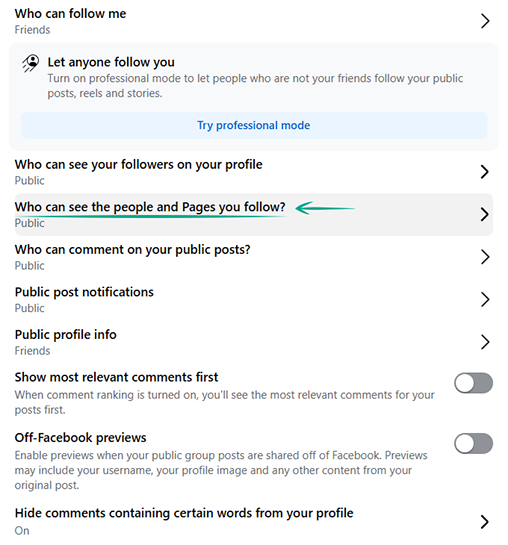
- Select one of the options:
- Friends: what you follow will be visible to all your friends;
- Friends except…: what you follow will be visible to all your friends except those you select from the list;
- Specific friends: what you follow will be visible only to friends you select from the list;
- Custom: combine the options above and add exceptions as needed;
- Only me: what you follow will be visible only to you.
You can also do this by editing the personal info in your profile:
- Click your profile picture in the upper right corner of the screen;
- Click the button with your name to go to your profile;
- Go to the Friends tab;
- Click three dots in the upper right corner of your friends list;
- Click Edit privacy;
- Click the globe next to Following;
- Select one of the options:
- Friends: what you follow will be visible to all your friends;
- Friends except…: what you follow will be visible to all your friends except those you select from the list;
- Specific friends: what you follow will be visible only to friends you select from the list;
- Custom: combine the options above and add exceptions as needed;
- Only me: what you follow will be visible only to you.
What for: To stop showing everybody when you are online.
Facebook shows your friends when you are, or last were, online. When you're online, people who want something from you can track your status and flood you with messages. Additionally, if you accept friend requests from people you don't know in real life, some of them could turn out to be bad actors. By following your status over a period of several days, they'll see when you are likely to be offline and unable to respond promptly to a cyberattack.
To stop Facebook from showing your status:
- On the main page, click on the chat icon in the top right corner;
- Click the three dots to open the settings;
- Click Active Status: ON;
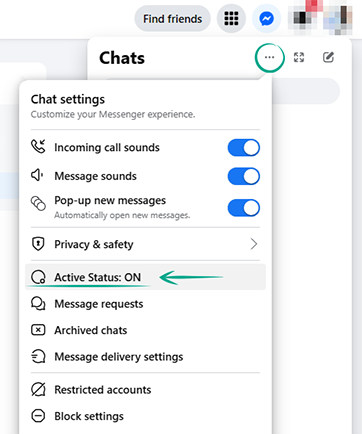
- Turn off Active Status: ON;
- Click Save.
Downside: By turning off your active status, you also won't be able to see when your friends or people you've messaged are online.
What for: To minimize the risks of a data breach.
Many apps and websites allow users to sign in with their Facebook account. It's handy if you want to avoid the hassle of managing unique logins and passwords for every site you use. However, it also gives the owners of third-party services access to your personal information, including your name, profile picture, and the e-mail address linked to your account. Service developers that have passed a review can request permission to create posts on your behalf or send you advertising messages. It's a best practice to periodically clean up your list of third-party apps and services. This helps prevent unauthorized activity in your account and reduces the risk of a data breach.
To clean up the list of third-party apps and services:
- Click your profile picture in the upper right corner of the screen;
- Select Settings & privacy;
- Click Settings;
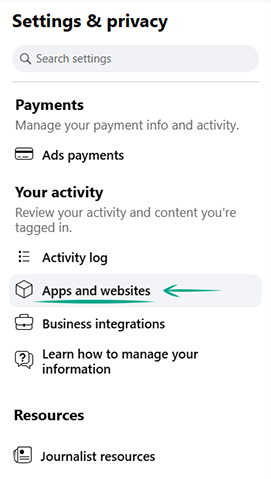
- Select Apps and websites under Your activity in the menu on the left;
- Click Remove next to the apps and websites you don't trust;
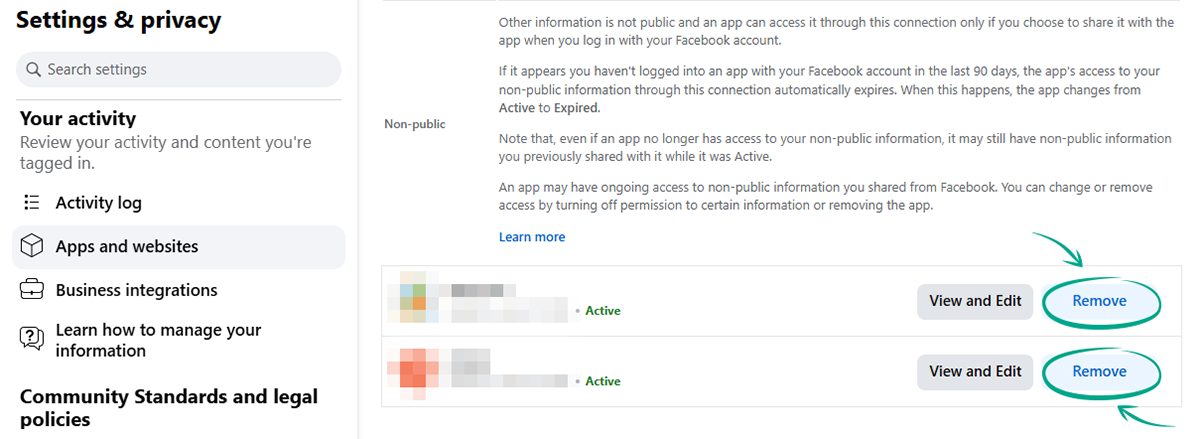
- Click Remove to confirm;
- Under Apps, websites and games, click Turn off if you'd rather disable sign-in with Facebook altogether;
- Confirm your choice.
You can also disable unnecessary integrations of third-party content or ad management services:
- Click your profile picture in the upper right corner of the screen;
- Select Settings & privacy;
- Click Settings;
- Select Business Integrations in the menu on the left;
- Under Active select the apps you don't use and click Remove;
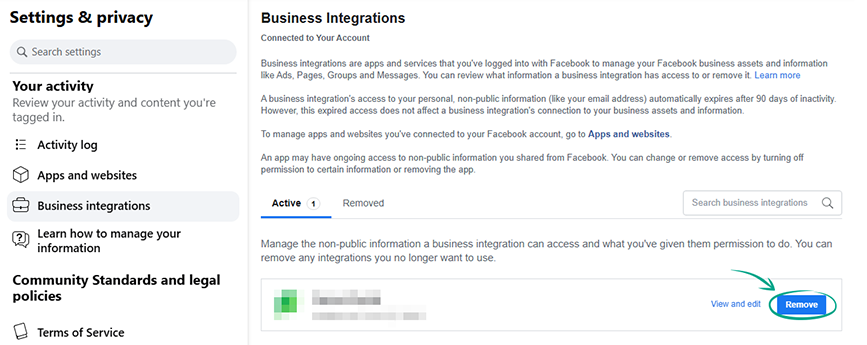
- Click Remove again to confirm your choice;
- Click Done.
Note that removing permissions from a third-party service doesn't mean automatically terminating your current session with it. To completely disconnect, you'll need to manually sign out of the service.
What for: To keep your social circle from being on public display.
By default, all Facebook users can see your friends and followers list. Hide that information in the settings unless you want strangers or someone you know to see who you're talking to.
To hide your friends list:
- Click your profile picture in the upper right corner of the screen;
- Select Settings & privacy;
- Click Settings;
- Select How people find and contact you under Audience and visibility in the menu on the left;
- Click Who can see your friends list?

- Select one of the options:
- Friends: your friends list will be visible only to your friends;
- Friends except…: your friends list will be visible to all your friends, except for those you specifically exclude;
- Specific friends: your friends list will be visible only to friends you select from the list;
- Custom: combine the options above and add exceptions as needed;
- Only me: your friends list will be visible only to you.
- Click Save.
To hide your followers:
- Click your profile picture in the upper right corner of the screen;
- Select Settings & privacy;
- Click Settings;
- Select Followers and public content in the menu on the left;
- Click Who can see your followers on your profile;
- Select one of the options:
- Friends: all your friends see your followers;
- Custom: combine Friends and Friends of friends, and add exceptions as needed;
- Only me: only you see your followers.
You can also do this by editing the personal info in your profile:
- Click your profile picture in the upper right corner of the screen;
- Click the button with your name to go to your profile;
- Go to the Friends tab;
- Click the three-dot icon in the upper right corner of the friends list;
- Click Edit privacy;
- Click the globe next to Friends list;
- Select one of the options:
- Friends: your friends list will be visible only to your friends;
- Friends except…: your friends list will be visible to all your friends, except for those you specifically exclude;
- Specific friends: your friends list will be visible only to friends you select from the list;
- Custom: combine the options above and add exceptions as needed;
- Only me: your friends list will be visible only to you.
- Click Save;
- Click the globe next to Following;
- Select one of the options:
- Friends: all your friends see your followers;
- Custom: combine Friends and Friends of friends, and add exceptions as needed;
- Only me: only you see your followers.
- Click Save;
- Click the cross in the upper right corner.
Remember that users will still be able to see your mutual friends.
What for: To prevent unwanted users from finding your account.
People can use the phone number and e-mail address you specify in your Facebook profile to find your account even when you use privacy settings to hide it. This makes it easy for people you’d rather avoid to find details about you and your private life. Additionally, this is a common tactic for fraudsters looking to collect data on potential victims.
To stop people from using your phone number or e-mail address to find your account:
- Click your profile picture in the upper right corner of the screen;
- Select Settings & privacy;
- Click Settings;
- Select How people find and contact you under Audience and visibility in the menu on the left;
- Under Who can Facebook suggest your profile to based on your phone number or email address? click People with your email address;
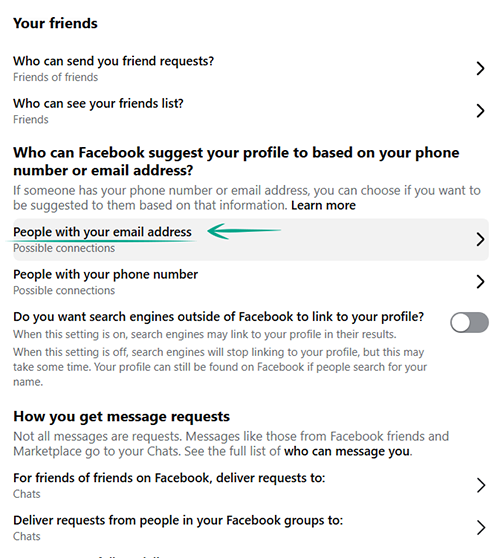
- Select No one;
- Click Save;
- While in the same section, click People with your phone number;
- Select No one;
- Click Save.
Downside: Your friends will have a harder time locating your Facebook profile.
What for: To protect information about you from prying eyes.
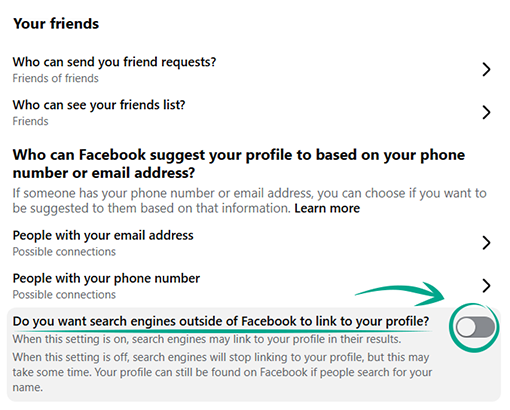
Facebook allows search engines such as Google or Yahoo to show links to your profile when users search for your name or other relevant information. If you do not want to be found online so easily, limit the visibility of your profile:
- Click your profile picture in the upper right corner of the screen;
- Select Settings & privacy;
- Click Settings;
- Select How people find and contact you under Audience and visibility in the menu on the left;
- Turn off Do you want search engines outside of Facebook to link to your profile?
What for: Not to appear in ads.
By default, Facebook shows information about your ad-specific activity to all of your friends. For example, Facebook might broadcast that you like a company's page or share your plans to attend a sponsored event. You may not want some people to know what products and services you like.
To hide such information from other users:
- Click your profile picture in the upper right corner of the screen;
- Select Settings & privacy;
- Click Settings;
- Click Accounts Center in the menu on the left;
- Select Ad preferences in the menu on the left;
- Go to the Manage into tab;
- Select Social interactions at the bottom of the page;
- Click your account name;
- Under Who can your social interactions alongside ads for this account? select Only Me.
How to get rid of unwanted notifications
What for: To avoid distractions.
By default, Facebook sends you notifications about all activities on the social network, including requests from apps, games, and nearby hangouts. If some notifications distract you, disable or mute them.
To manage the notifications:
- Click your profile picture in the upper right corner of the screen;
- Select Settings & privacy;
- Click Settings;
- Select Notifications in the menu on the left;
- Under What notifications you receive, select the notifications that you don't want to receive and turn off Allow notifications on Facebook;
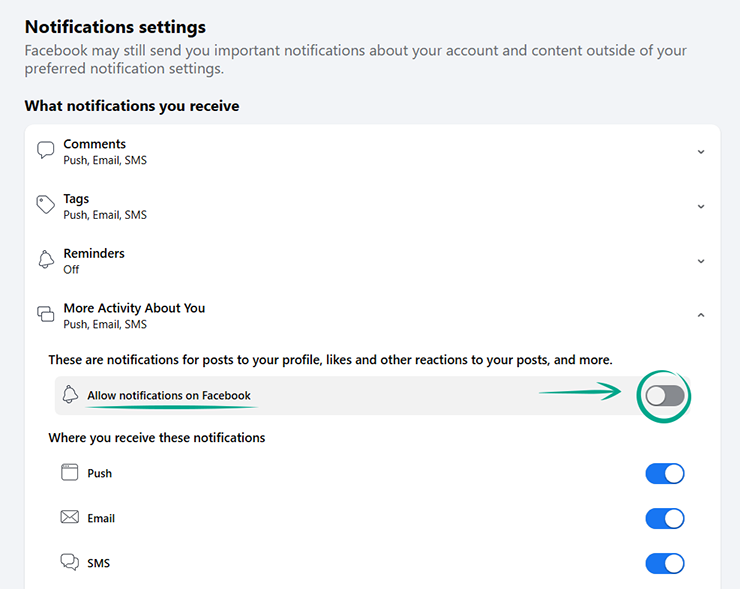
- You can't disable all notifications for certain event types with one click. In that case, select the event and turn off Push, Email, and SMS one by one.
- To disable browser push notifications and sounds, click Browser under Where you receive notifications;
- Disable the options:
- Push Notifications;
- Play a sound when each new notification is received;
- Play a sound when a message is received.
- To disable unnecessary email notifications, click Email under Where you receive notifications;
- Select the notifications you don't want to receive and turn them off.
To disable notifications from games and apps:
- Click your profile picture in the upper right corner of the screen;
- Select Settings & privacy;
- Click Settings;
- Select Apps and websites in the menu on the left;
- Click Turn off next to Game and app notifications;
- Click Turn off again.
To disable Marketplace notifications:
- Click Marketplace in the menu on the left;
- Click the cog in the Marketplace menu header on the left;
- Turn off Show notification dots or click Customize notifications for granular options:
- Click Messages from sellers and turn it off;
- Click Updates and turn off the notifications you don't need;
- Click Recommended for you and turn off the notifications you don't need;
- Click Messages from buyers and turn off the notifications you don't need;
- Click Tips for sellers and turn off the notifications you don't need.
Note that the Facebook website also lets you choose the frequency of email notifications. If you activate this option, you'll only get notifications that Facebook's algorithms consider important. You can choose Suggested notifications, which are based on the features you use most often, or Required notifications, which only cover account, privacy, and security matters. In reality, this setting doesn't affect neither the types of notifications you get nor their frequency.
How to keep your data from being stolen
What for: To back up your important data.
Facebook collects and stores a lot of information about you. This is your profile information, activities (posts, comments, likes, and other), and all your settings. If your account is stolen or blocked, this data will be lost. To prevent this from happening, you can request an archive of your data from Facebook and download it. Note: It may take up to four days for the ZIP archive to appear after your request. You'll get an e-mail notification as soon as it's ready.
To download your Facebook data archive:
- Click your profile picture in the upper right corner of the screen;
- Select Settings & privacy;
- Click Settings;
- Select Accounts Center in the menu on the left;
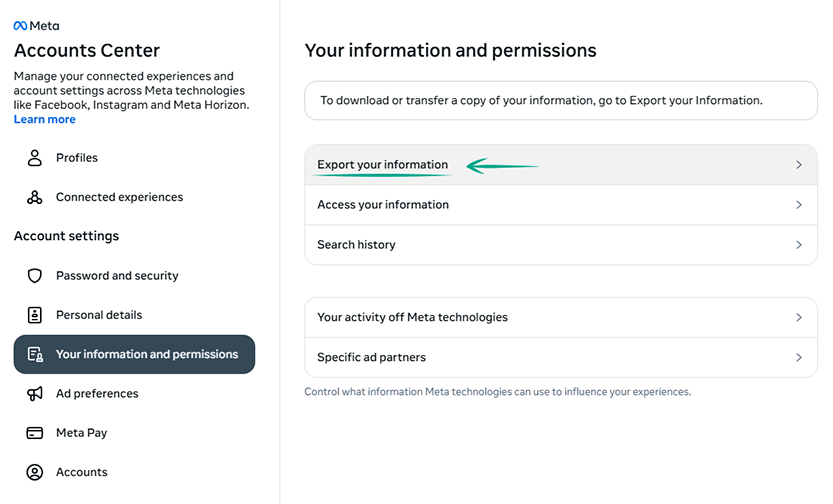
- Click Your information and permissions in the menu on the left;
- Select Export your information;
- Click Create export;
- Select Export to device;
- Select the data to download, date range, file format, and media quality;
- Scroll down and click Start export.
Note that Facebook doesn't delete data it has collected on you unless you're deleting your account. However, if you are a citizen of the European Union, you can demand that Facebook remove your data pursuant to Article 17 of the General Data Protection Regulation (GDPR). The company is obligated to take steps to remove that information even if the data has been transferred to third parties and is stored by them. Within a month, the social network will send you a progress report or the reason why your request has been denied (the list of possible reasons appears in Part 3 of Article 17 of the GDPR).