

How to protect your account
What for: To keep your account from being hacked.
Windows 7 lets you set a password to log in to the system (or more accurately, to your account on it). If you do not set a password for your account, other people (relatives, visiting acquaintances, plumbers, etc.) will be able to use the computer in your name in your absence. In the best-case scenario, the unauthorized user may change your desktop wallpaper to something funny. However, they can instead opt to infect your device with malware, copy private information, or corrupt files you need.
If you use a short and simple password, then strangers will be able to guess it easily. The more complicated and longer your secret password combination, the harder it will be for someone to hack your computer. Use a strong password that:
- Consists of 8–20 characters.
- Contains lowercase and uppercase letters, numbers, and special characters ($, @).
- Is not an actual word or known phrase.
- Is not the same as your password for any other of your social network accounts.
- Does not contain information that strangers could easily find out (your name or the name of a loved one, pet’s name, date of birth).
To change your password or create a new one:
- Press the Start menu button in the bottom left corner of the screen and select Control Panel in the right column of the menu.
- If you have configured the sections of the Control Panel to be displayed by category, open the User Accounts and Family Safety section and click User Accounts. If the items in the Control Panel appear as a list, select User Accounts.
- Select Change your password. If no password has already been set, select Create a password for your account.
- In the window that opens, enter the current password for your account and enter the new password twice. If you are creating a password for the first time, you will only need to enter the new password twice.
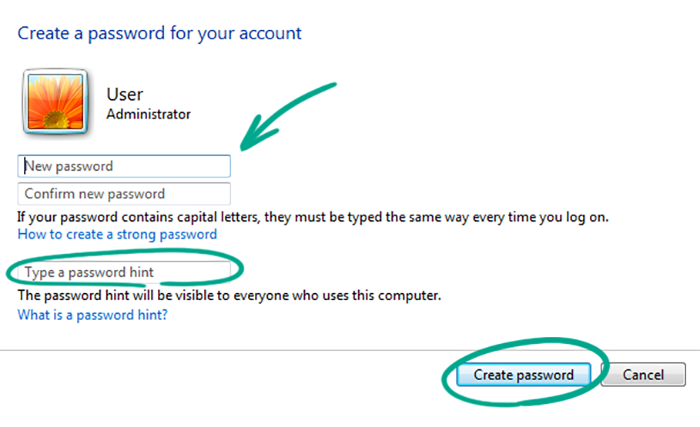
- If necessary, enter a password hint (a word or phrase to display if you forget your password) that will help you remember your password. Do not enter the password combination itself as the hint.
- Click Change password.
What for: To prevent anyone from getting access to your computer in your absence.
If an attacker obtains physical access to your computer when you are away from it, they can steal important information from it or install malware on it. To avoid that, set a screen lock that will turn on if you step away from Windows for a while. If you have set a password for your account, strangers will not be able to disable the lock without it.
To set a screen lock:
- Press the Start menu button in the bottom left corner of the screen and select Control Panel in the right column of the menu.
- If you have configured the sections of the Control Panel to be displayed by category, open Appearance and Personalization and click Personalization. If the items in the Control Panel appear as a list, select Personalization.
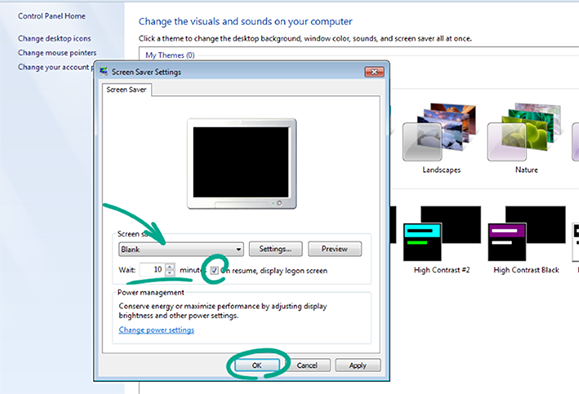
- In the window that opens, click Screen Saver.
- In the screen saver settings window:
- Tick the check box next to the On resume, display logon screen item.
- Enter the amount of time without activity on the computer before it should activate the screen lock, such as, for example, 10 minutes.
- Optionally, select a screen saver from the drop-down menu.
- Click OK.
How to keep strangers out
What for: To prevent attackers from taking control of your system.
Remote connections allow you to view and manage data on your computer remotely. This can be useful if you are connecting to your work device from home or you are contacting technical support to resolve a problem with the operating system or your apps. At the same time, remote access may be used by attackers to steal your information, install malware and take control of your device.
We recommend that you disable the ability to remotely connect to your computer and activate it only if necessary for a limited period of time. To block remote connections:
- Press the Start menu button in the bottom left corner of the screen and select Control Panel in the right column of the menu.
- If you have configured the sections of the Control Panel to be displayed by category, open the System and Security section and the System subsection. If the items in the Control Panel appear as a list, select the System item.
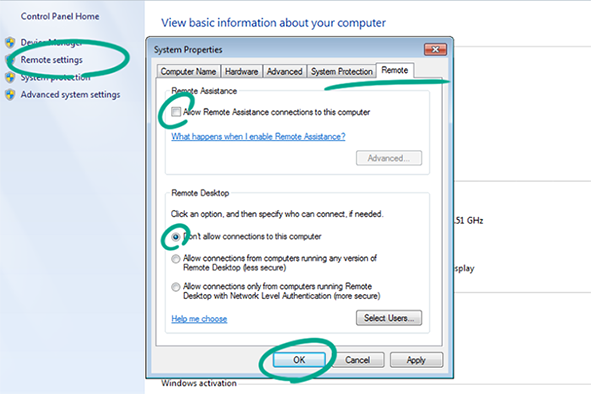
- Select Remote settings in the menu at the left.
- If Windows asks you to confirm the operation, select Yes.
- In the System Properties window that opens, on the Remote tab:
- Untick the check box next to the Allow Remote Assistance connections to this computer item in the Remote Assistance section.
- Tick the check box next to the Don’t allow remote connections to this computer item in the Remote Desktop section. You may not see this section because some versions of Windows do not support this connection.
- Click OK.
What for: To prevent those who share your home network from viewing files on your computer.
If your computer is connected to a local network or is part of a home group, users of other devices, such as family members or roommates, will be able to connect to it, access files and folders, and use your connected printer and other equipment. If you do not want to allow other people to work with information on your computer, disable the ability to access it:
- Press the Start menu button in the bottom left corner of the screen and select Control Panel in the right column of the menu.
- If you have configured the sections of the Control Panel to be displayed by category, open the Network and Internet section and click the Network and Sharing Center. If the items in the Control Panel appear as a list, select Network and Sharing Center.
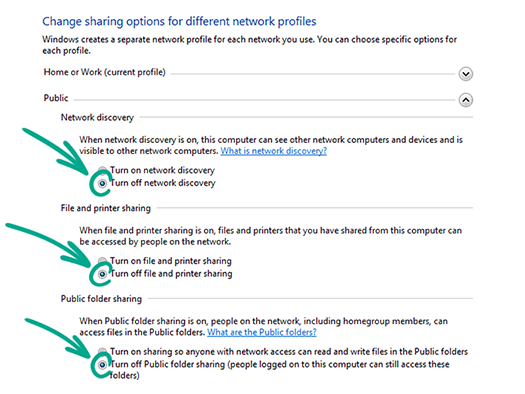
- Select Change advanced sharing settings in the menu at the left.
- In the window that opens, tick the check box next to the following items:
- Turn off network discovery.
- Turn off file and printer sharing.
- Turn off Public folder sharing (people logged on to this computer can still access these folders).
- Scroll down the page and click the down arrow to the right of the General section. In the window that opens, tick the check boxes next to the same items.
- Click Save Changes.
- If Windows asks you to confirm the operation, select Yes.
How to take control of apps
What for: To prevent strangers from collecting information about your location.
If you use Windows on a laptop, the system can collect your location data through location sensors. When an app first accesses your location information, an icon appears in the notification area. Various apps and services use that information to improve their operation. However, certain apps may use this data without your consent, including by transmitting it to third parties. To disable the use of location sensors:
- Press the Start menu button in the bottom left corner of the screen and select Control Panel in the right column of the menu.
- If you have configured the sections of the Control Panel to be displayed by category, change the setting to display the items as a list.
- Select Location and Other Sensors.
- Untick the check box next to the name of the devices that can track your location and click Apply.
- If Windows asks you to confirm the operation, select Yes.
Downside: You will have to expend a bit more effort to find cafés, museums, and other nearby places that may be of interest, and you will not be able to use navigation and other apps and services based on location.
What for: To prevent malware from changing anything.
By default, Windows will notify you every time an app tries to make changes to your computer. This will protect you from attempts by malware to secretly change operating system settings and install other apps, such as ransomware or spyware.
To get around this limitation, certain malware tricks the user into changing settings. For example, a cryptocurrency miner disguised as a game may call up a window asking you to turn off your virus protection. To increase your level of computer security, use the most stringent user account policy.
- Press the Start menu button in the bottom left corner of the screen and select Control Panel in the right column of the menu.
- If you have configured the sections of the Control Panel to be displayed by category, open the System and Security section and click Action Center. If the items in the Control Panel appear as a list, select Action Center.
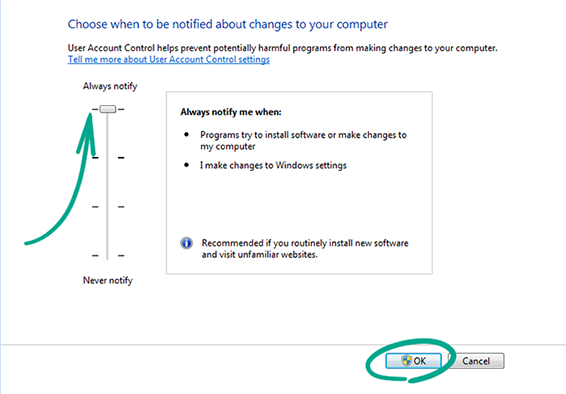
- In the menu at the left, select Change User Account Control settings.
- On the left side of the window that opens, move the slider to the up position so that it says Always notify.
- Click the OK button.
- If Windows asks you to confirm the operation, select Yes.
Please note that advanced malware can circumvent this limitation. You must use antivirus software to increase the security of your system.
Downside: Notifications may annoy you if you frequently install new software or visit unrecognized websites.
How to keep your data from being stolen
What for: So that you can restore your data if your account is hacked.
Windows has a restore mechanism if unwanted changes are made to your system, such as, for example, if system objects are damaged by ransomware. To do this, the OS may save critically important files and settings so that they can be restored if necessary. The feature is enabled by default, but we recommend configuring its settings:
- Press the Start menu button in the bottom left corner of the screen and select Control Panel in the right column of the menu.
- If you have configured the sections of the Control Panel to be displayed by category, open the System and Security section and click System. If the items in the Control Panel appear as a list, select the System subsection.
- Select System protection in the menu at the left.
- If Windows asks you to confirm the operation, select Yes.
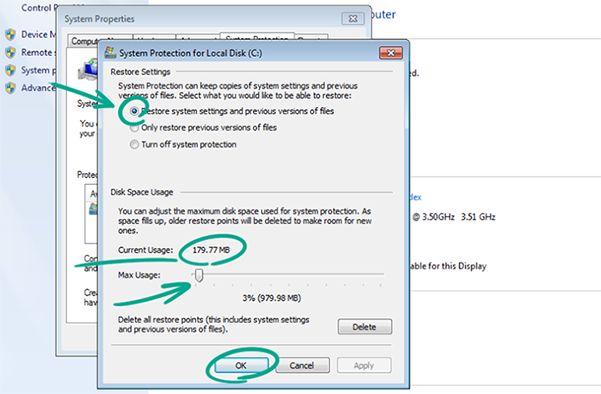
- In the System Properties window that opens, on the System protection tab, click the Configure button in the Protection Settings section:
- Check that in the Restore Settings section the check box next to the Restore system settings and previous versions of files item is ticked. Enable this setting if necessary.
- Adjust the amount of disk space that is allocated for storing backup data by moving the toggle switch in the Disk Space Usage section.
- Click OK.
- Click OK.
Windows deletes old system restore points when creating new ones. The more disk space you allocate for the storage of that data, the more recovery points you can create.
What for: So you can still log in if you forget your password or your computer is hacked.
If you forget the password for your account or hackers break in and change it, you can reset it using a special USB thumb drive, allowing you to log in to Windows. We recommend that you prepare this device in advance and store it in a safe place.
To create a USB thumb drive to reset your password:
- Press the Start menu button in the bottom left corner of the screen and select Control Panel in the right column of the menu.
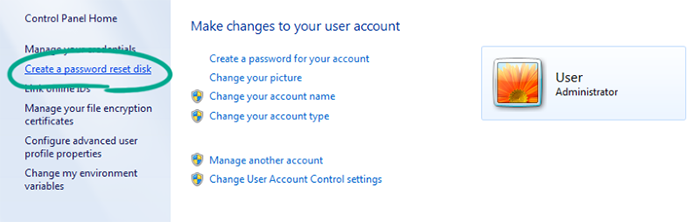
- If you have configured the sections of the Control Panel to be displayed by category, open the User Accounts and Family Safety section and click User Accounts. If the items in the Control Panel appear as a list, select User Accounts.
- Connect the USB thumb drive to your computer.
- In the menu at the left, select Create a password reset disk.
- In the Forgotten Password Wizard window that opens, click Next.
- Select a thumb drive from the list to reset your password and click Next.
- Enter the current password for your account and click Next.
- Wait for the operation to complete and click Next.
- Click Done.
You do not need to recreate the USB thumb drive to reset your password when you change your account password in the future.