


Windows 10 end of support
Microsoft is ending support for Windows 10. As of October 14, 2025, updates for the OS, including vulnerability fixes, will no longer be available. This lack of support will greatly reduce your security. We recommend switching to Windows 11, which will continue to receive updates. If for any reason you cannot do that, you should never turn off system protection for any reason, and you must also use a reliable security solution.
How to keep your account from being hacked
What for: To prevent your account from being hacked.
Windows 10 provides several system login options, including alphanumeric or graphic passwords, PIN codes, face or fingerprint recognition, and a hardware security key. For the most effective protection, we recommend using a PIN code or a fingerprint scanner.
The PIN code is stored locally on the device and is tied to your computer. Even if someone finds out your password combination, they will not be able to log in to your account from another device. That's a PIN code's advantage over a password.
Use a reliable secret code that:
- Is at least 8 characters long;
- Contains lowercase and uppercase letters, numbers, and special characters ($, @, etc.);
- Is not too simple, such as, for example, 12345678 or 00000000;
- Is not the same as your passwords for any other accounts, including your Microsoft password;
- Is not an actual word or easy-to-guess phrase;
- Does not consist of information that strangers could easily find out (your name, date of birth, pet's name, and so forth — or those of your friends or relatives).
To create a PIN code:
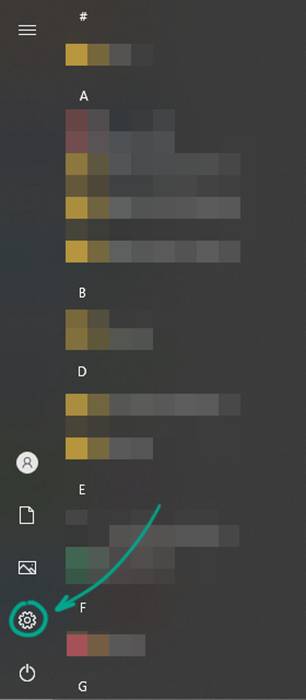
- Open your system's Settings by clicking the cogwheel in the Start menu or using the Win key + I key combination;
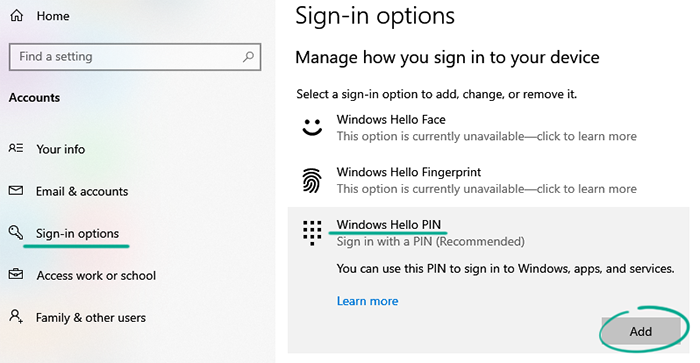
- Go to the Accounts section;
- Select Sign-in options in the menu at the left;
- Find Windows Hello PIN and click Add;
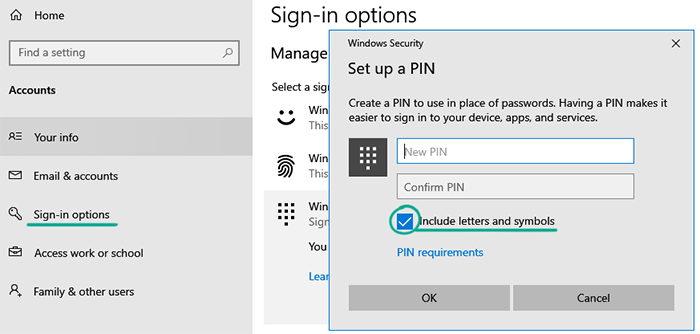
- Click Next. If necessary, enter the password for your local or Microsoft account.
- In the window that opens, select Include letters and symbols and create a secure combination.
Use a short and simple PIN code only if you are certain that no one else will gain access to your computer. Otherwise, strangers can easily guess your password combination and get hold of your personal data.
You can use the same PIN to protect programs on your computer that require a login and online services — for example, OneDrive or Dropbox.
If you have a fingerprint scanner or one is built into your device, you can enable fingerprint authorization after creating a PIN code. It is not so easy to fake a fingerprint, so this method is safer than face recognition, which in some cases can be tricked, for example, by using a photo. Keep in mind though that Windows will send your biometric data and your sensor usage details to Microsoft.
To turn on fingerprint authorization:
- Open your system's Settings by clicking the cogwheel in the Start menu or using the Win key + I key combination;
- Go to the Accounts section;
- Select Sign-in options in the menu at the left;
- Find Windows Hello Fingerprint and click Set up;

- Click Get started.
- Enter the PIN code that you use to log in to the system;
- Scan your fingerprint;
- Click Close.
What for: To prevent strangers from gaining access to the system while you are away.
Windows 10 can lock your computer when you are not using it. This will prevent strangers from accessing your confidential information in your absence.
To configure the screen lock:
- Open your system's Settings by clicking the cogwheel in the Start menu or using the Win key + I key combination;
- Go to the Personalization section;
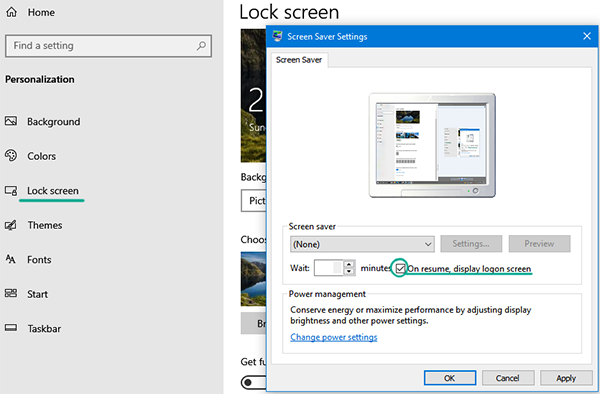
- Select Lock screen in the menu at the left;
- Click Screen saver settings;
- In the windows that opens, check the On resume, display logon screen box and select your preferred lock interval;
- Click OK.
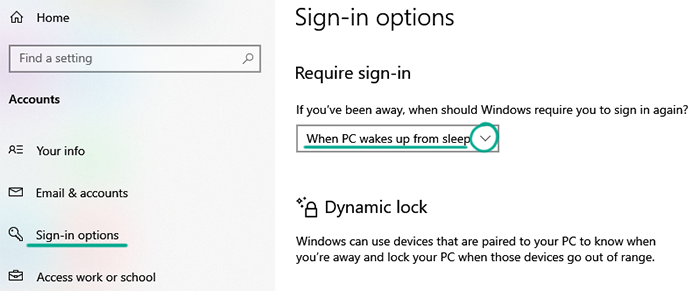
You can configure the lock settings so that a valid password is required to wake the system. This feature is enabled by default. However, it can be disabled. We recommend checking the settings and reactivating if necessary:
- Open your system's Settings by clicking the cogwheel in the Start menu or using the Win key + I key combination;
- Go to the Accounts section;
- Select Sign-in options in the menu at the left;
- If you see that Never is selected in the Require sign-in section, click the arrow to the right of this text and select When PC wakes up from sleep.
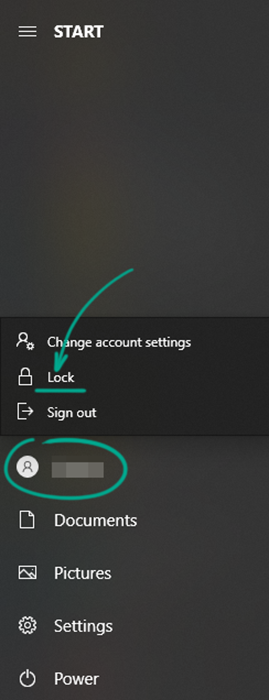
You can lock the computer manually by using the Win key + L key combination or in the Start menu:
- Open the Start menu;
- Click your profile icon;
- Select Lock.
What for: To ensure that your screen is locked automatically when you leave your computer.
Windows 10 can lock your computer when you are away. The system is paired with gadgets that are connected to your computer, such as your smartphone. To use this function, you need to connect the device to your computer via Bluetooth. Your computer will be locked when you leave the geofenced area (which is usually about 10 meters) for more than a minute.
To enable dynamic lock:
- Open your system's Settings by clicking the cogwheel in the Start menu or using the Win key + I key combination;
- Go to the Accounts section;
- Select Sign-in options in the menu at the left;
- Check the box in the Dynamic lock section;

- Click the Add Bluetooth or other device button and link your gadget to the computer.
Remember that Bluetooth signals can penetrate walls and other obstacles. Therefore, leaving the room may not be sufficient to lock your computer.
We recommend you use this feature together with the automatic screen lock to keep your data safe even if you leave the linked gadget next to your computer.
How to protect your data
What for: To lock your computer if you lose it.
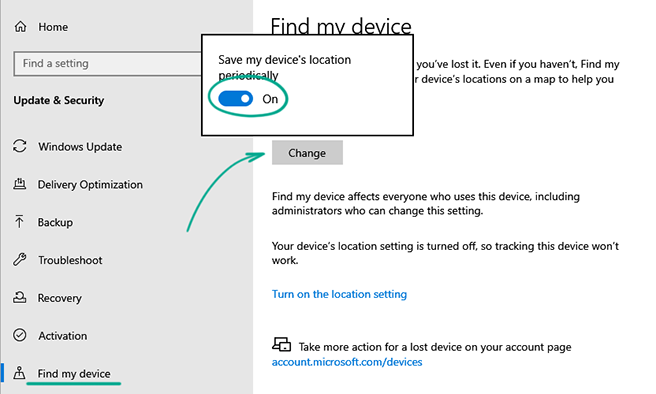
Windows 10 regularly saves your device location so that you can find it. If you lose your computer or if it is stolen, you can track it and, if necessary, lock it. This feature is enabled by default, but we recommend checking your settings:
- Open your system's Settings by clicking the cogwheel in the Start menu or using the Win key + I key combination;
- Go to the Update & security section;
- Select Find my device in the menu at the left.
- Click Change and enable device search.
You can find and lock a lost device in the Devices section on the Microsoft Account page.
Remember that you must use the Microsoft user account that you used to log in to the lost computer to search for it. A lost device can send its location only if it is turned on and connected to the Internet.
Downside: Your computer's location will be sent to the company's server and stored on the device.
What for: To keep your personal data private.
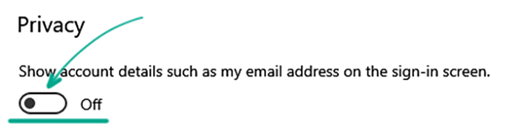
Windows 10 can display your Microsoft account information on the lock screen. This feature allows you to see your meeting schedule for tomorrow or notifications of incoming messages without logging in to the system. However, if you leave your laptop somewhere, strangers will be able to see this information. This feature is disabled by default. However, we still recommend checking the settings:
- Open your system's Settings by clicking the cogwheel in the Start menu or using the Win key + I key combination;
- Go to the Accounts section;
- Select Sign-in options in the menu at the left;
- Make sure that the Show account details such as my address on sign-in screen feature is disabled.
To stop your apps from displaying notifications on the lock screen:
- Open your system's Settings by clicking the cogwheel in the Start menu or using the Win key + I key combination;
- Go to the System section;
- Select Notifications & actions in the menu at the left;
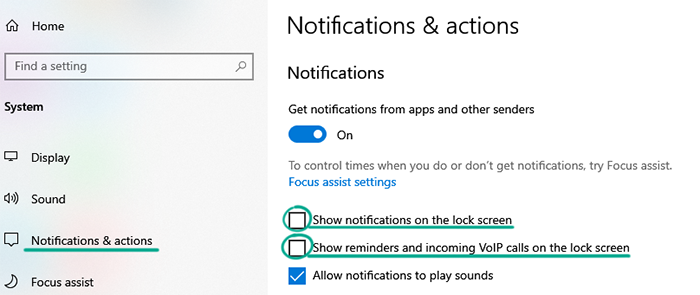
- Uncheck the following boxes in the Notifications section:
- Show notifications on the lock screen;
- Show reminders and incoming VoIP calls on the lock screen.
To allow only particular apps to show notifications on the sign-in screen:
- Open your system's Settings by clicking the cogwheel in the Start menu or using the Win key + I key combination;
- Go to the Personalization section;
- Select Lock screen in the menu at the left;
- One by one select the icons of the apps, for which detailed or summary status information is displayed on the lock screen, and select None.

What for: To restore important data in case of a crash.
A backup copy of your data will help you to restore files after a hard drive crash or a ransomware attack. By default, Windows 10 offers to copy your data to your OneDrive cloud storage. To do so, you need to log in to OneDrive with your Microsoft account. You can store up to 5GB free in your cloud storage account.
To turn on backups:
- Open your system's Settings by clicking the cogwheel in the Start menu or using the Win key + I key combination;
- Go to the Update & security section;
- Select Windows Security in the menu at the left;
- Select Virus & threat protection in the list of protection areas;
- Scroll down and click Manage ransomware protection;

- Click the Set up OneDrive button in the Ransomware data recovery section;
- Enter the e-mail address for your Microsoft account and click Log in.
- If you do not have a Microsoft account, click Sign up for new account: You will be taken to the OneDrive site to create an account.
Keep in mind that your cloud storage may also be targeted by cybercriminals. We recommend creating several backups of your important files, on physical media in particular.
To create a backup copy on a local drive:
- Connect your storage media to the device;
- Open your system's Settings by clicking the cogwheel in the Start menu or using the Win key + I key combination;
- Go to the Update & security section;
- Select Backup in the menu at the left;
- Click Add a drive;

- Select the connected storage media;
- Click More options to select folders for backup.
How to get rid of unwanted notifications and ads
What for: To stop Windows from spamming you with Microsoft offers.
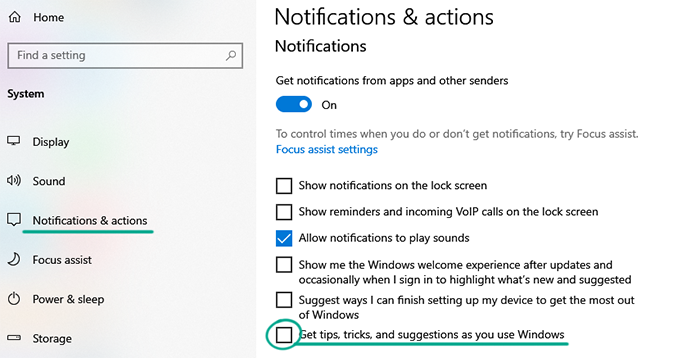
By default, Windows 10 shows you notifications with tips and product recommendations from Microsoft. You can turn off these notifications.
- Open your system's Settings by clicking the cogwheel in the Start menu or using the Win key + I key combination;
- Go to the System section;
- Select Notifications & actions in the menu at the left;
- Uncheck the box next to Get tips, tricks, and suggestions as you use Windows in the Notifications section.
If it is just the notification sounds that get on your nerves, try muting them: Uncheck the box next to Allow notifications to play sounds in the Notifications section.
What for: So that Microsoft and advertisers do not learn too much about you.
Your advertising ID is tied to your account and used to personalize ads. You can restrict certain data collection used to personalize ads and disable the use of your advertising ID:
- Open your system's Settings by clicking the cogwheel in the Start menu or using the Win key + I key combination;
- Go to the Privacy section; You will see the general settings tab.
- Disable all the toggle switches in the Change privacy options section to fully restrict apps and websites from collecting your information to customize ads.
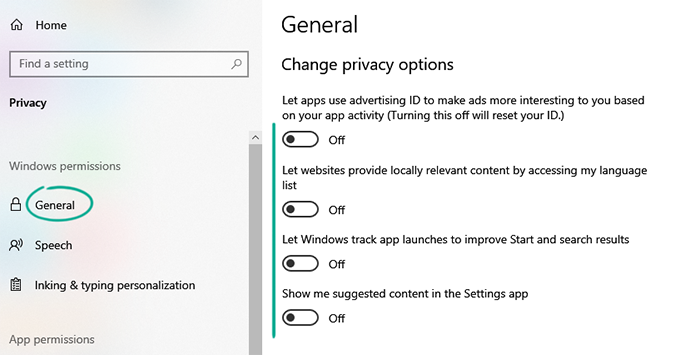
Microsoft will keep showing you offers and ads, but they will not be personalized.
What for: So you do not get bothered by targeted ads.
Microsoft can show you ads based on diagnostic data such as your search history. You can restrict Microsoft from using this information:
- Open your system's Settings by clicking the cogwheel in the Start menu or using the Win key + I key combination;
- Go to the Privacy section;
- Select Diagnostics & feedback in the menu at the left.
- Find Tailored experiences and disable the feature.

Note that Microsoft can also use other information to personalize ads for you, such as your location, voice commands, and contact list.
How to protect yourself from snooping
What for: So that no one can spy on you.
Apps and websites can obtain access to the camera and microphone on your computer, for example to make video calls. Certain malware and Web pages try to get these permissions either covertly or by tricking you to spy on you. You can partially or fully restrict the system or apps and websites from accessing the camera and microphone.
To block access to your camera:
- Open your system's Settings by clicking the cogwheel in the Start menu or using the Win key + I key combination;
- Go to the Privacy section;
- Select Camera in the menu at the left;
- If you want to block Windows and all apps from accessing your camera, click Change and disable the feature.
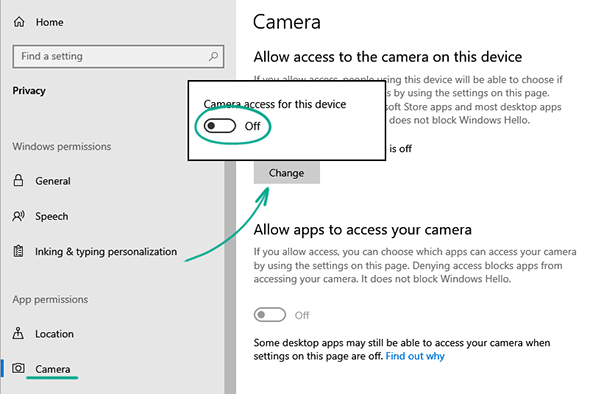
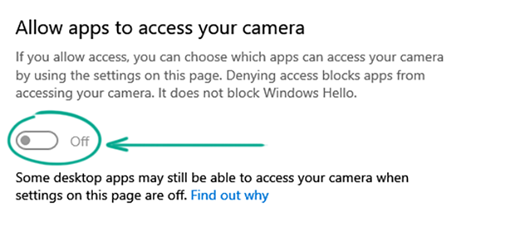
- If you want to block most apps from accessing your camera (for more details about exclusions, see the information after these instructions), disable the toggle switch in the Allow apps to access your camera section.
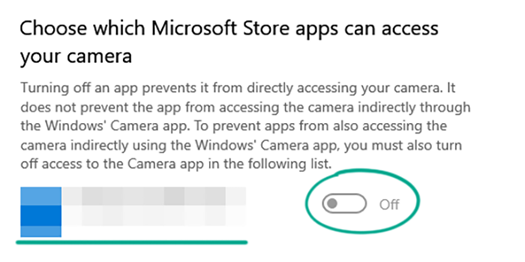
- If you want to block specific apps from accessing your camera, scroll down to the list of Microsoft Store apps and disable the toggle switches for the apps that do not require access to your camera. After that these apps will not be able to use the camera directly. However, they will still be able to ask you to grant them access in the Camera app. If you do that, the permission will remain valid until you cancel it.
Please note that if you use Windows Hello to sign in to your computer, the service will still have access to the camera.
To block access to your microphone:
- Open your system's Settings by clicking the cogwheel in the Start menu or using the Win key + I key combination;
- Go to the Privacy section;
- Select Microphone in the menu at the left;
- If you want to block Windows and all apps from accessing your microphone, click Change and turn off the feature.

- If you want to block most apps from accessing your microphone, disable the toggle switch in the Allow apps to access your microphone section.

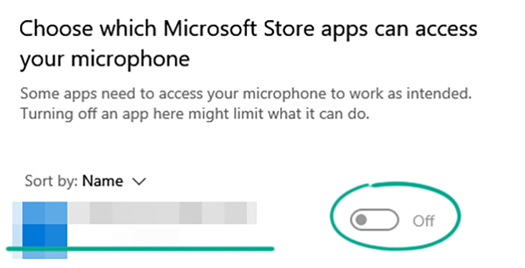
- If you want to block specific apps from accessing your microphone, scroll down to the list of Microsoft Store apps and disable the toggle switches next to the names of those apps that you want to block from accessing the microphone.
Certain apps installed not from the Microsoft Store may still have access to the camera and microphone, even if you have disabled it for the apps from other sources. For example, when an app installs a driver, the app is able to directly access your hardware.
For better protection, you can disconnect your external camera and microphone. You can turn off the built-in camera and microphone using the Device Manager. However, to do that you need to know their names. You can find this information on the manufacturer's website, in your computer's technical specifications. To disable your camera and microphone:
- Right-click the Start icon in the lower left corner of the screen;
- Select Device Manager in the drop-down list;
- Double click the Cameras category;
- In the drop-down list right-click your camera name and select Disable device;

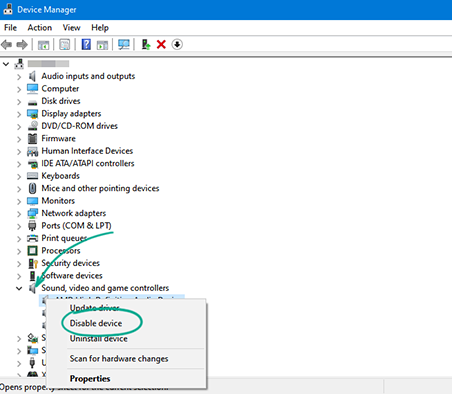
- To disable your microphone, double-click Sound, video and game controllers in the category list of your Device Manager.
- In the drop-down list right-click the name of your microphone and select Disable device.
You can reenable your camera and microphone at any time: Open Device Manager as specified in steps 1 and 2, then find your camera and microphone in the device list as specified in steps 3–6, and instead of Disable device select Enable device.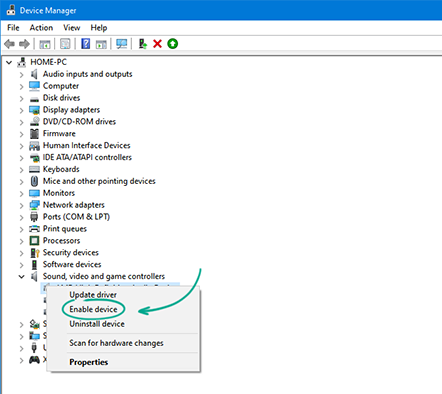
Downside: If you need the camera and microphone, for example to make a video call, you will have to manually enable them in the Device Manager.
What for: To keep the apps on your computer out of your private affairs.
By default, Windows 10 grants apps access to your SMS and MMS messages, phone calls, other apps' diagnostic data, e-mail messages, and other information. Malware can masquerade as harmless apps and obtain system permissions. We recommend checking your settings and revoking access from apps you do not trust:
- Open your system's Settings by clicking the cogwheel in the Start menu or using the Win key + I key combination;
- Go to the Privacy section;
- In the menu at the left, select the following, one at a time: Notifications, Contacts, Calendar, Phone calls, Call history, Email, Tasks, Messaging, Radios, Other devices, Automatic file downloads, Documents, Pictures, Video;
- If you want to block Windows and all apps from accessing your this data, click Change and disable the feature;
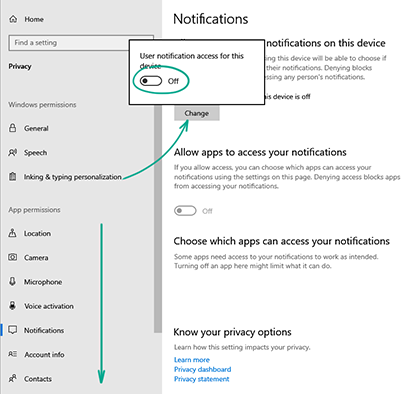
- If you want to revoke access from these apps, disable the toggle switch in the corresponding section.
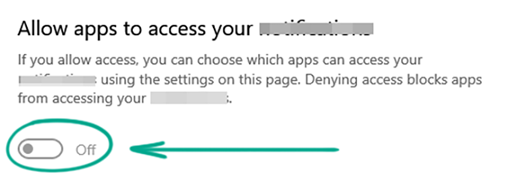
- If you want to revoke access for specific apps, scroll down to the list of Microsoft Store apps and disable the toggle switches next to the app names.
Please keep in mind that you will find only default and Microsoft Store apps in the list. This setting will not affect apps that were downloaded from other sources.
If you wish, you can block not all, but only desktop apps (not downloaded from the Microsoft Store) from accessing certain settings. Note that such a ban will affect only some of these apps. To prevent third-party apps from viewing your personal information, make sure to download apps from reliable sources.
What for: So that developers do not learn too much about you.
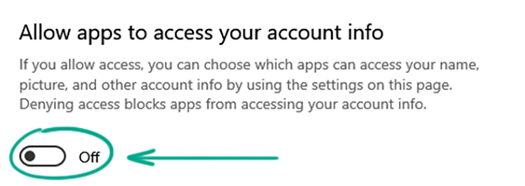
Windows apps can access your account details, such as your calendar, contacts, call history, and other data. This information can be used to improve the software and to personalize ads, and it can also be sent to third parties. You can block the OS as well as all or just some of your apps from accessing this data.
- Open your system's Settings by clicking the cogwheel in the Start menu or using the Win key + I key combination;
- Go to the Privacy section;
- Select Account info in the menu at the left;
- If you want to block Windows and all apps from accessing your account information, click the Change button and disable this toggle switch;
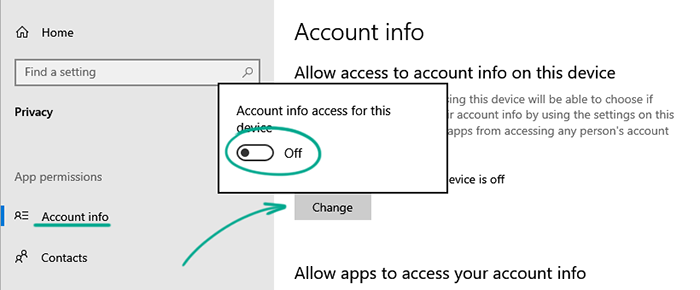
- If you want to revoke access from apps, disable the toggle switch in the Allow apps to access your account info section.
- If you want to revoke access from specific apps, scroll down to the list of Microsoft Store apps and disable the toggle switches next to the apps.
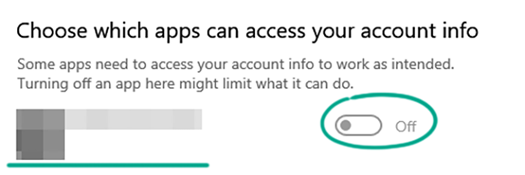
Please keep in mind that you can only find default and Microsoft Store apps in the list. This setting will not affect apps that were downloaded from other sources.
What for: So no one can track your device when you are looking for a Wi-Fi network.
When searching for a Wi-Fi network, your device broadcasts a signal with a unique device identifier (MAC). This identifier can be used to track your movements. For example, a public Wi-Fi provider can capture data about what stores you visit most often and sell the information to advertisers. To ensure that your computer cannot be identified, enable random MAC addresses:
- Open your system's Settings by clicking the cogwheel in the Start menu or using the Win key + I key combination;
- Go to the Network & Internet section;
- Select Wi-Fi in the menu at the left;
- Enable the Use random hardware addresses feature.
If you use MAC address filtering on your home network for security purposes, you can disable changing MAC addresses when connecting to it.
- Connect to the network where you need to use a real MAC address;
- Open your system's Settings by clicking the cogwheel in the Start menu or using the Win key + I key combination;
- Go to the Network & Internet section;
- Select Wi-Fi in the menu at the left;
- Click Manage known networks;
- Click the network for which you want to use the real MAC address, then click Properties;
- Disable the Use random hardware addresses for this network feature.

Remember that using public Wi-Fi networks entails risks. Do not use a public network to log in to your bank account or any other resources that require you to enter a password.
How to keep corporations out of your business
What for: So that your computer does not store your location history.
The operating system as well as some apps collect data about your location. This information is sent to Microsoft and app developers' servers, and it is also stored on your computer. Geolocation is used to create routes, provide you with weather information, automatically determine your time zone, and enable some other features. If you do not want to share your location, turn off location services:
- Open your system's Settings by clicking the cogwheel in the Start menu or using the Win key + I key combination;
- Go to the Privacy section;
- Select Location in the menu at the left;
- Click Change and turn off this feature.
- Turn off the Allow apps to access your location feature;

- If you want to revoke access for specific apps, scroll down to the list of Microsoft Store apps and disable the toggle switches next to the app names;
- To delete your location history from a device, find the Location history section and click Clear.

Even if you disable geolocation access, certain apps can still get your computer's approximate location by using Wi-Fi, Bluetooth or your wireless modem.
Downside: After you disable geolocation you cannot use the lost device search feature.
What for: So that voice assistants do not spy on your conversation.
Cortana and certain apps can react to special voice commands. By default, voice activation is enabled in Windows 10, and it can always access your microphone, even when your computer is locked. In addition, your voice samples are occasionally sent to developers in order to improve the app.
The developers of voice assistants claim that this feature in no way compromises user privacy. However, if this does not sound convincing enough, you can disable voice activation.
- Open your system's Settings by clicking the cogwheel in the Start menu or using the Win key + I key combination;
- Go to the Privacy section;
- Select Voice activation in the menu at the left.
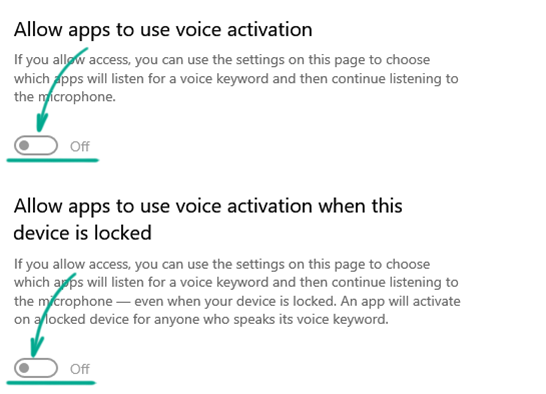
- Turn off the toggle switches:
- Allow apps to use voice activation;
- Allow apps to use voice activation when this device is locked;
- If you want to block voice activation for specific apps, scroll down to the app list.
If you blocked apps that use voice activation from accessing your microphone, voice activation will also be unavailable. However, please note that it does not work the other way around: Disabling voice activation will not prevent other apps from accessing the microphone.
What for: So that your voice samples are not sent to Microsoft.
Voice commands can be used for controlling apps that support this technology, for searching and speech-to-text transcription. You can use local voice services, or you can connect them to Microsoft cloud services. The second option allows for more accurate command recognition, but if you do not want to share samples of your voice, you can turn off cloud-based speech services.
- Open your system's Settings by clicking the cogwheel in the Start menu or using the Win key + I key combination;
- Go to the Privacy section;
- Select Speech in the menu at the left;
- Turn off the Online speech recognition feature.

Downside: Voice commands may be recognized less accurately.
If you blocked access to the microphone, voice services would be unavailable. However, please note that turning off voice recognition does not prevent apps from accessing the microphone.
What for: So that the system does not track your typing or inking.
By default, the user dictionary is enabled in Windows 10. The system saves the unique words that you enter using the keyboard or handwriting recognition. This increases the accuracy of the text you enter. You can restrict the OS from collecting this data:
- Open your system's Settings by clicking the cogwheel in the Start menu or using the Win key + I key combination;
- Go to the Privacy section;
- Select Inking & typing personalization in the menu at the left;
- Deactivate the toggle switch in the Getting to know you section.

- If you want to clear your saved data, click View your personal dictionary and select Clear your personal dictionary.

Downside: The system will not be able to use your user dictionary to recognize handwriting or provide typing suggestions.
What for: To stop the OS from sending data about your computer to Microsoft.
Windows 10 sends a set of your system's data to Microsoft. By default, it includes all diagnostic info, detailed error reports, Web search history, and a lot more. This is necessary for collecting statistics and improving the way certain features, such as SmartScreen, work. If you do not want to share this information with Microsoft, you can limit the amount of information that is sent and delete any collected data:
- Open your system's Settings by clicking the cogwheel in the Start menu or using the Win key + I key combination;
- Go to the Privacy section;
- Select Diagnostics & feedback in the menu at the left.
- Select Required diagnostic data in the Diagnostic data section;

- To clear the diagnostic data log, scroll down to the Delete diagnostic data section and click Delete.

Please keep in mind that Windows collects more than just diagnostic data. For example, if you do not turn off personalized typing suggestions, voice recognition or geolocation, these services will continue to transmit data about you to Microsoft. You can review and delete your data on this Microsoft page.
What for: So that the system does not store your activity log.
By default, Windows 10 saves data about the apps that you use, visited websites, and other activities on your computer. It can also send this log to Microsoft cloud services so that you can continue to work from where you left off on another device. If you do not want Windows to store your activity log, you can disable this feature:
- Open your system's Settings by clicking the cogwheel in the Start menu or using the Win key + I key combination;
- Go to the Privacy section;
- Select Activity history in the menu at the left;
- Uncheck the boxes next to
- Let Windows collect my activities from this PC;
- Let Windows syncmy activities from this PC to the cloud;

- Scroll down and click Clear to erase any data about your activities.

Downside: You will not be able to resume your work in apps (for example, editing a document in Word on the page where you left off) on another device.