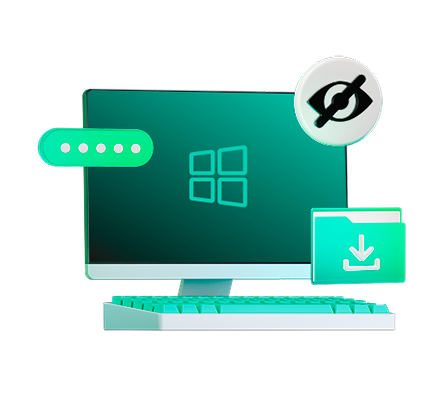
How to protect your account from cybercriminals
Your YouTube account is linked to a Google account, and data security directly depends on the security of this account. Therefore, in addition to your YouTube settings, you are advised to check the settings of your Google account.
What for: So you don't get hacked.
YouTube uses your Google account password to sign you in. If you use a short and simple password, cybercriminals can guess it and hijack your account. A long and complex password is more secure. Use a strong password that:
- Is at least 8 characters long;
- Contains lowercase and uppercase letters, numbers, and special characters ($, @, etc.);
- Is not an actual word or easy-to-guess phrase;
- Is not the same as your passwords for any other accounts;
- Does not consist of information that strangers could easily find out (your name, date of birth, pet's name, and so forth — or those of your friends or relatives).
To change the password:
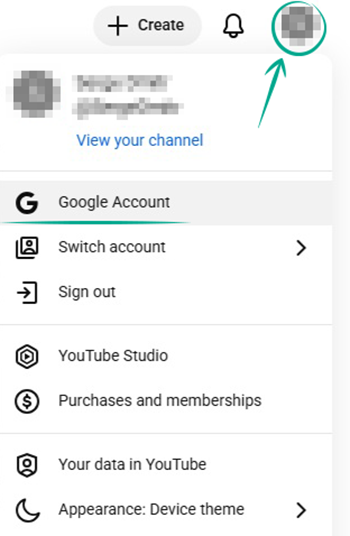
- Click the profile picture in the upper right corner of the screen to open the menu;
- Click Google Account.
Your Google account settings page opens. To continue the password change process, follow our guide to changing your Google account password.
What for: So you definitely don't get hacked.
Your YouTube account is linked to your Google account. You can enable two-factor authentication in the settings. Every time you try to log in from a new device, the system will ask for a one-time code. A notification will be sent to all gadgets that are already logged in to that account. This will help improve your Google account security.
To enable two-factor authentication, follow our guide to configuring your Google account.
How to protect your money
What for: To prevent criminals from using your accounts.
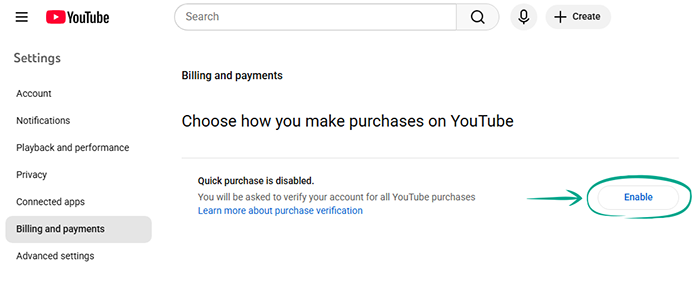
When making purchases, YouTube asks for your password by default. However, the quick purchases option lets you make payments without confirmation. If you want to prevent accidental expenditures and protect your money, you are advised not to opt out of transaction confirmation. To turn off the quick purchases option:
- Click the profile picture in the upper right corner of the screen to open the menu;
- Select Settings;
- In the left menu, select Billing and payments;
- If the quick purchases option is enabled, click Disable.
How to keep corporations out of your business
What for: To keep Google from knowing what you've searched for or watched.
Google saves data about your search queries in YouTube and a list of the videos that you watched. The service uses this information to curate your feed and create targeted ads, and it may share this data with third parties, such as Google partners. If you do not want the service to collect this information, you can disable the watch history and delete any previously accumulated data.
To delete your search and watch history:
- Click your profile picture in the lower right corner of the screen to open the menu;
- Click Google Account.
You'll be redirected to your Google account settings page. There, you can delete your search and watch history by following the appropriate guide.
The option to delete search and watch history is also available in the YouTube mobile app for Android and iPhone.
Downside: After you turn off search and watch history, your feed will stop showing recommended videos.
How to defeat spammers and trolls
What for: So you can avoid running into unwanted people.
If a YouTube user is leaving offensive comments, sending you spam, or is otherwise annoying you, you can block this person. They will not be notified, but they will be unable to view your profile, leave comments under your videos, or write messages in live chats. All existing comments from this user under your videos will be hidden.
To block a user:
- Open the user's YouTube page;
- Click More in the channel description to the right of the user's profile picture;
- Click Report user;
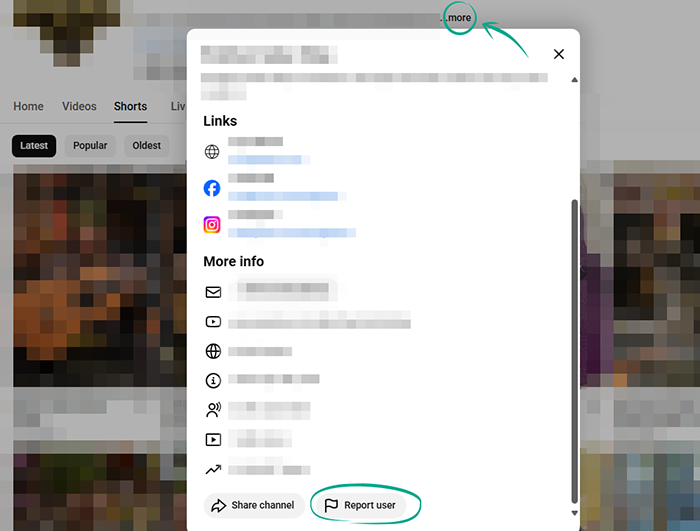
- Select Hide user from my channel and confirm.
You can also block a user via a comment they left under your video:
- Click the three-dot button to the right of the comment;
- Select Hide from channel and confirm.
You can also block a user in a live stream chat:
- Click a comment by the user you want to block;
- Select Block.
To unblock a user:
- Open the user's YouTube page;
- Click More in the channel description to the right of the user's profile picture;
- Click Report user;
- Select Unhide user from my channel and confirm.
Alternatively, you can do this in your channel settings:
- Click the profile picture in the upper right corner of the screen to open the menu;
- Select YouTube Studio;
- In the menu on the left, click Settings;
- Go to the Community moderation section;
- Go to the User management tab;
- Under Hidden users, click the X next to the user's name.

What for: So that you do not see any spam or offensive remarks in comments.
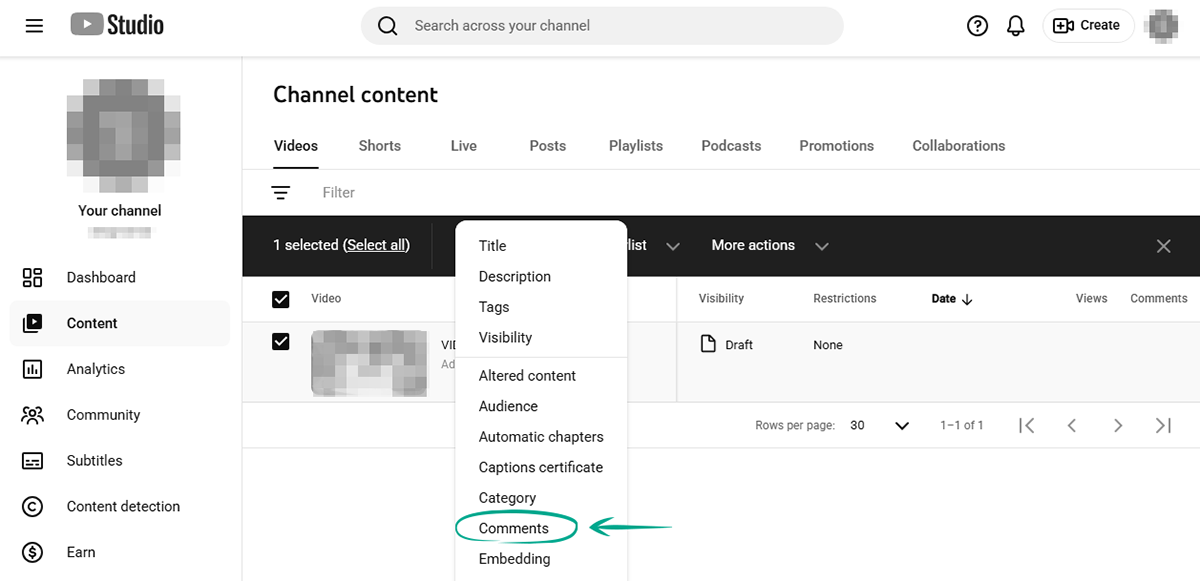
By default, all YouTube users can leave comments under your videos. YouTube automatically hides and flags comments it considers offensive or inappropriate for your review. If spammers, trolls, and other unwanted individuals still appear under your videos, you can disable comments or change your moderation settings for future posts:
- Click the profile picture in the upper right corner of the screen to open the menu;
- Select YouTube Studio;
- In the left menu, select Settings;
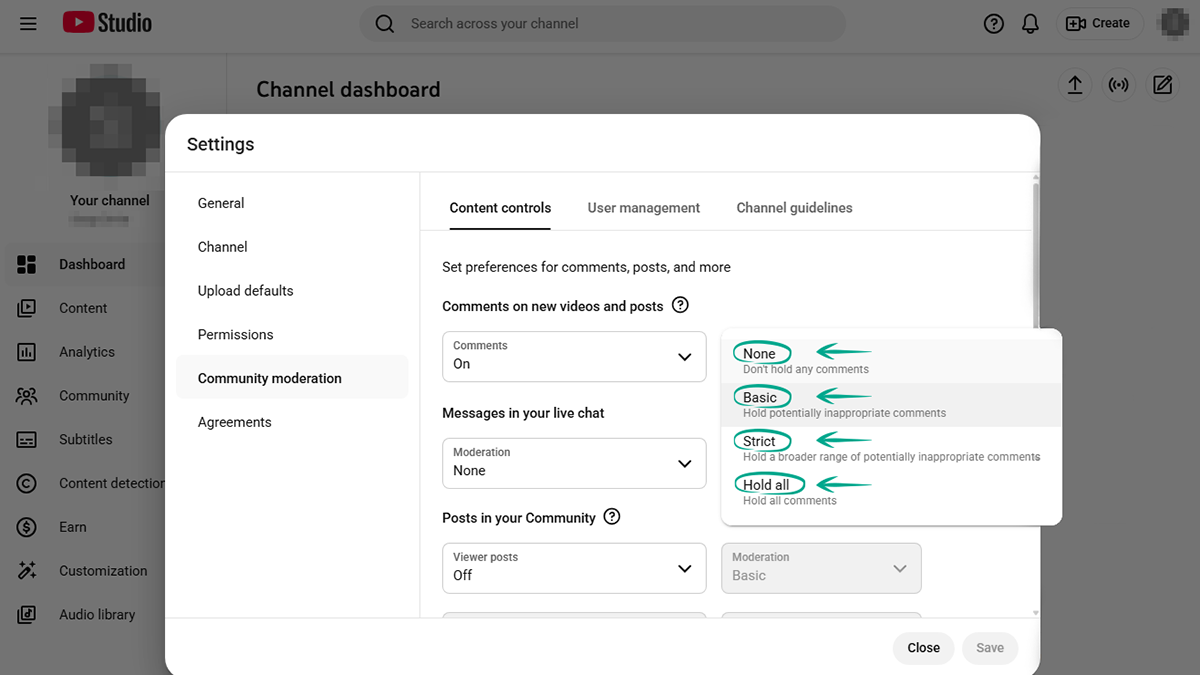
- Go to the Community moderation section. You'll land on the Content controls tab;
- Turn off comments or pick an automatic moderation option:
- Basic: on by default, hides and flags for review comments with clear signs of spam, self-promotion, offensive language, or gibberish;
- Strict: hides and flags for review comments with clear or subtle signs of spam, self-promotion, offensive language, or gibberish;
-
Hold all: hides and flags for review any comments.
- Turn on Basic moderation for live stream chat;
- Select Basic or Hold all for community posts, or turn off Viewer posts;
- In the Blocked words box, enter words and phrases you find unacceptable, separated by commas — comments containing them will also be held for review;
- Enable moderation for all comments containing hashtags and URLs;
- Click Save.
To change comment settings for existing videos and posts:
- Click the profile picture in the upper right corner of the screen to open the menu;
- Select YouTube Studio;
- In the left menu, select Content;
- Set the check mark next to the videos you want to adjust comment settings for — or select all videos at once;
- In the Edit drop-down list above the video list, click Comments;
- Turn off or pause comments, or pick an automatic moderation option:
- Basic: on by default, hides and flags for review comments with clear signs of spam, self-promotion, offensive language, or gibberish;
- Strict: hides and flags for review comments with clear or subtle signs of spam, self-promotion, offensive language, or gibberish;
- Hold all: hides and flags for review any comments.
- Select who can post comments:
- Everyone;
- Subscribers and members.
- Click Update videos.
Please note: When comments are paused, viewers will not be able to post new comments, but existing comments will remain visible under the video. All automatically hidden comments and posts go to the Community section of the YouTube Studio menu, where you can choose to approve or delete them permanently. This lets you control what is posted below your videos and restore comments that were hidden by mistake. If a comment or post is not approved within 60 days, it will be permanently deleted.
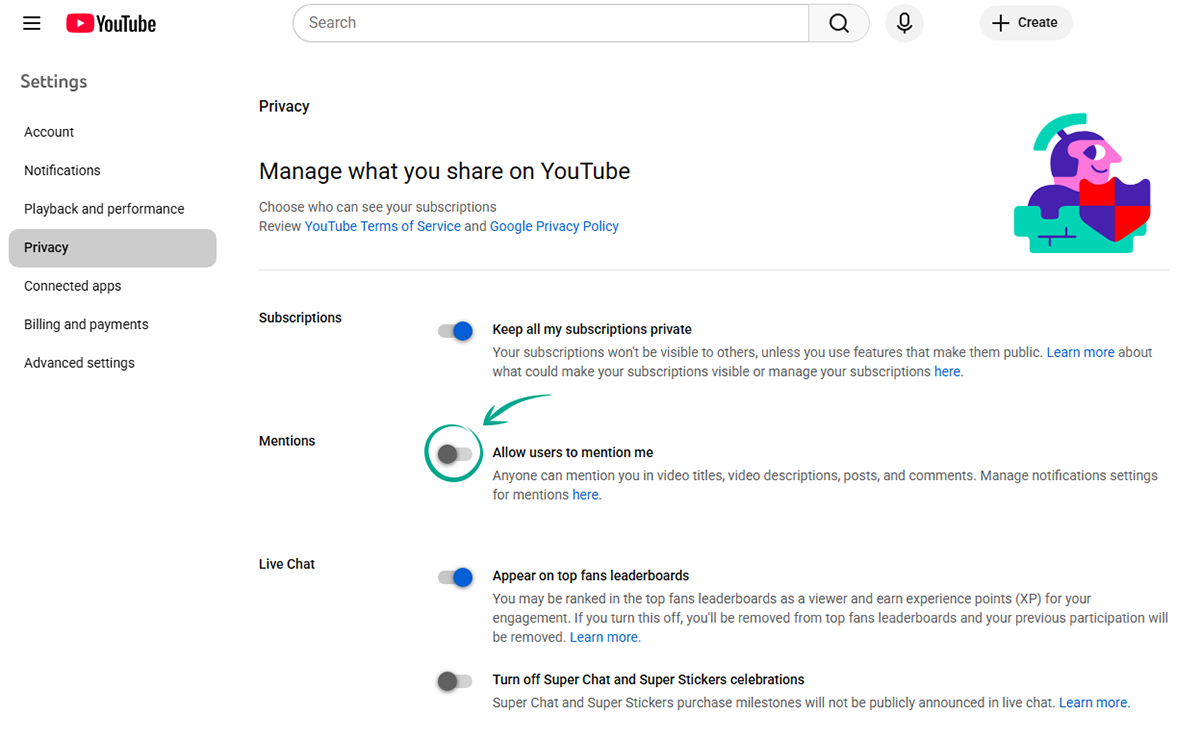
What for: To prevent your name from appearing next to offensive content.
Other YouTube users can mention your profile name with a link to it in their posts, video titles and descriptions, community posts, and comments. To prevent this from happening in an inappropriate context, disable mentions:
- Click the profile picture in the upper right corner of the screen to open the menu;
- Select Settings;
- In the left menu, select Privacy;
- Turn off Allow users to mention me.
How to hide from prying eyes
What for: So that strangers do not know too much about you.
The description of your channel might contain information that could be used to easily find out your address, place of work or study, and other information about you. Enemies or overenthusiastic fans could use this information to find out where you live and hang out, and then stalk you in real life. We advise editing the description of your channel and deleting any private information:
- Click the profile picture in the upper right corner of the screen to open the menu;
- Select View your channel;
- Click Customize channel;
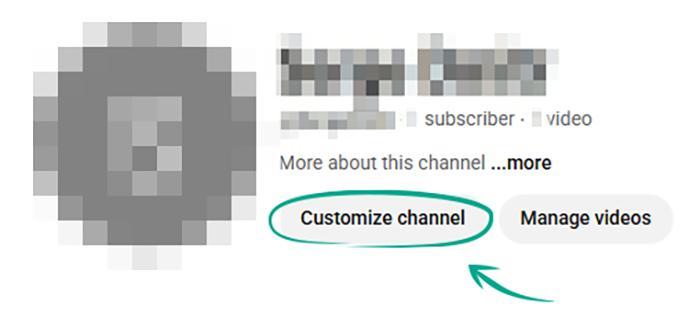
- Scroll down and remove confidential information from the Description field;
- Click Publish.
Alternatively, you can do this in the YouTube Studio menu:
- Click the profile picture in the upper right corner of the screen to open the menu;
- Select YouTube Studio;
- Select Customization in the menu on the left;
- Scroll down and remove confidential information from the Description field;
- Click Publish.
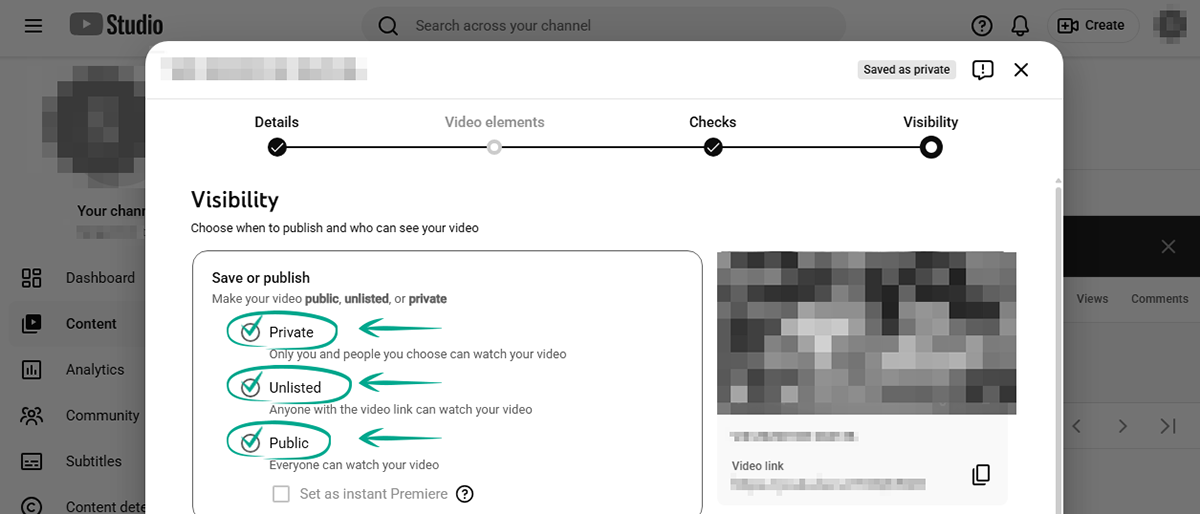
What for: To control who is allowed to watch your videos.
By default, anyone can watch any videos you upload to YouTube. If a video is not intended for a large audience, you can limit its visibility at any time.
To restrict access to already uploaded videos:
- Click the profile picture in the upper right corner of the screen to open the menu;
- Select YouTube Studio;
- In the left menu, select Content;
- Set the check marks next to the videos you want to restrict access to or select all videos at once;
- Click Edit above the video list;
- Click Visibility;
- Select a visibility option:
- Public means that all internet users will be able to watch the video;
- Private means that only you and the YouTube users that you approve will be able to watch the video;
-
Unlisted means that only people who have a link to the video will be able to watch it.

- Click Update videos in the header above the video list.
To restrict access to a video while it is being uploaded to the website:
- When publishing a video, go to the Access section in the settings window;
- Select a visibility option:
- Private means that only you and the YouTube users that you approve will be able to watch the video;
- Unlisted means that only people who have a link to the video will be able to watch it;
-
Public means that all internet users will be able to watch the video.
Note that access by link does not guarantee the video will stay private. If you share a video with a user, that user can forward the link to other people or post it on social media. Besides, bear in mind that approved users can record your video from their own screen and repost it on a different website. Therefore, if a video clip contains confidential information, it is probably safer not to post it on YouTube at all.
To approve a user:
- Click the profile picture in the upper right corner of the screen to open the menu;
- Select YouTube Studio;
- In the left menu, select Settings;
- Go to the Community moderation section;
- Go to the User management tab;
- Enter the URL of the user you want to approve into the Approved users box;
- Click Save.
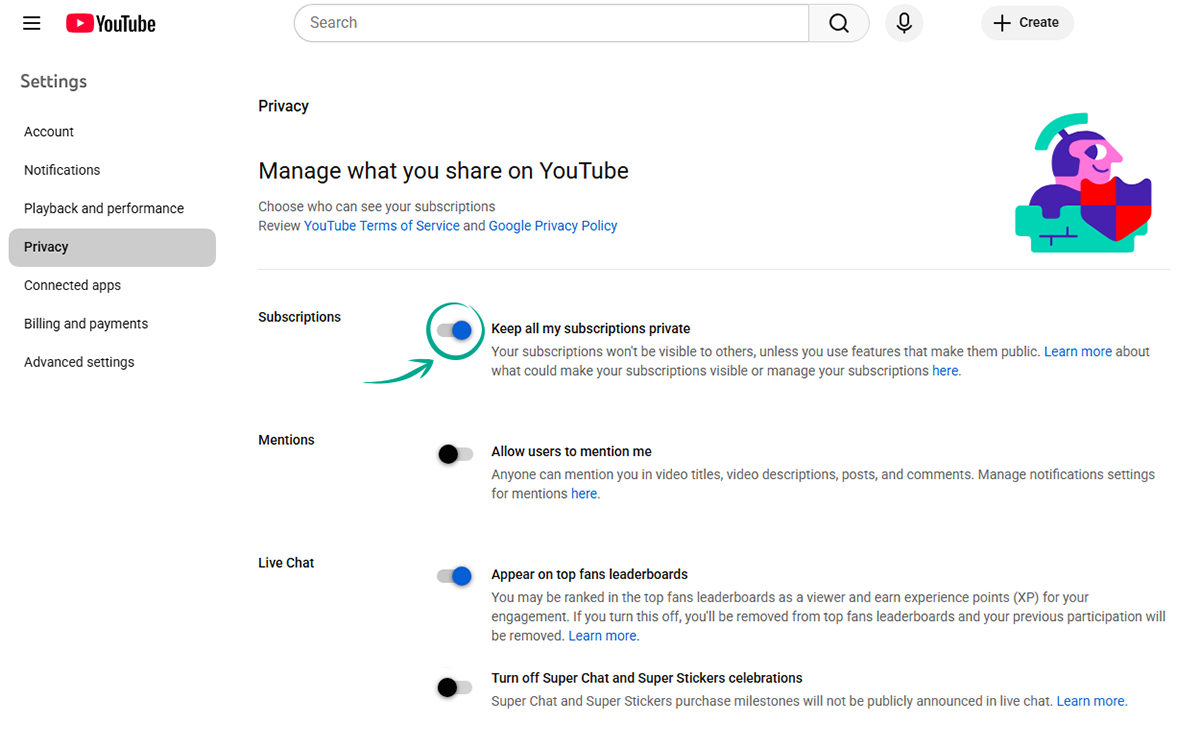
What for: To prevent strangers from knowing what you watch.
Your YouTube profile page contains information about your subscriptions. If you do not want other users to see this information, block access to it:
- Click the profile picture in the upper right corner of the screen to open the menu;
- Select Settings;
- In the left menu, select Privacy;
- Turn on Keep all my subscriptions private.
How to improve your YouTube experience
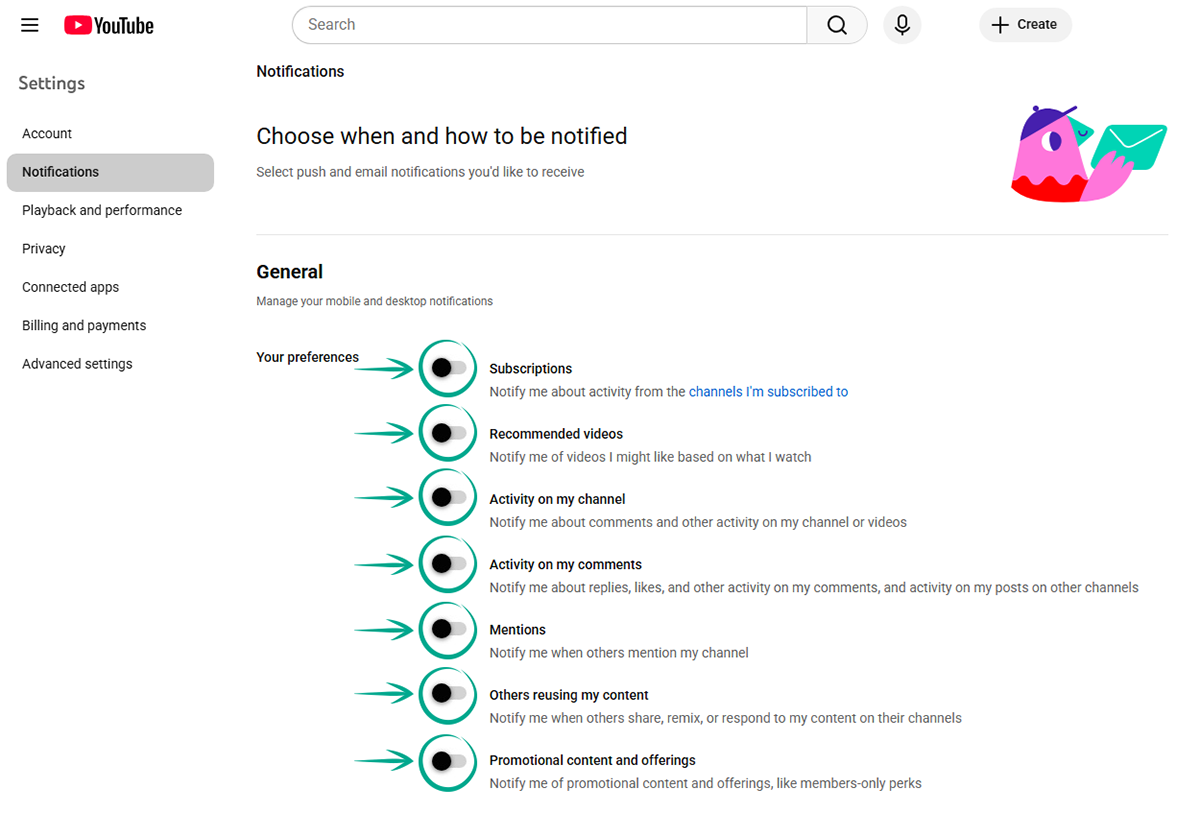
What for: To avoid distractions.
In your browser, YouTube may show notifications about the actions of other users on your channel and events related to your account and subscriptions. These notifications can appear regardless of whether the YouTube page is open, and can be irritating and distracting. To disable excessive notifications:
- Click the profile picture in the upper right corner of the screen to open the menu;
- Select Settings;
- In the left menu, select Notifications;
- Under General, disable the app and browser notifications you don't need:
- Subscriptions;
- Recommended videos;
- Activity on my channel;
- Activity on my comments;
- Mentions;
- Others reusing my content;
- Promotional content and offerings.
- In the Email notifications section, select which types of events YouTube will send you e-mail notifications for:
- Send me emails about family and product updates for YouTube or YouTube Kids;
- Send me emails about my YouTube activity and updates I requested;
- General product updates;
- YouTube Premium updates;
- Creator updates and announcements.
Please note: In any case, YouTube will send you messages regarding important changes to its operation and to your account, such as information about the status of your subscription or a blocked profile.