
How to keep your account from getting hacked
What for: So you don’t get hacked.
If you are using a short and simple password, cybercriminals can guess it and steal your account. A long and complex password is more secure. Use a strong password that:
- Is at least 8 characters long;
- Contains lowercase and uppercase letters, numbers, and special characters ($, @, etc.);
- Is not an actual word or easy-to-guess phrase;
- Is not the same as your passwords for any other accounts;
- Does not consist of information that strangers could easily find out (your name, date of birth, pet's name, and so forth — or those of your friends or relatives).
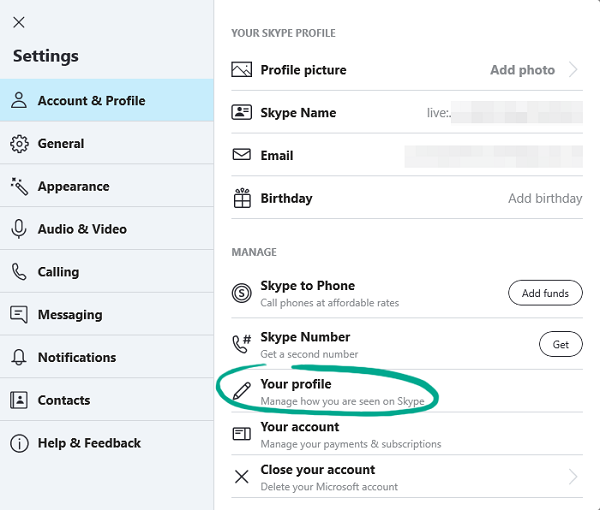
To change your Skype password:
- Click your profile picture;
- Select Settings;
- Select Your profile to open your profile management page;
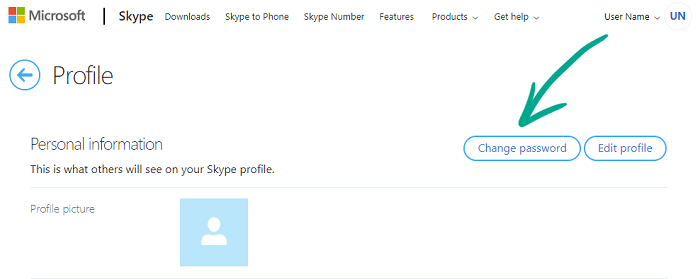
- Click Change password;
- Enter the current password for your Skype account (it’s the same as the password for your Microsoft account);
- Select how you want to receive the one-time code — by e-mail, text message, or other means;
- Enter the code you receive and click Confirm;
- Enter your current Skype password;
- Enter a new strong password twice;
- Click Save.
Note: Your Microsoft account is used to sign in to Skype, so its password will also be changed.
What for: So you definitely don’t get hacked.
Two-factor authentication protects your account even if hackers know your username and password. You will have to enter a one-time code whenever you sign in to your Skype account. The code can be received by text message or e-mail, or generated by an app.
You sign in to Skype with your Microsoft account credentials, so enable two-factor authentication for this account:
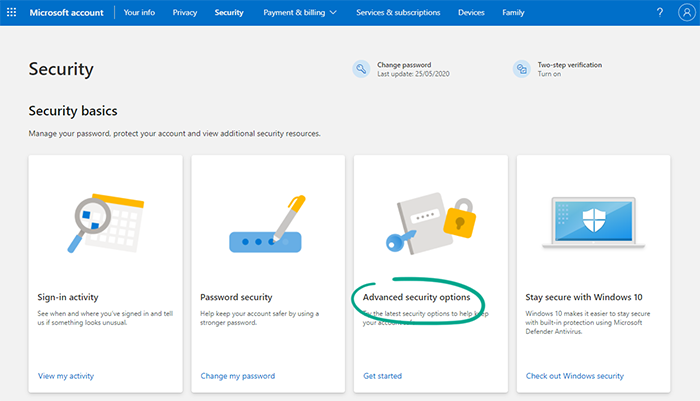
- In your browser, open your Microsoft account page at https://account.microsoft.com/;
- Go to the Security section;
- Select Advanced security options;
- Click Turn on in the Two-step verification section;
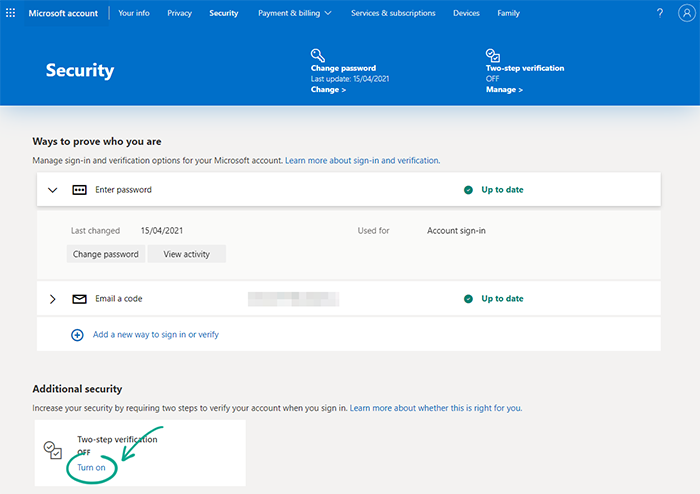
- Read the information about two-step verification and click Next;
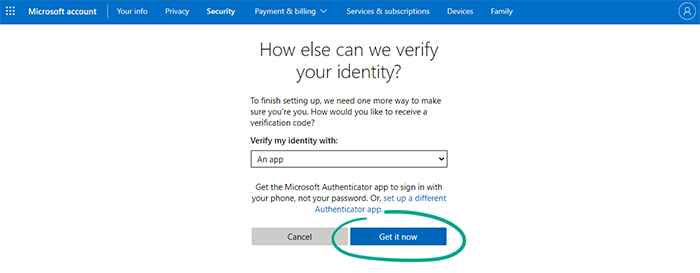
- You will be prompted to download Microsoft Authenticator or to set up a different app for receiving authentication codes.
To use Microsoft Authenticator:
- Click Get it now;
- When the download page opens, click Get the app and choose a convenient source for your download: Google Play, App Store, or a link in a text message.
To use a different app, such as Google Authenticator, click set up a different Authenticator app and follow the instructions.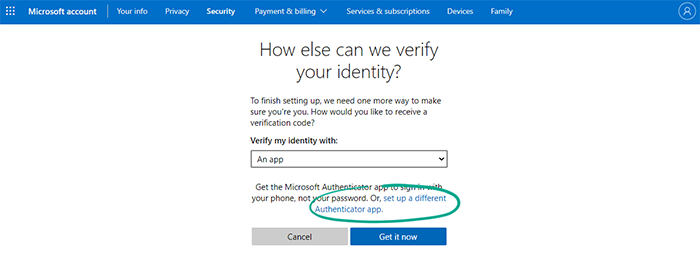
If you do not want to use an app, you can receive two-factor authentication codes by text message or e-mail. To do so, on the page prompting you to install Microsoft Authenticator:
- Click Cancel;
- You will be prompted to create a separate password for the Outlook app on your smartphone. This will improve the security of your account (useful if you want to receive the codes by e-mail through mobile Outlook). To create a password, click the link for your mobile device's operating system and follow the instructions;
- Click Next;
- If you use other Microsoft services and products, such as an Xbox 360 account or the desktop Outlook app, carefully read the on-screen instructions for creating a temporary password for these accounts. Note: After enabling two-factor authentication, you will not be able to use these services until you create a temporary password for them. You can create or change a temporary password in the Advanced security options section of your Microsoft account at https://account.live.com/proofs/manage/additional;
- Click Done to turn on two-factor authentication. You do not need to enter your phone number or e-mail address: Number and e-mail from your account will be used, and you can choose between a text message and an e-mail each time you sign in.
After this, the system will prompt you for a security code whenever you sign in to Skype or other accounts linked to your Microsoft account.
How to hide your data from prying eyes
What for: So that strangers do not know too much about you.
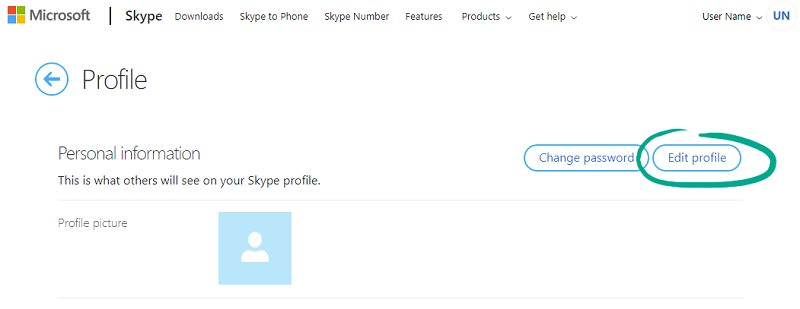
Personal information in your profile may be visible to unwanted users or even fraudsters who can use it for phishing scams. To delete private information from your account:
- Click your profile picture;
- Select Settings;
- Select Your profile to open your profile management page;
- Click Edit Profile;
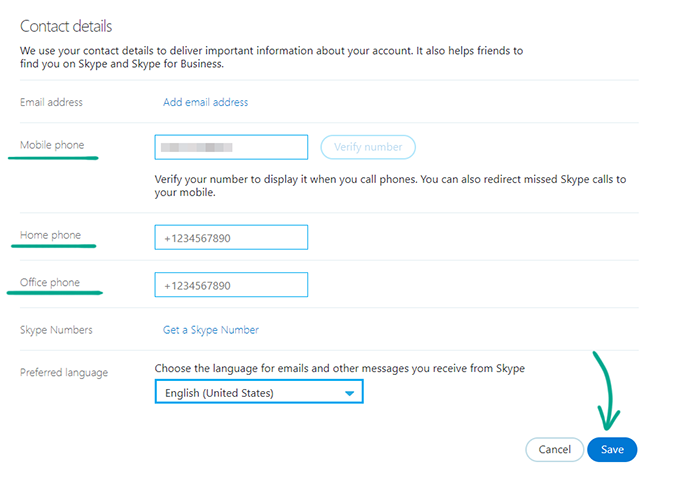
- If you previously indicated your real name but no longer want other users to see it, enter a pseudonym in the Name field;
- Delete information from the following fields:
- About me;
- Gender;
- Birthday;
- City;
- State/region;
- Country/region;
- Mobile phone;
- Home phone;
- Office phone;
- Delete all e-mail addresses except your primary one;
- Click Save.

Downside: Your friends will have a harder time finding you in Skype.
What for: To keep Microsoft and their partners from listening to your conversations.
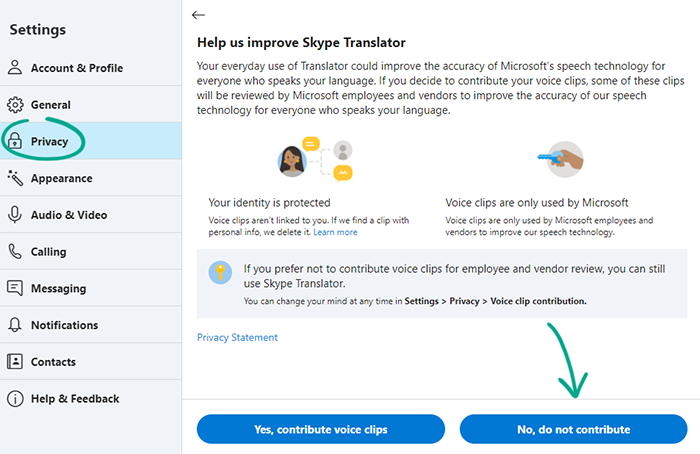
The automatic translation feature lets you communicate with other users even if you do not know their language. To improve this service, Skype collects fragments (snippets) of your conversations and analyzes them automatically using machine learning algorithms. However, to increase the accuracy of recognition and translations, you can allow employees of Skype and its partners to listen to these snippets.
According to its developers, all data is encrypted and depersonalized, and the employees who work with this data have to sign a non-disclosure agreement.
This feature is disabled by default, but we still recommend checking the settings:
- Click your profile picture;
- Select Settings;
- Go to the Privacy section;
- Click Voice clip contribution;
- Click No, do not contribute or Stop to contribute.
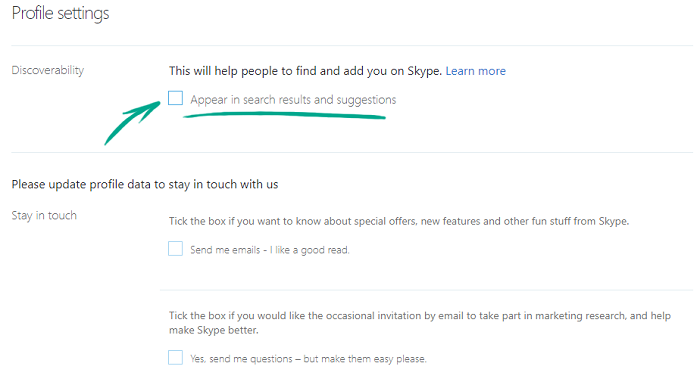
What for: To hide your profile from strangers.
Skype may show your profile to your contacts in search results and suggestions. If you do not want your profile to be seen by all users who have your phone number or e-mail address, turn off this feature:
- Click your profile picture;
- Select Settings;
- Select Your profile to open your profile management page;
- Clear the check box next to Appear in search results and suggestions.
What for: To back up your important data.
By default, files from conversations, call logs and voice messages are stored on Skype servers for 30 days and then deleted. To save your important data, you can download it:
- Click your profile picture;
- Select Settings;
- Go to the Account & Profile section;
- Select Your account;
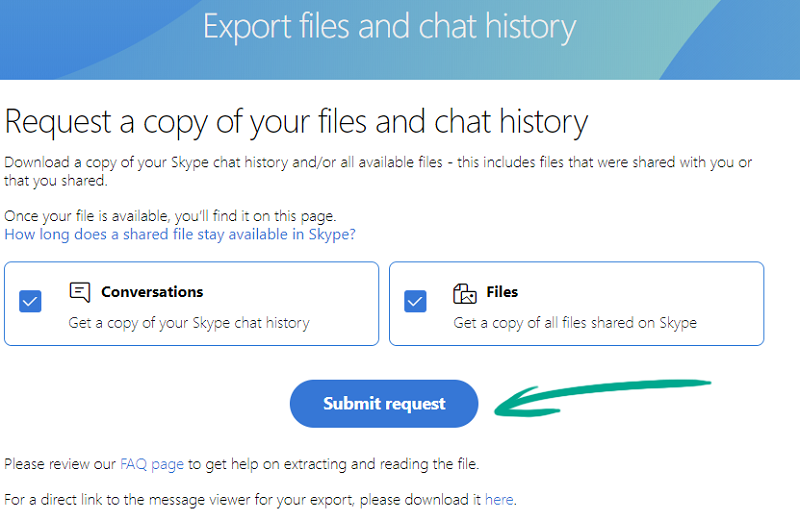
- Under Settings and preferences, click Export files and chat history;
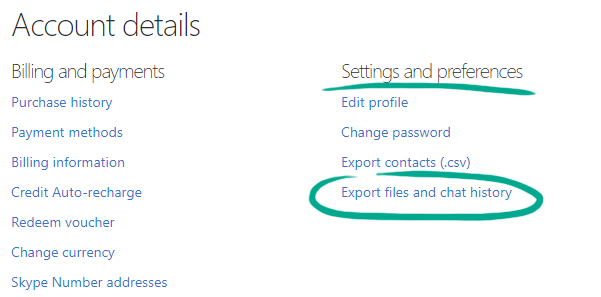
- Choose whether you want to download only your Skype chat history or all available files;
- Click Submit request.
You can also download your contact list to keep in touch with your friends even if you lose access to your account. To download your Skype address book, under Settings and preferences click Export contacts (.csv).
What for: To prevent it from leaking.
Paid subscriptions let you use Skype to call mobile numbers and landlines. To top up your account, you can link a bank card or PayPal account to it. However, this information could be compromised by a data breach. To eliminate this risk, delete your bank card and PayPal account data:
- Click your profile picture;
- Select Settings;
- Select Your account;

- Scroll down the page that opens. In the Billing and payments section, click Payment methods;

- Click Delete on the right of the PayPal account or bank cards you want to unlink from your account.
How to avoid annoying distractions in Skype
What for: To avoid unwanted communication.
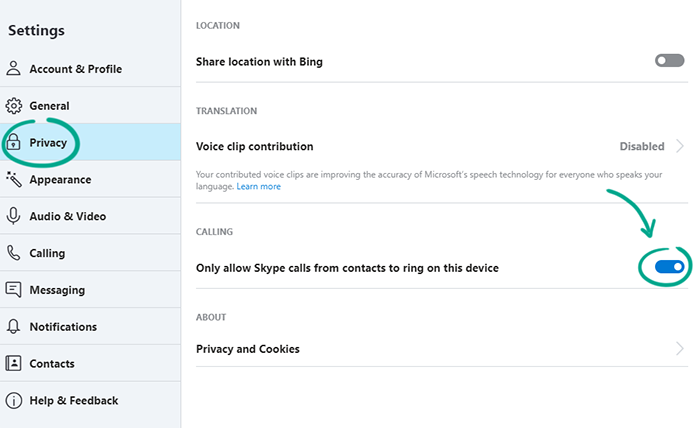
By default, any Skype user can call you. If you do not want to be bothered by strangers, block calls from anyone not in your contact list:
- Click your profile picture;
- Select Settings;
- Click Privacy in the menu on the left;
- Turn on the toggle next to Only allow Skype calls from contacts to ring on this device.
What for: To avoid unpleasant people.
If your contact list contains people who write offensive messages, distribute spam, or are just annoying, you can block them. Blocked contacts cannot call or message you. To blacklist (block) a user:
- Find their profile in your Skype contact list;
- Right-click on the contact's photo;
- Select Edit contact;
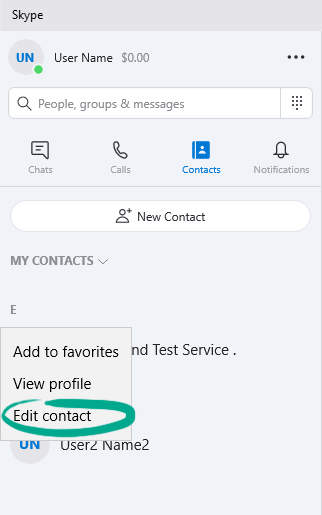
- Click Block contact;
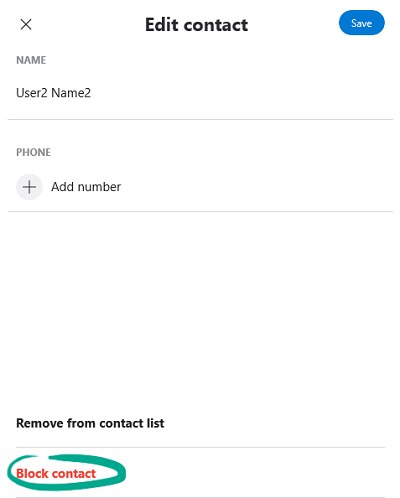
- Click Block.
Blocked users will not know you’ve blacklisted them.
What for: Less distraction.
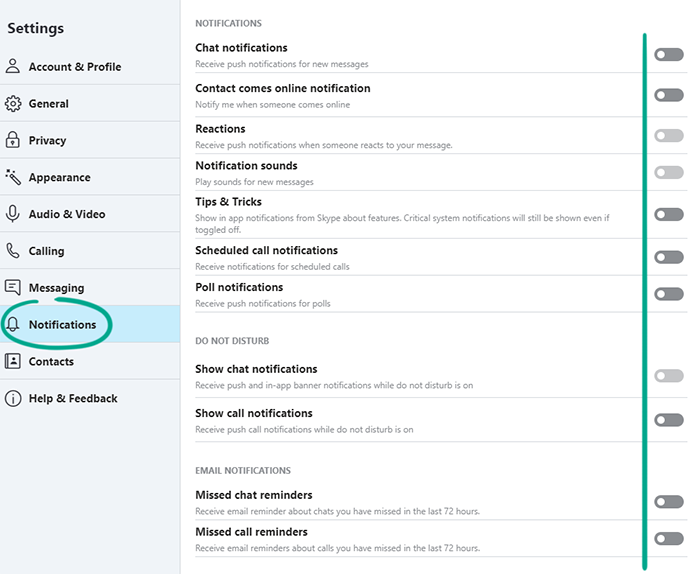
Skype may send you notifications about incoming messages, surveys, and ads. If you are bothered by frequent notifications, you can completely or partially disable them:
- Click your profile picture;
- Select Settings;
- Click Notifications in the menu on the left;
- Disable the unwanted notifications.