

How to keep your account from being hacked
What for: To secure your account and set up secure sign-in.
By default, you can sign in to a Windows 11 device without a password, with your Microsoft account credentials or with a local (device-specific) user account. None of the three options ensure a due level of security, but you can't set up secure sign-in with a PIN or fingerprint unless you set a password first. If you haven't connected a Microsoft account and you're not planning to, you can set a local account password. A strong password:
- Is at least 8 characters long;
- Contains lowercase and uppercase letters, numbers, and special characters ($, @, etc.);
- Is not a word, popular expression or easy-to-guess combination of characters, such as "123456789" or "pa$$word";
- Does not consist of information that strangers could easily find out (your name, date of birth, pet's name, and so forth — or those of your friends or relatives);
- Is not the same as your passwords for any other accounts, including your Microsoft password.
To set a local account password:
- Open your system's settings by clicking the cogwheel in the Start menu or using the Windows + I key combination;
- Go to the Accounts menu;
- Under Accounts, select Sign-in options;
- Under Ways to sign in, select Password and click Add;
- In the window that opens, enter your new password twice in the appropriate fields and add a hint in case you forget your password;
- Click Next;
- Click Finish.
Please note: We recommend adding further methods to secure your device in addition to a password. A PIN or fingerprint are the recommended methods.
What for: To prevent your account from being hacked.
Windows 11 offers several additional options for more secure sign-in: picture password, PIN, facial recognition, fingerprint recognition and hardware security key. For the most effective protection, we recommend using a PIN code or a fingerprint scanner.
The PIN code is stored locally on the device and is tied to your computer. Even if someone finds out your password combination, they will not be able to log in to your account from another device. That's a PIN code's advantage over a password.
Avoid short and easy PINs that a stranger may easily guess to get to your data. A strong PIN is one that meets the following requirements:
- Is at least 8 characters long;
- Contains lowercase and uppercase letters, numbers, and special characters ($, @, etc.);
- Is not a word, popular expression or easy-to-guess combination of characters, such as "123456789" or "pa$$word";
- Does not consist of information that strangers could easily find out (your name, date of birth, pet's name, and so forth — or those of your friends or relatives);
- Is not the same as your passwords for any other accounts, including your Microsoft password.
Please note: You have to secure your account with a password before you can use a PIN.
To create a PIN code:
- Open your system's settings by clicking the cogwheel in the Start menu or using the Windows + I key combination;
- Go to the Accounts menu;
- Under Accounts, select Sign-in options;
- Under Ways to sign in, select PIN (Windows Hello);

- Click Set up. If necessary, click Next and enter the password for your local or Microsoft account;
- Select Include letters and symbols in the opened window and create a secure combination.
If you have a dedicated built-in or plug-in scanner, you can enable fingerprint sign-in after you create a PIN. It is not so easy to fake a fingerprint, so this method is safer than face recognition, which in some cases can be tricked, for example, by using a photo. Keep in mind though that Windows will send your biometric data and your sensor usage details to Microsoft.
To enable sign in by fingerprint:
- Open your system's settings by clicking the cogwheel in the Start menu or using the Windows + I key combination;
- Go to the Accounts menu;
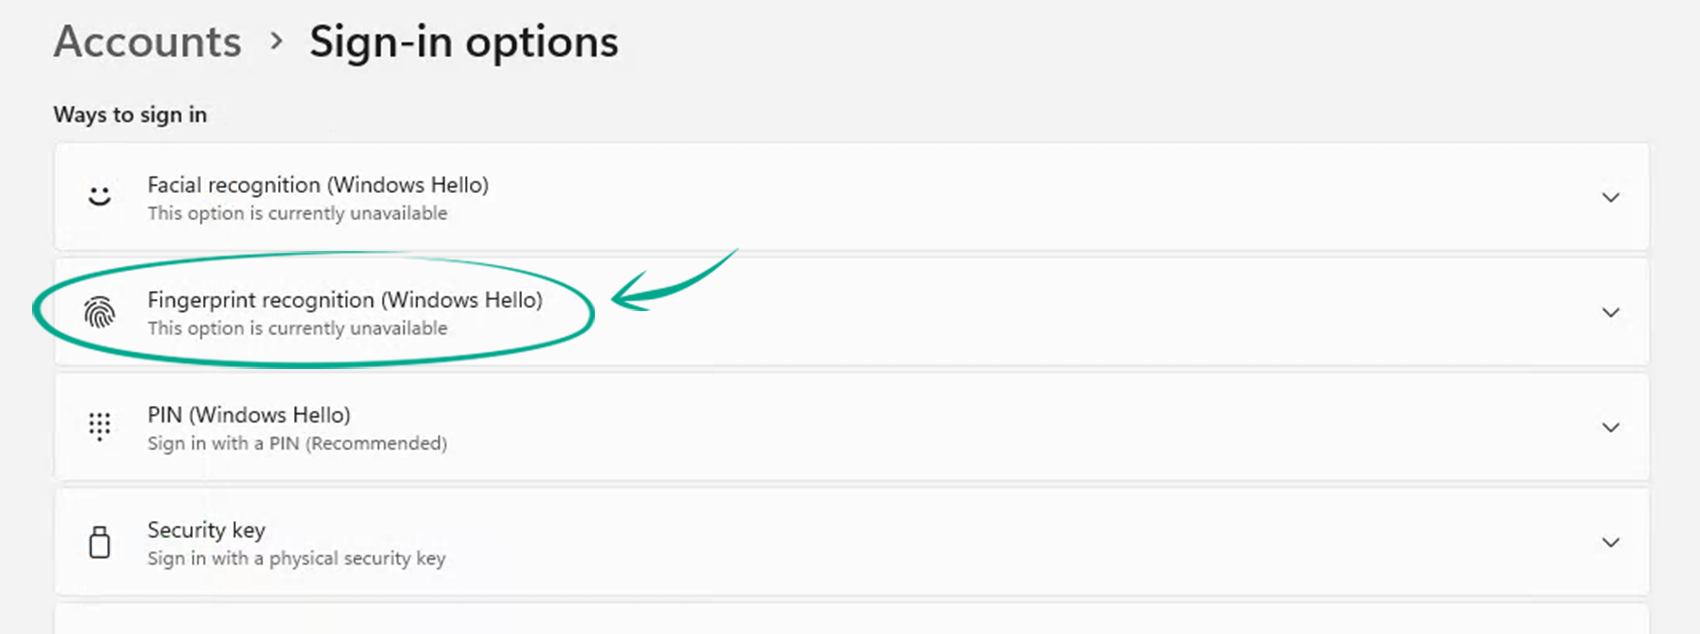
- Under Accounts, select Sign-in options;
- Under Ways to sign in, find Fingerprint recognition (Windows Hello), click that and then click Set up;
- Click Get started;
- Enter the PIN code that you use to log in to the system;
- Scan your fingerprint;
- Click Close.
Please note: Even if you have set up PIN or fingerprint sign-in, Windows lets you use your Microsoft account password to sign in. This makes the device less secure, as the password for a cloud account is more likely to be leaked. The option is off by default, but if you have changed the system settings, we recommend checking and adjusting if needed.
To prevent your device from using an account password instead of a PIN or fingerprint for authentication:
- Open your system's settings by clicking the cogwheel in the Start menu or using the Windows + I key combination;
- Go to the Accounts menu;
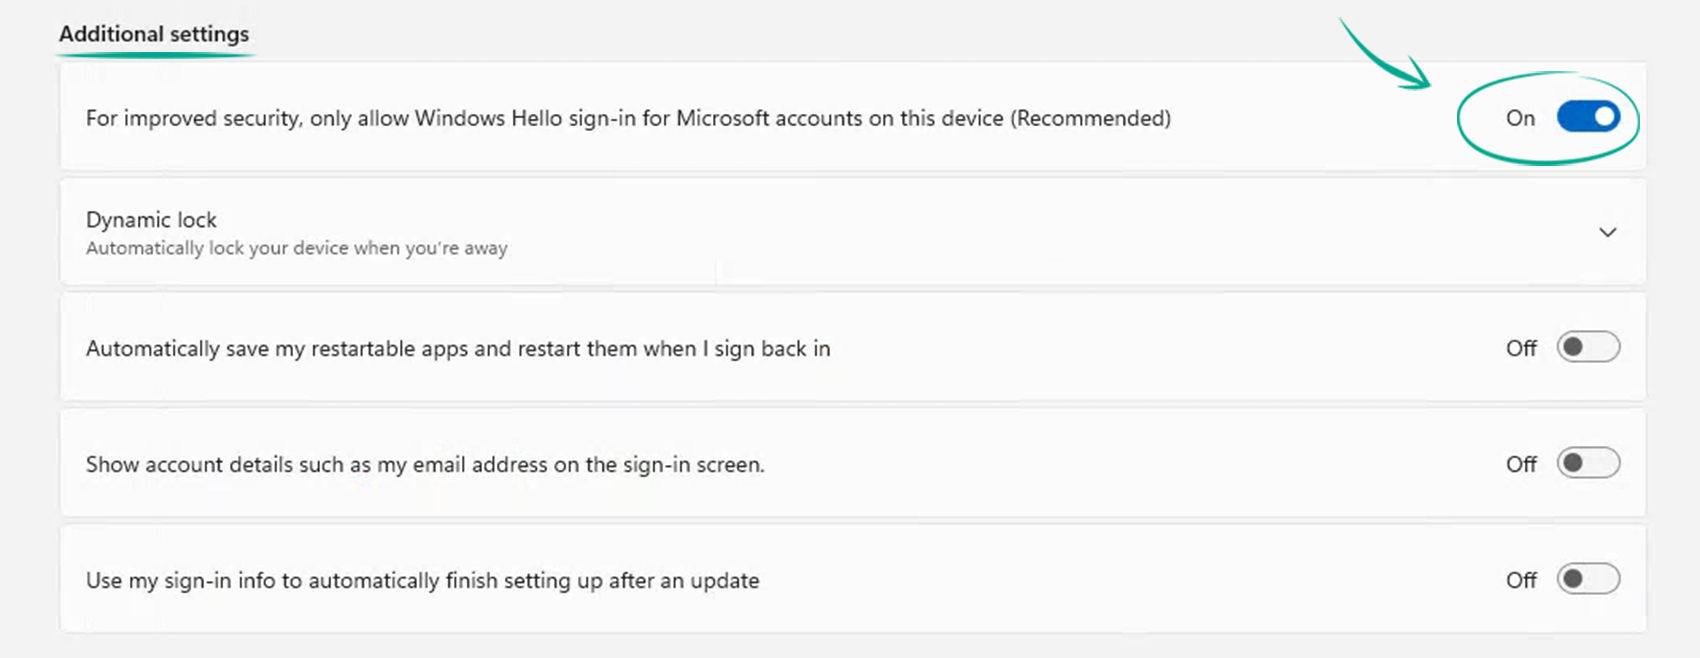
- Under Accounts, select Sign-in options;
- Under Additional settings, turn on For improved security, only allow Windows Hello sign-in for Microsoft accounts on this device (Recommended).
You cannot completely remove your PIN or any other Windows Hello sign-in method as long as this option is on.
What for: To keep strangers from gaining access to the system while you're away from your device and haven't locked it manually.
Windows 11 can lock your computer if you haven't used it for a preset period of time. This will prevent strangers from accessing your confidential information in your absence.
To configure the screen lock:
- Open your system's settings by clicking the cogwheel in the Start menu or using the Windows + I key combination;
- Go to the Personalization section;
- Click Lock screen;
- Under Related settings, select Screen Saver;
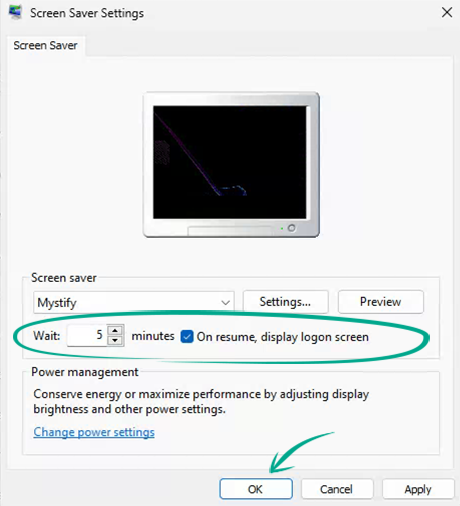
- In the window that opens, select a screen saver of your choice. We suggest choosing "Blank", "Mystify" or "Ribbons", which prevent viewing or recovering your desktop and data;
- In the windows that opens, check the On resume, display logon screen box and select your preferred lock interval;
- Click OK.
This will cause the screen to start locking, and you will have to enter your password to unlock it.
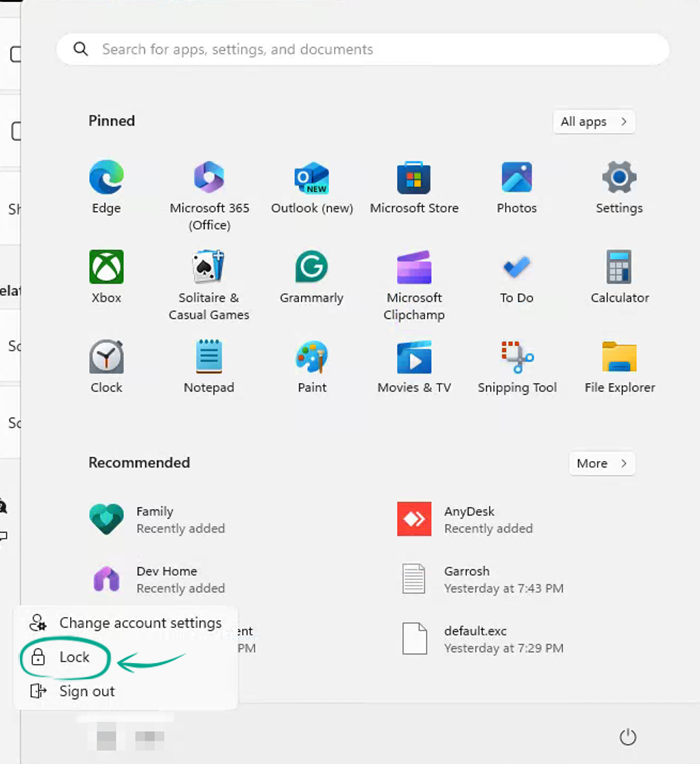
You can lock the computer manually by using the Windows+L key combination or in the Start menu:
- Open the Start menu;
- Click your profile icon;
- Select Lock.
What for: To ensure that your screen is locked automatically when you leave your computer.
Windows 11 can lock your computer when you are away. The system is paired with gadgets that are connected to your computer, such as your smartphone. To use this function, you need to connect the device to your computer via Bluetooth. Your computer will be locked when you leave the geofenced area (which is usually about 10 meters) for more than a minute.
To enable dynamic lock:
- Open your system's settings by clicking the cogwheel in the Start menu or using the Windows + I key combination;
- Go to the Accounts menu;
- Under Account settings, select Sign-in options;
- Under Additional settings, open Dynamic lock and check Allow Windows to automatically lock your device while you're away.
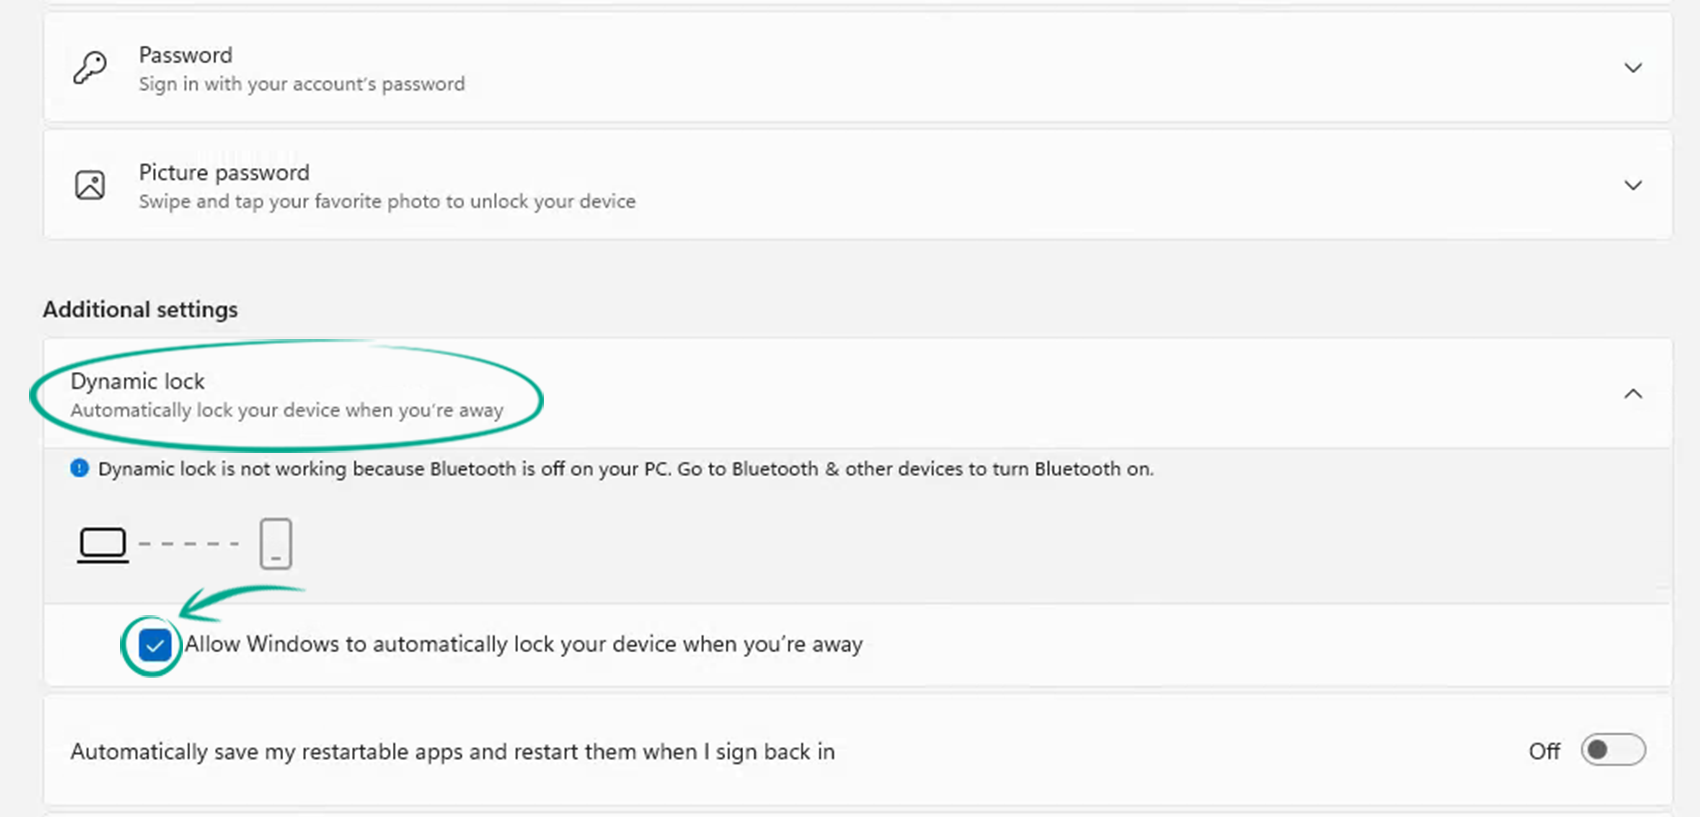
It's all ready unless you see any warnings. If you get a warning that says, "Dynamic lock is not working because Bluetooth is off on your PC":
- Go to Bluetooth & devices;
- Turn on Bluetooth. If you get a warning that says, "Dynamic lock is not working because your PC has no paired phone";
- Go to Bluetooth & devices;
- Select Mobile devices;
- Turn on Phone link. If that option is already on, click Open Phone Link;
- In the window that opens, select Android or iPhone, scan the QR code with your phone and follow the on-screen directions to link your gadget to the PC.
Note that Bluetooth signals can penetrate walls and other obstacles. Therefore, leaving the room may not be sufficient to lock your computer.
We recommend you use this feature together with the automatic screen lock to keep your data safe even if you leave the linked gadget next to your computer.
Downside: You have to keep Bluetooth enabled on your gadget for this feature to work as designed, which will cause your device to drain its battery a bit faster.
How to protect your data
What for: To find your computer if you lose it.
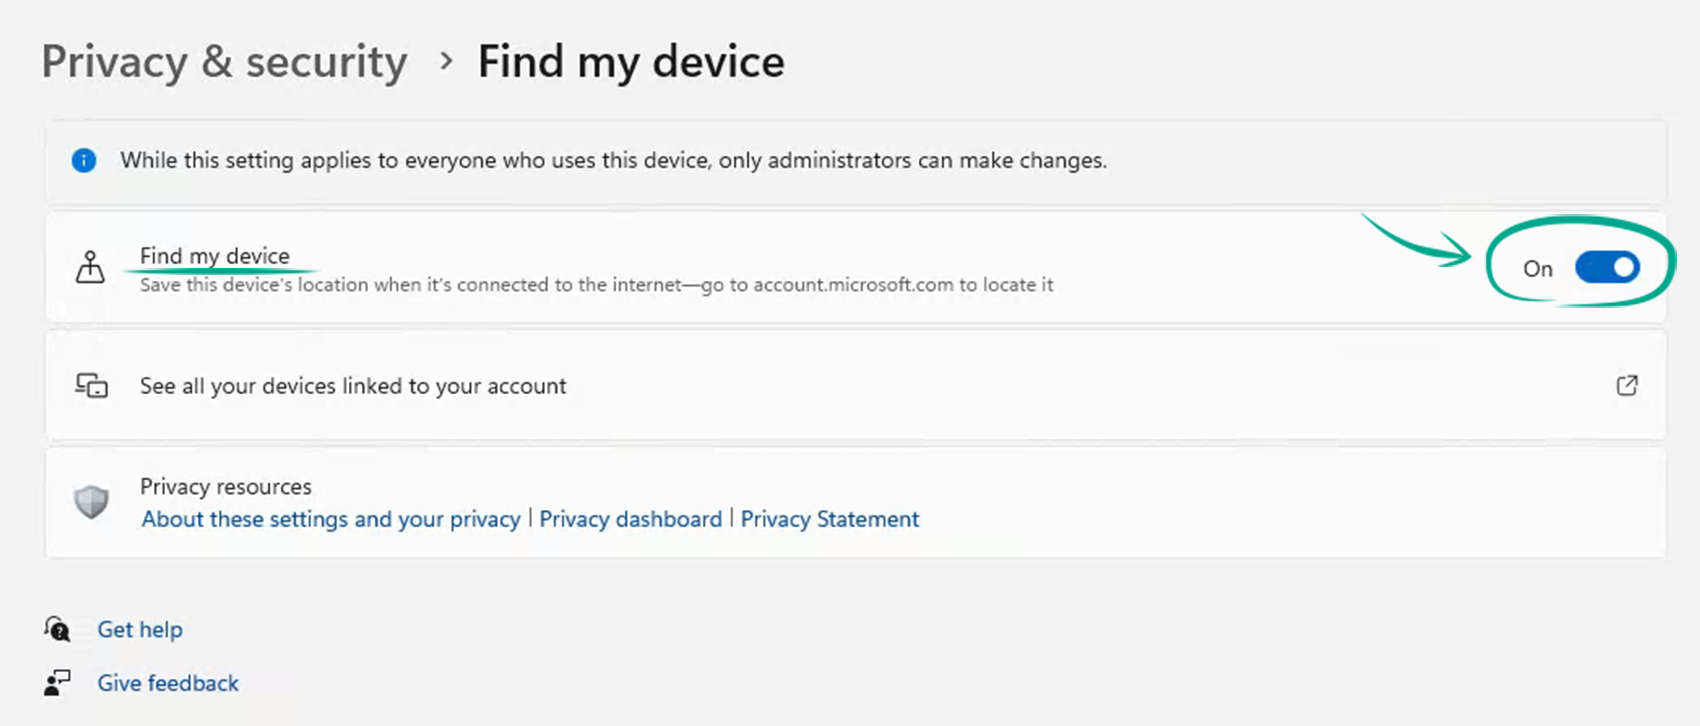
Windows 11 saves the location of your device regularly. If you lose your computer or if it is stolen, you can track it and, if necessary, lock it. This feature is enabled by default, but we recommend checking your settings:
- Open your system's settings by clicking the cogwheel in the Start menu or using the Windows + I key combination;
- Go to Privacy & security;
- Under Privacy & security, select Find my device and turn on the identically named option.
You can find and lock a lost device in the Devices section on the Microsoft Account page.
Remember that you must use the Microsoft user account linked to your lost computer. A lost device can send its location only if it is turned on and connected to the Internet.
Downside: Your computer's location will be sent to the company's server and stored on the device.
What for: To keep your personal data private.
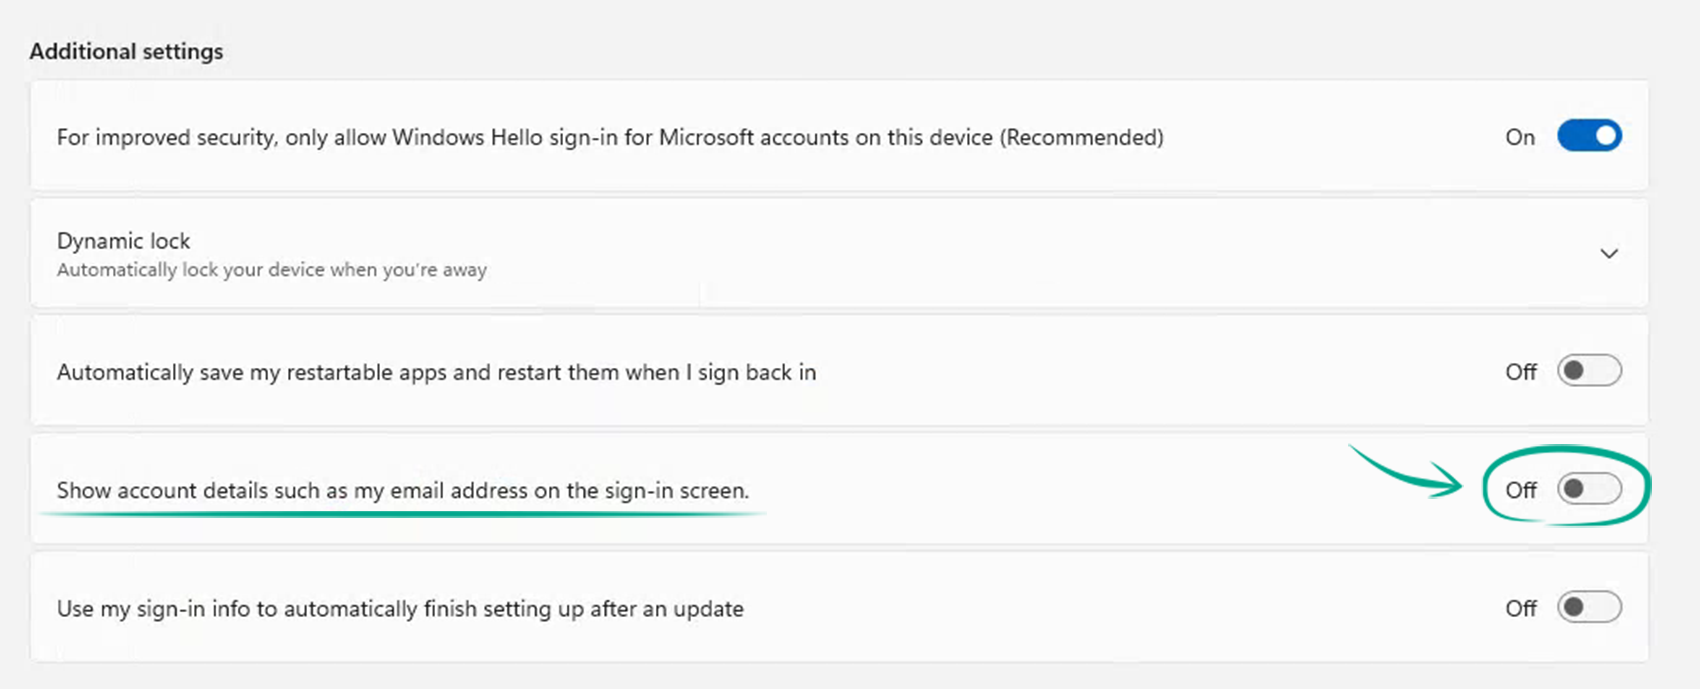
Windows 11 can display information in your Microsoft account, such as your meeting schedule or incoming message notifications, on the lock screen. This helps to view the information without signing in, but others can see it too. This feature is disabled by default. However, we still recommend checking the settings:
- Open your system's settings by clicking the cogwheel in the Start menu or using the Windows + I key combination;
- Go to the Accounts menu;
- Under Account settings, select Sign-in options;
- Make sure that the Show account details such as my email address on the sign-in screen feature is disabled.
To stop your apps from displaying notifications on the lock screen:
- Open your system's settings by clicking the cogwheel in the Start menu or using the Windows + I key combination;
- Go to System;
- Select Notifications;
- Uncheck the following boxes in the Notifications section:
- Show notifications on the lock screen;
- Show reminders and incoming VoIP calls on the lock screen.
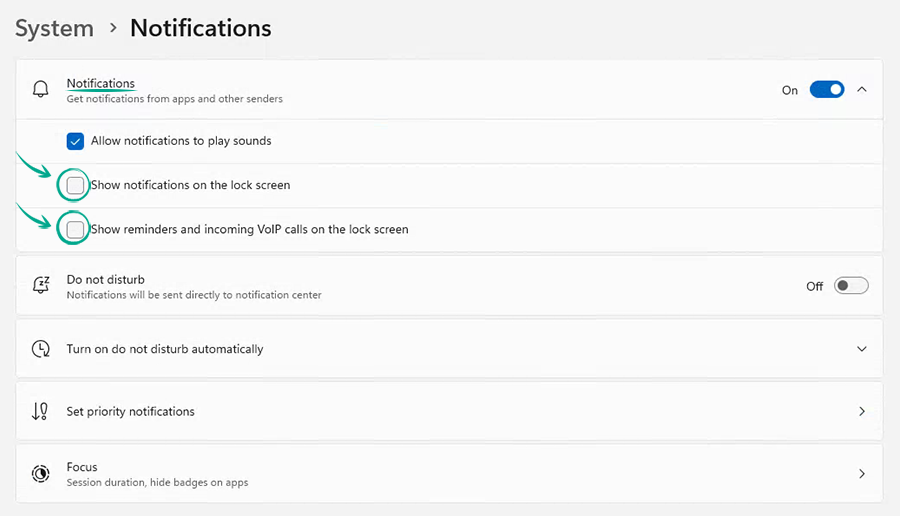
Downside: The lock screen will stop showing important notifications, and you'll have to sign in to see these.
What for: To restore important data in case of a crash.
A backup copy of your data will help you to restore files after a hard drive crash or a ransomware attack. By default, Windows 11 offers to copy your data to your OneDrive cloud storage. To do so, you need to log in to OneDrive with your Microsoft account. You can store up to 5GB free in your cloud storage account.
To turn on backups:
- Open your system's settings by clicking the cogwheel in the Start menu or using the Windows + I key combination;
- Go to Privacy & security;
- Under Security, select Windows Security;
- Select Virus & threat protection in the list of protection areas;
- Scroll down and click Ransomware protection;
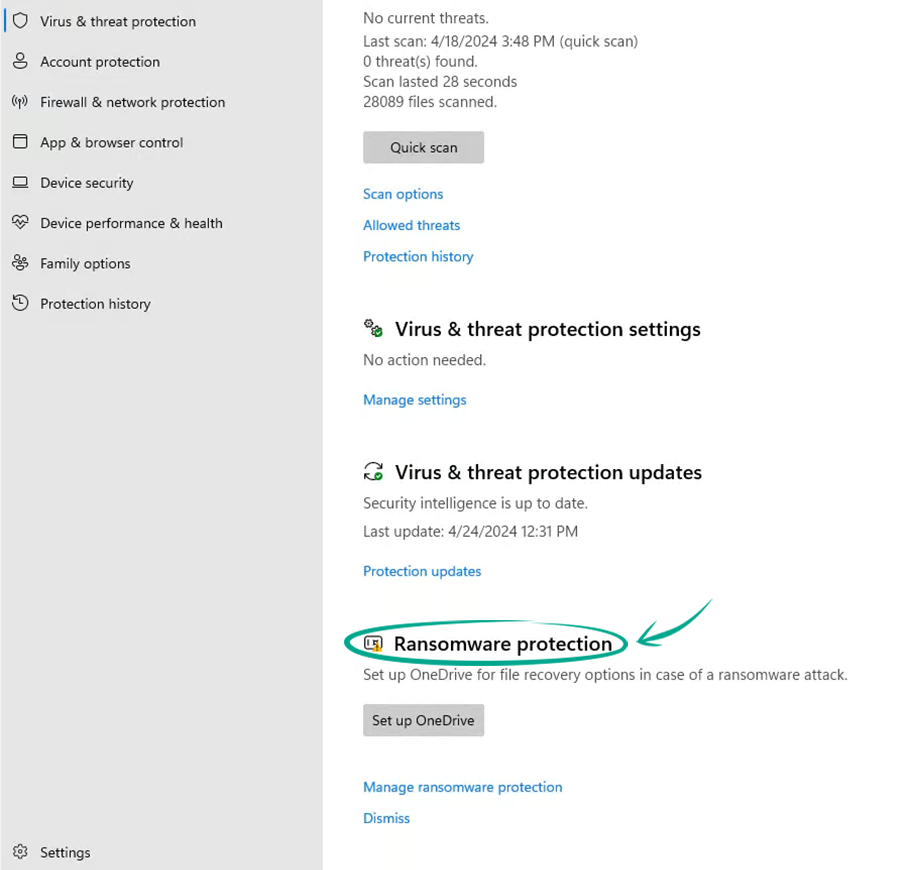
- Click Set up OneDrive;
- Enter the e-mail address for your Microsoft account and click Log in:
- If you don't have a Microsoft account, click Create account. You will be taken to the OneDrive site to create an account.
Note that your cloud storage may also be targeted by cybercriminals. We recommend creating several backups of your important files, including on physical media not connected to the Internet.
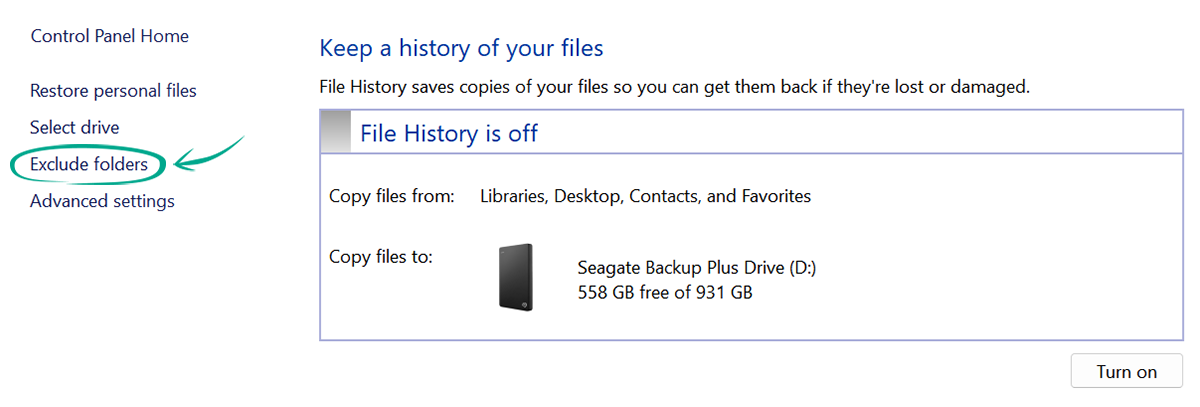
To create a backup copy on a local drive:
- Connect your storage media to the device;
- Open the Start menu;
- Enter File History in the search bar;
- Click Select drive and choose the right drive if you need to;
- Click Exclude folders to specify the ones you don't need to back up.
How to get rid of unwanted notifications and ads
What for: To stop Windows from spamming you with Microsoft offers.
By default, Windows 11 shows you notifications with tips and product recommendations from Microsoft. You can turn off these notifications:
- Open your system's settings by clicking the cogwheel in the Start menu or using the Windows + I key combination;
- Go to System;
- Select Notifications;
- Click Additional settings and uncheck Get tips and suggestions when using Windows.
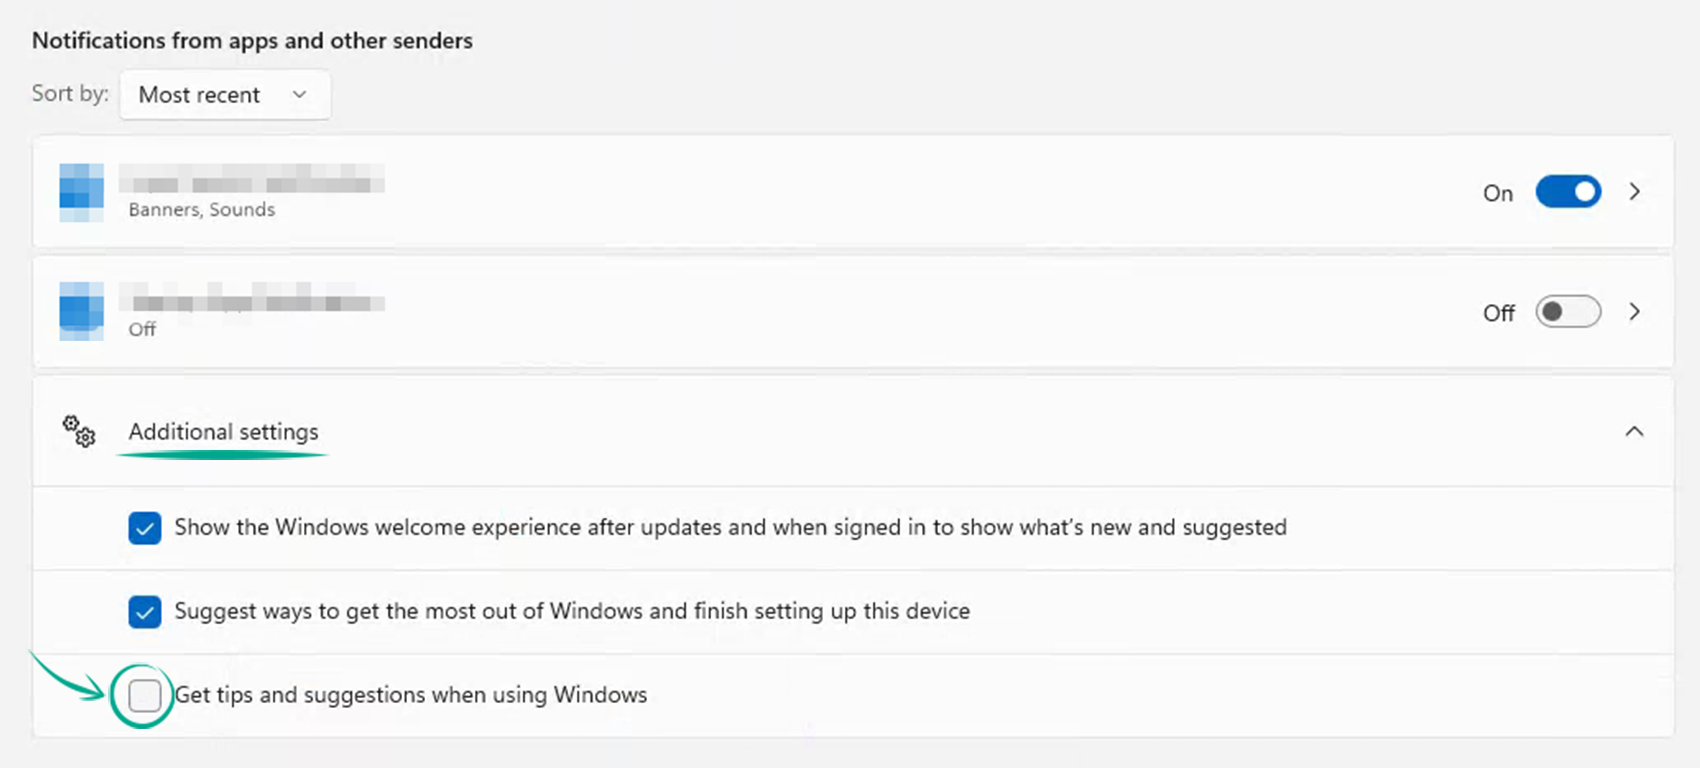
If it is just the notification sounds that get on your nerves, try muting them: Uncheck the box next to Allow notifications to play sounds in the Notifications section.
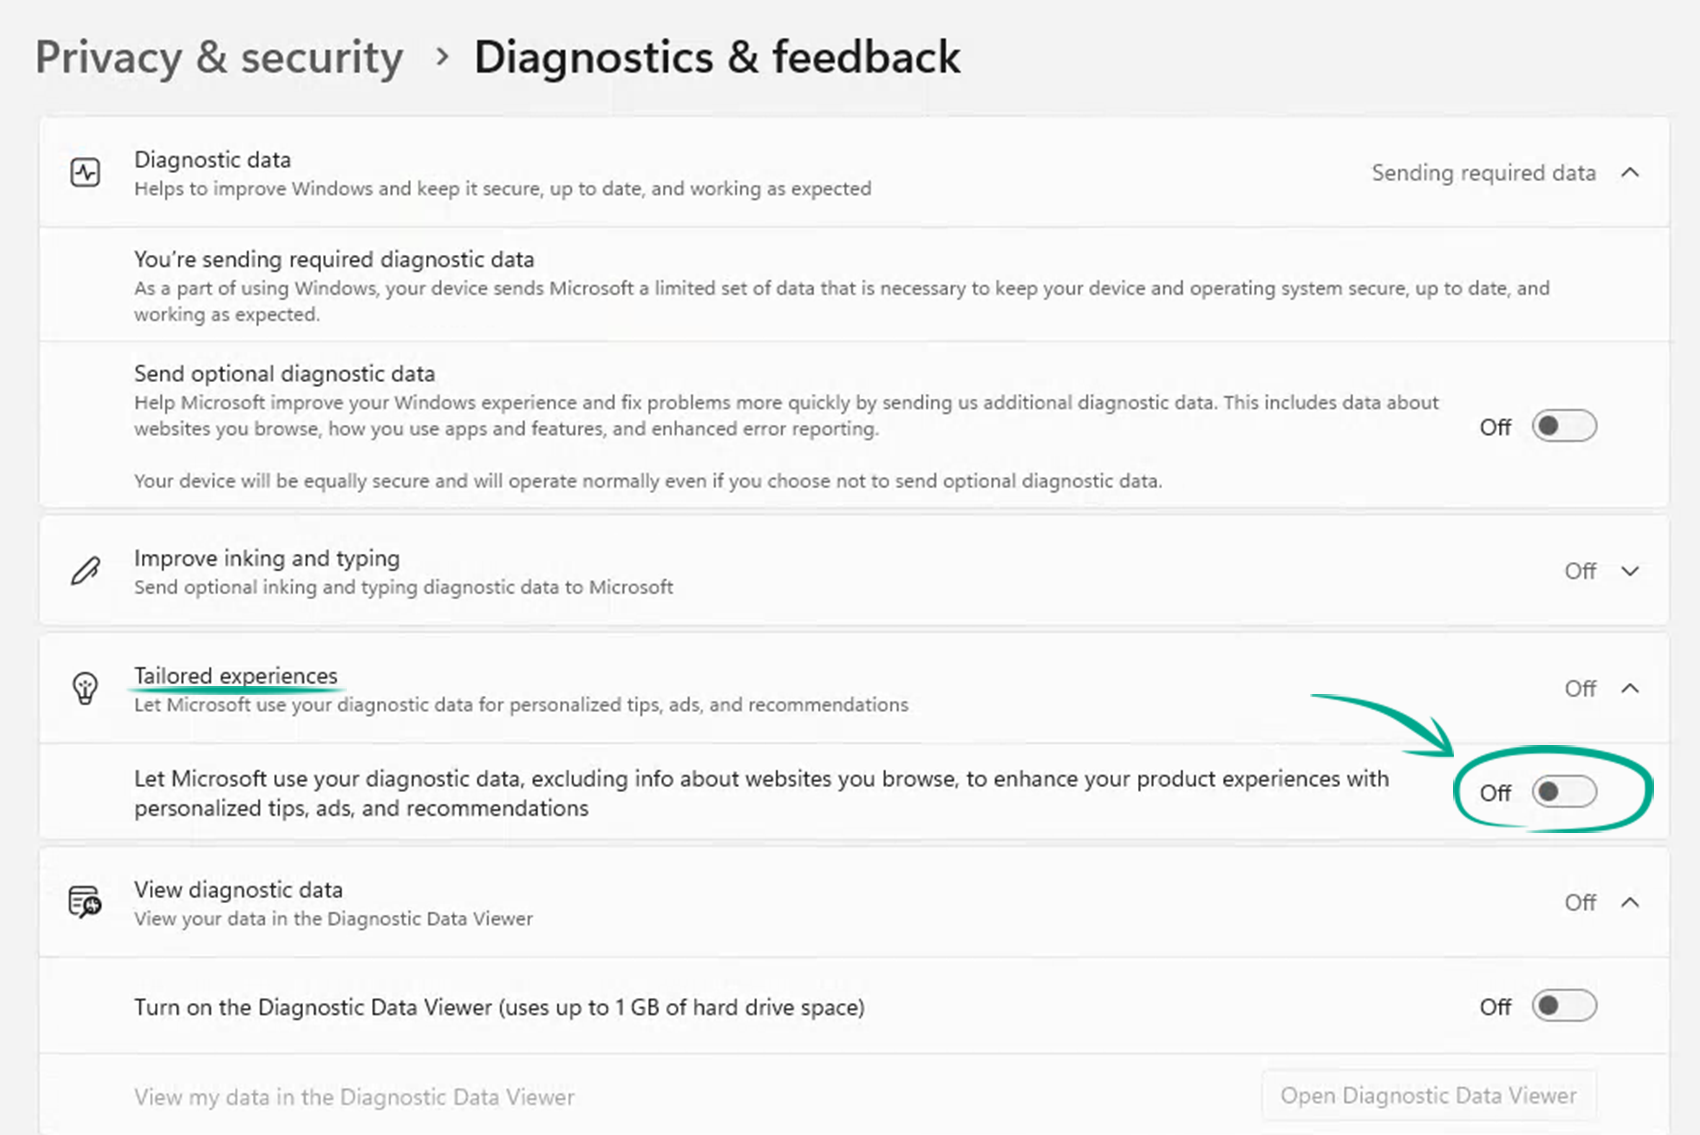
What for: To prevent Windows from using information about you to personalize ads.
Microsoft can gather diagnostic data on your device, such as PC configuration, system failures and app crashes. The company can use this data to display personalized ads or tips, such as new Windows features or offers to get more OneDrive storage space when you run out of it. Microsoft's partners like Yahoo can obtain and use that information too.
You are free to prevent the collection of your device and activity data any time. As an added bonus, you will get fewer system setup tips if you do so:
- Open your system's settings by clicking the cogwheel in the Start menu or using the Windows + I key combination;
- Go to Privacy & security;
- Under Windows permissions, select Diagnostics & feedback;
- Click Tailored experiences;
- Turn off the option that appears.
Please note: Microsoft also can use other information, such as your location, voice commands, contact list and so on, to personalize ads. Steps you need to follow if you want to prevent that data from being collected can be found below.
How to protect yourself from snooping
What for: So that no one can spy on you.
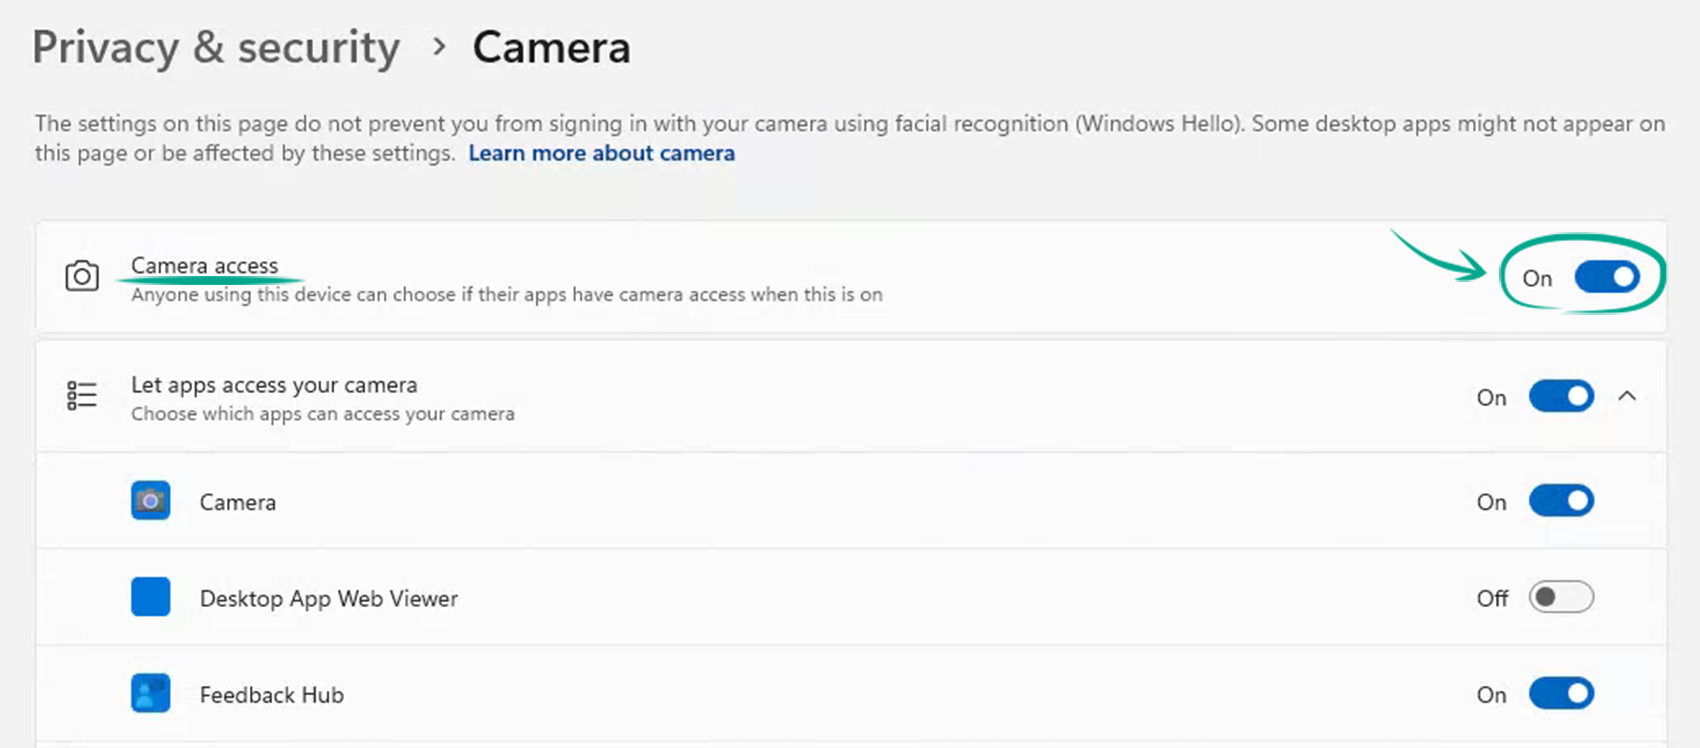
Apps and websites can obtain access to the camera and microphone on your computer, for example to make video calls. Certain malware and Web pages try to get these permissions either covertly or by tricking you to spy on you. You can partially or fully restrict the system or apps and websites from accessing the camera and microphone.
To limit access to your camera:
- Open your system's settings by clicking the cogwheel in the Start menu or using the Windows + I key combination;
- Go to Privacy & security;
- Under App permissions, select Camera;
- To block access to your camera:
- For most apps (see below the steps for exceptions), turn off Let apps access your camera;
- For individual apps, turn off the appropriate options. After that these apps will not be able to use the camera directly. However, they will still be able to ask you to grant them access in the Camera app. If you do that, the permission will remain valid until you cancel it;
- If your account has local administrator permissions, you can prevent other accounts on the PC to set up app camera access. Just turn off Camera access.
Please note that if you use Windows Hello to sign in to your computer, the service will still have access to the camera.
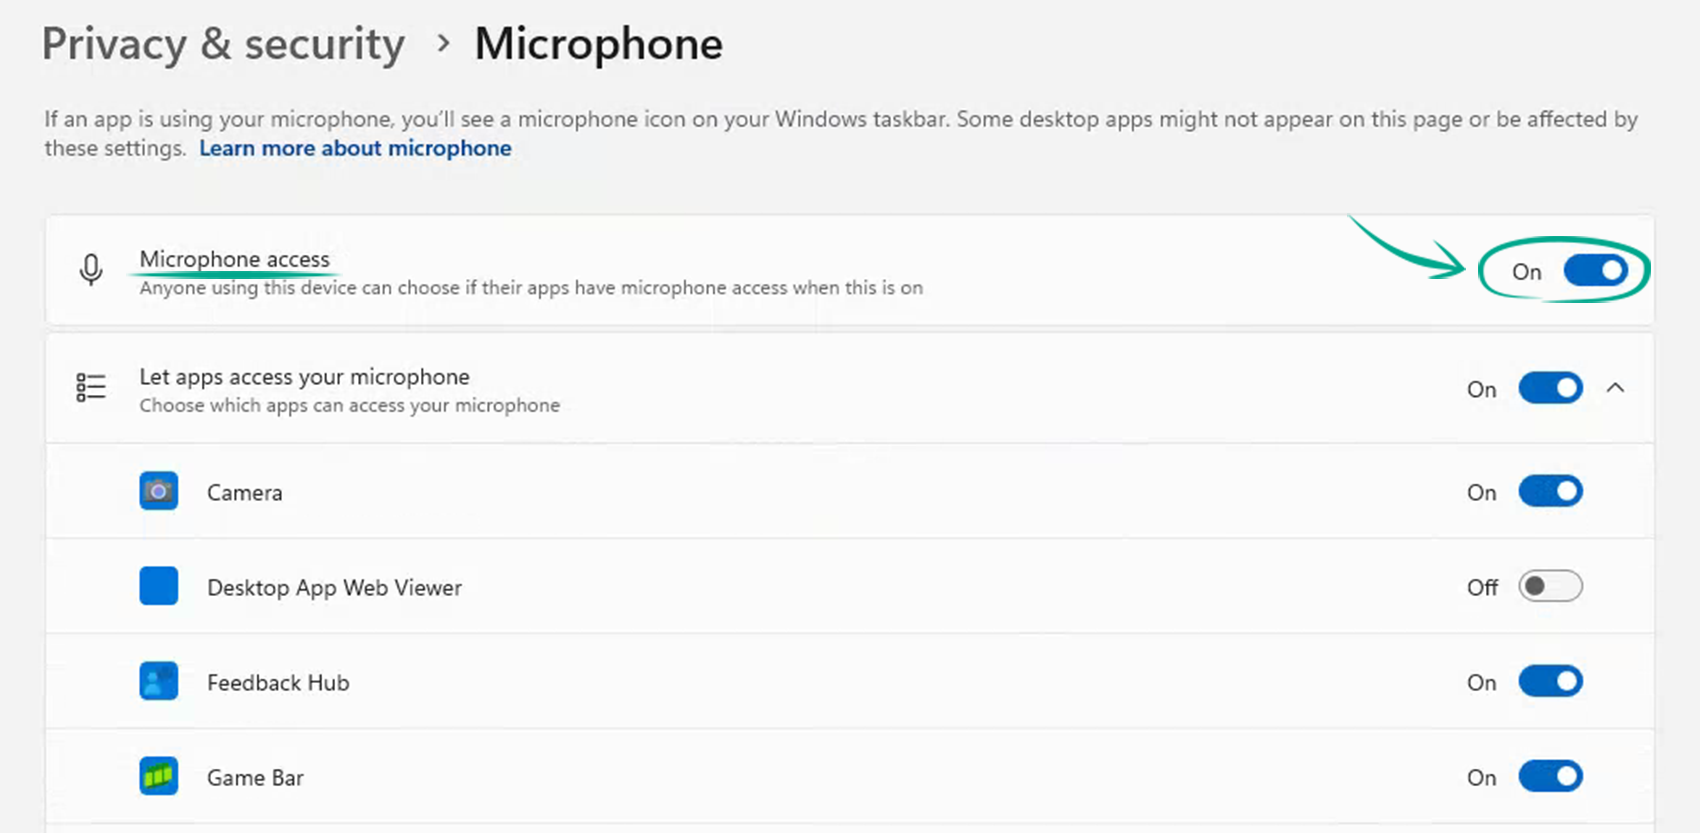
To limit access to your microphone:
- Open your system's settings by clicking the cogwheel in the Start menu or using the Windows + I key combination;
- Go to Privacy & security;
- Under App permissions, select Microphone;
- To block access to your microphone:
- For most apps (see below the steps for exceptions), turn off Let apps access your microphone;
- For individual apps, turn off the appropriate options in the app list.
- If your account has local administrator permissions, you can prevent other accounts on the PC to set up app microphone access. Just turn off Microphone access.
Please keep in mind that you will find only default and Microsoft Store apps in the list. This setting will not affect apps that were downloaded from other sources.
Downside: In Windows 11, one camera and microphone access setting applies to all apps except for the built-in ones. So, if you need to give camera or microphone access to one of your apps, you'll have to turn access back on for all of them.
What for: To keep the apps on your computer out of your private affairs.
Windows 11 by default allows apps to read and send instant messages and e-mails, make calls, and view other apps' diagnostic data. The operating system also gives apps access to data in your account, such as your calendar, contacts, call log and other information. Malware can masquerade as benign apps and get the same permissions from the system. We recommend checking your settings and revoking access from apps you do not trust:
- Open your system's settings by clicking the cogwheel in the Start menu or using the Windows + I key combination;
- Go to Privacy & security;
- Under App permissions, select the permission type you're looking for:
- Notifications;
- Account info;
- Contacts;
- Calendar;
- Phone calls;
- Call history;
- Email;
- Tasks;
- Messaging;
- Radios;
- Other devices;
- App diagnostics;
- Automatic file downloads;
- Documents;
- Downloads folder;
- Music library;
- Pictures;
- Videos;
- File system;
- Screenshot borders;
- Screenshots and apps.
- To restrict access to this information:
- For most apps (see below the steps for exceptions), turn off Let apps access your …, e.g.: Let apps access your notifications, etc.;
- For individual apps, turn off the appropriate options in the app list.
- If your account has local administrator permissions, you can prevent other accounts on the PC to set up app access to information. To do this, turn off … access, e.g.: Notification access, etc.
Please note: You cannot turn off access to certain settings for certain kinds of apps, such as cloud-based apps, the way you can do this for classic apps that run directly on the device. Install apps from trusted sources to reduce the risk of malicious actors stealing your data.
Certain apps installed not from the Microsoft Store may still have access to the camera and microphone, even if you have disabled it for the apps from other sources. For example, when an app installs a driver, the app is able to directly access your hardware.
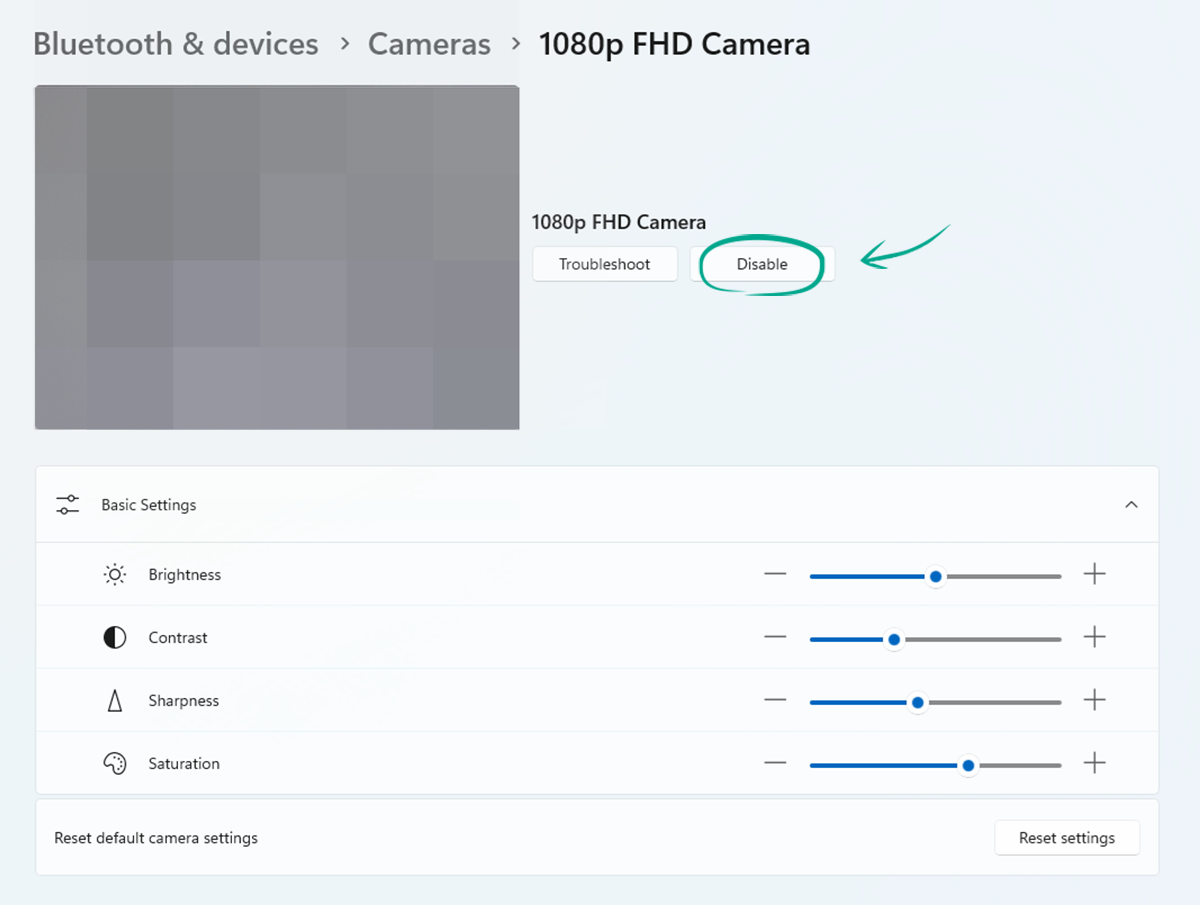
For better protection, you can disconnect your external camera and microphone. You can turn off the built-in camera and microphone using the Device Manager. However, to do that you need to know their names. You can find this information on the manufacturer's website, in your computer's technical specifications. To disable the camera and microphone in the system settings:
- Open your system's settings by clicking the cogwheel in the Start menu or using the Windows + I key combination;
- Go to Bluetooth & devices;
- Select Cameras;
- Click the name of your camera in the list that opens;
- Click Disable;
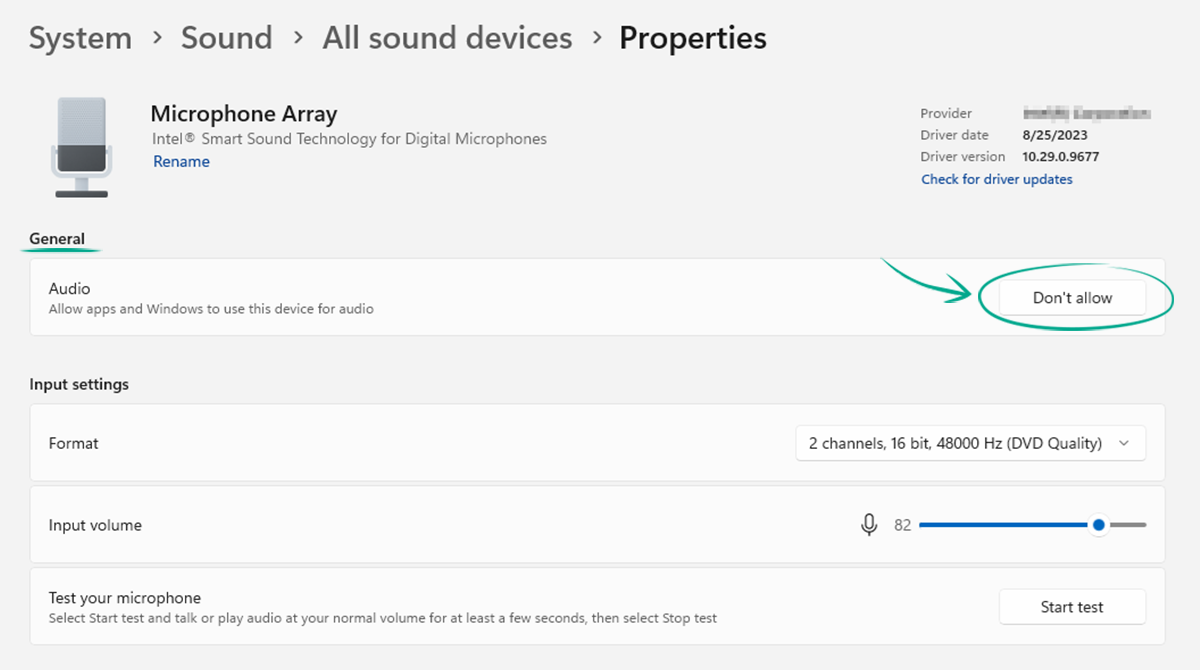
- To disable the microphone, go to System and select Sound;
- Under Input, click the name of your microphone;
- Under General, click Don't allow.
You can reenable your camera and microphone at any time: Just open the appropriate settings sections again as detailed under 1, 2 and 5 above, find your device in the list, and click Allow.
Downside: If you need your camera or microphone to make a video call, etc., you'll have to re-enable them manually.
What for: So no one can track your device when you are looking for a Wi-Fi network.
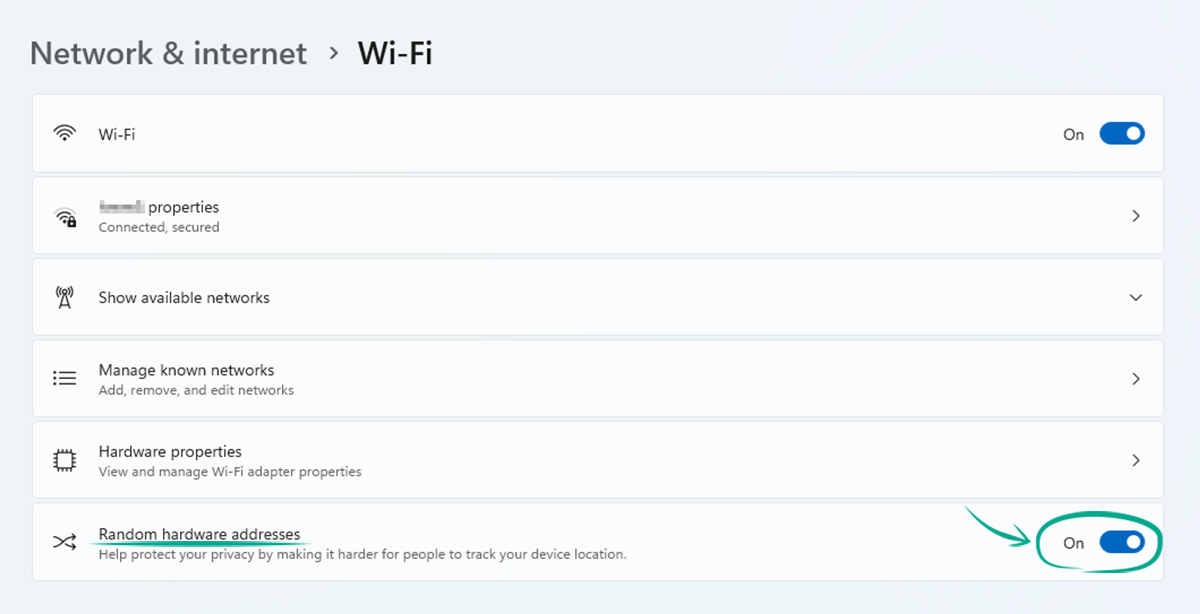
When searching for a Wi-Fi network, your device broadcasts a signal with a unique device identifier (MAC). This identifier can be used to track your movements. For example, a public Wi-Fi provider can capture data about what stores you visit most often and sell the information to advertisers. To ensure that your computer cannot be identified, enable random MAC addresses:
- Open your system's settings by clicking the cogwheel in the Start menu or using the Windows + I key combination;
- Go to the Network & internet menu;
- Select Wi-Fi;
- Turn on Random hardware addresses.
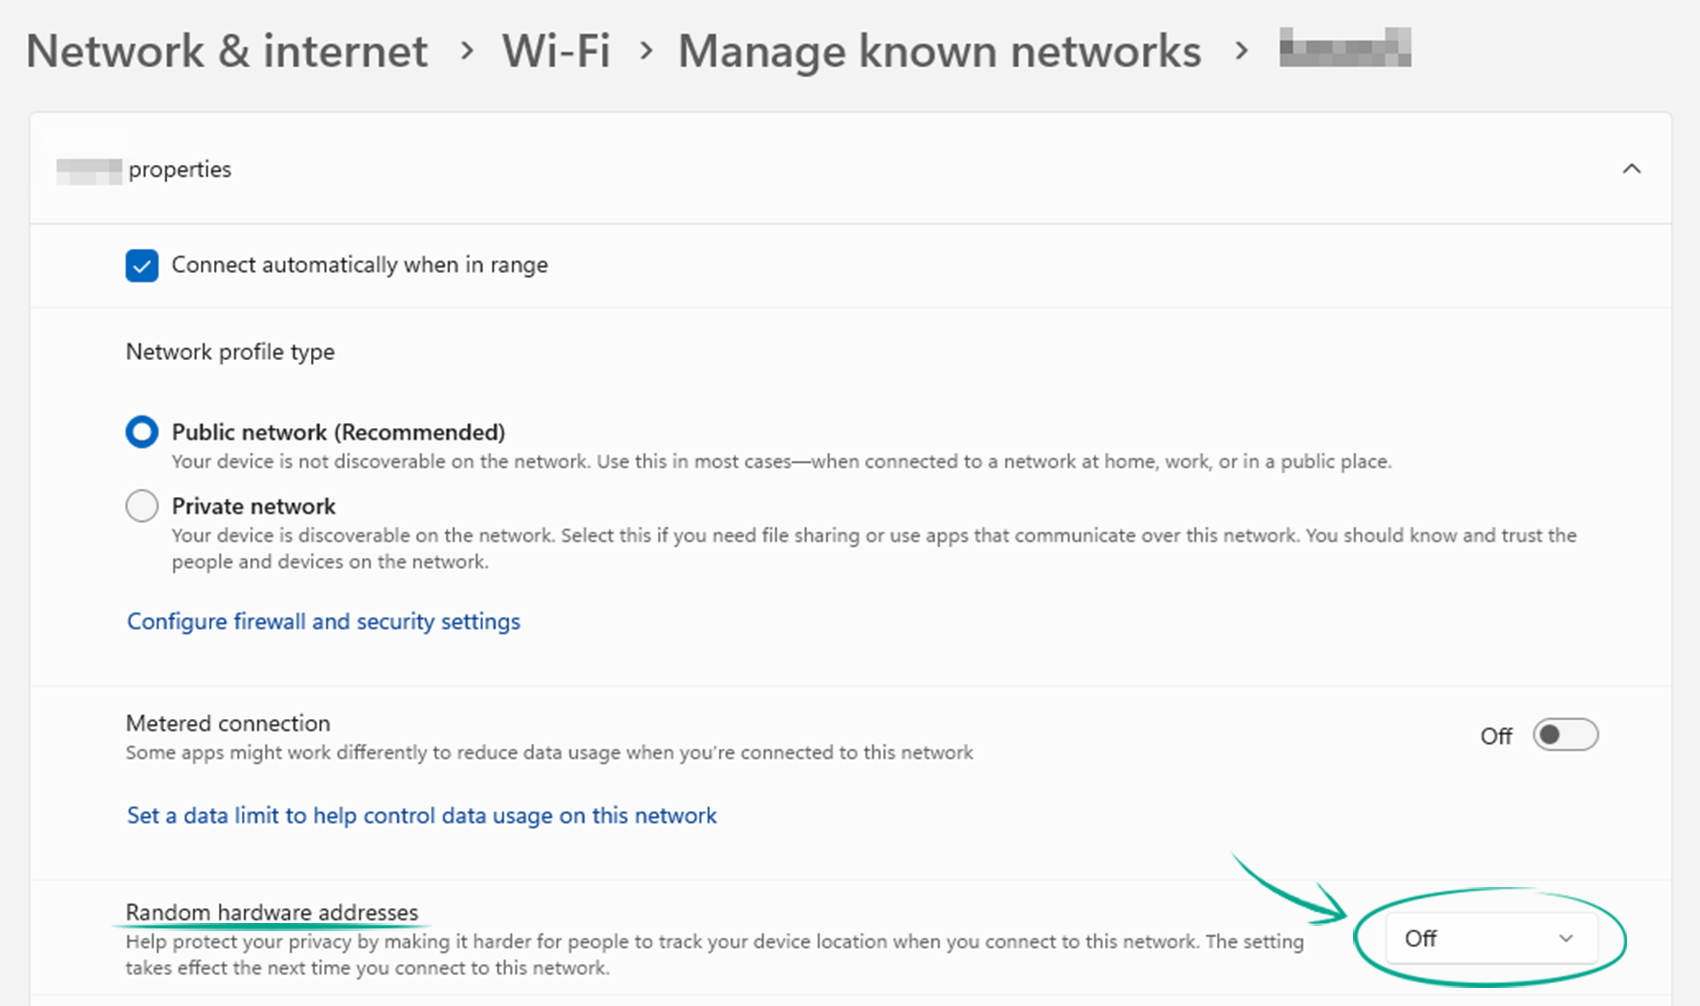
If you use MAC address filtering on your home network for greater security, you can set up your device to keep the MAC address from changing automatically whenever the device connects to the network:
- Connect to the network where you want to use a real MAC address;
- Open your system's settings by clicking the cogwheel in the Start menu or using the Windows + I key combination;
- Go to the Network & internet menu;
- Select Wi-Fi;
- Click Manage known networks;
- Select the network you want to use the current MAC address to connect to;
- Under Random hardware addresses, select Off.
How to keep corporations out of your business
What for: So that voice assistants do not spy on your conversation.
Certain Windows 11 components and apps can respond to voice commands, even when the computer is locked. Voice activation is enabled by default, and Windows 11 constantly monitors the microphone. What's more, the system and apps can send samples of your speech to developers from time to time.
The developers of voice assistants claim that this feature in no way compromises user privacy. However, if this does not sound convincing enough, you can disable voice activation:
- Open your system's settings by clicking the cogwheel in the Start menu or using the Windows + I key combination;
- Go to Privacy & security;
- Under App permissions select Voice activation;
- Turn off Let apps access voice activation services.
If you'd rather keep some of the voice activation functionality running, you can disable it on the lock screen or for certain apps only:
- Open your system's settings by clicking the cogwheel in the Start menu or using the Windows + I key combination;
- Go to Privacy & security;
- Under App permissions select Voice activation;
- To prevent your device from using voice activation while it's locked, click Let apps access voice activation services and turn off Let apps use voice activation when device is locked;
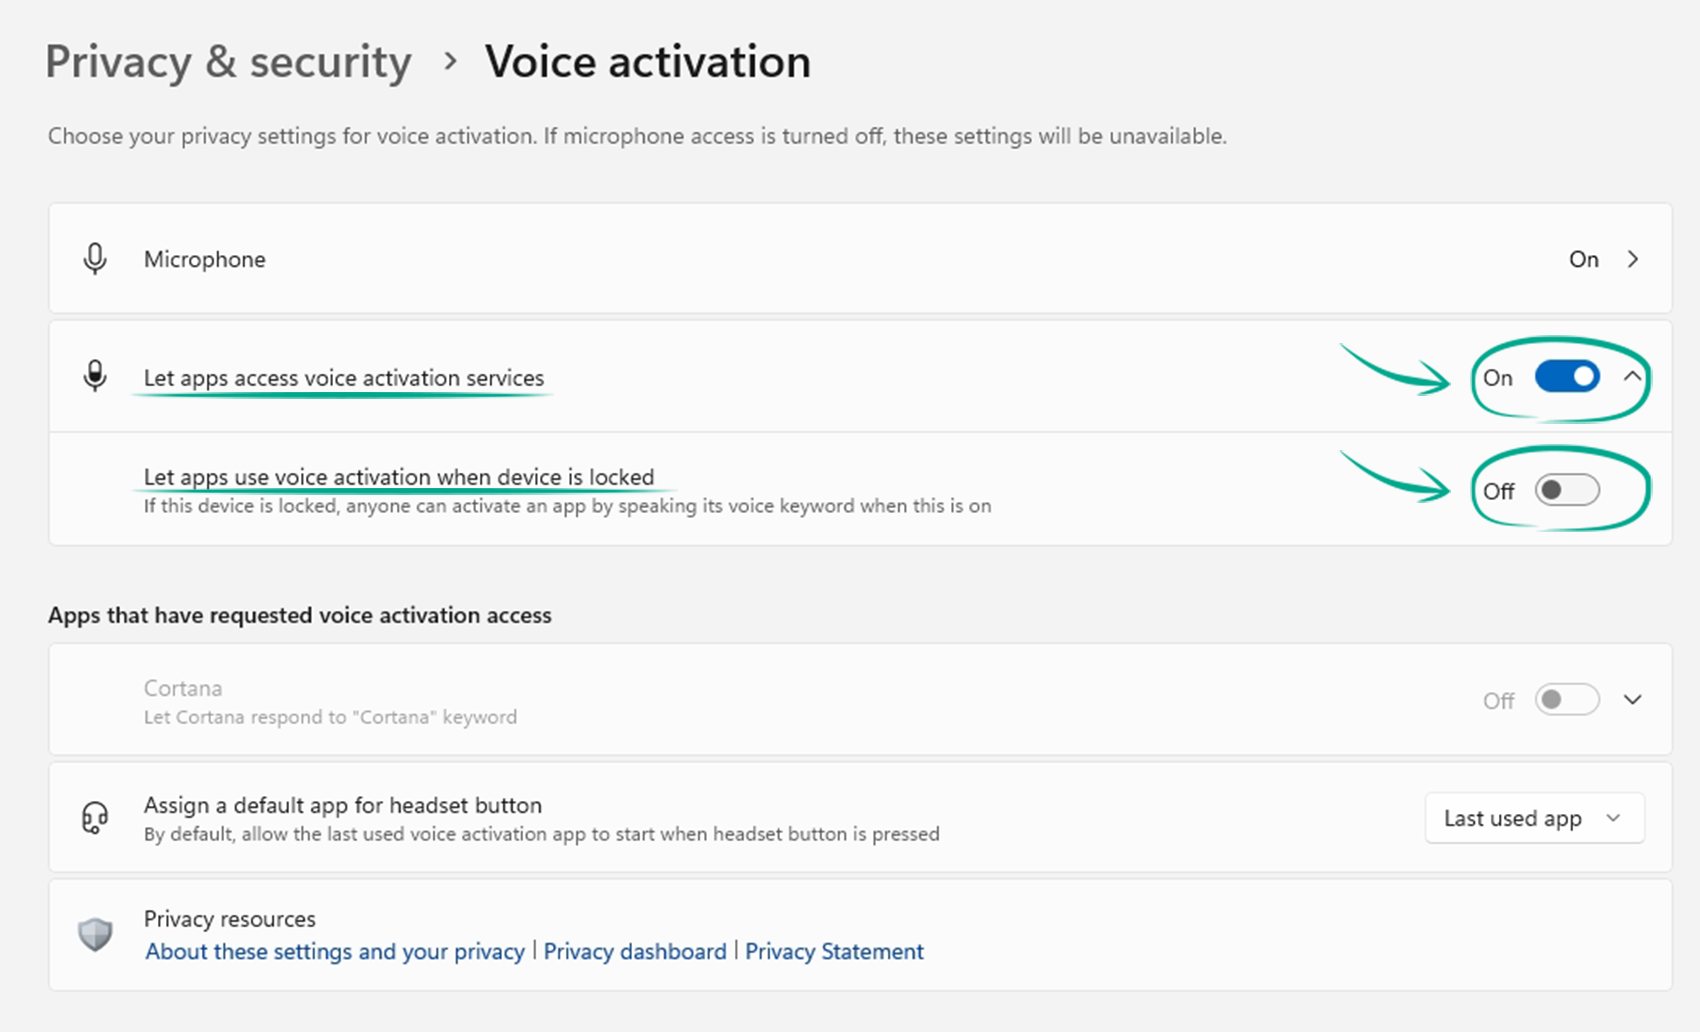
- If you want to disable voice activation for certain apps, turn off the appropriate options in the Microsoft Store app list.
Note that if you blocked apps that use voice activation from accessing your microphone, voice activation will also be unavailable. The reverse doesn't work, though: preventing an app from using voice activation does not block its microphone access.
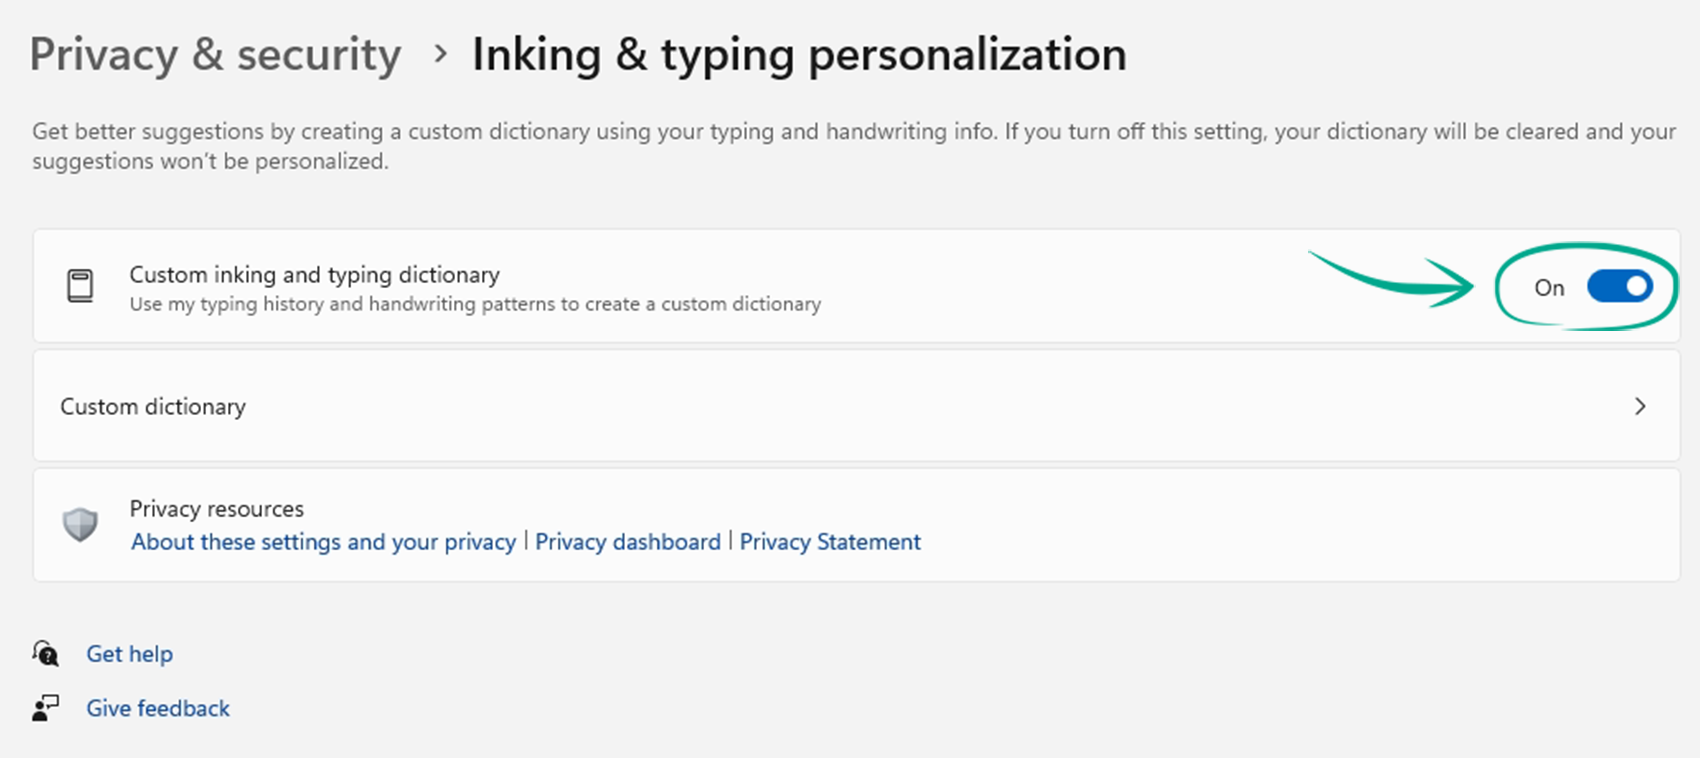
What for: So that the system does not track your typing or inking.
By default, the user dictionary is enabled in Windows 11. The system saves the unique words that you enter using the keyboard or handwriting recognition. This increases typing accuracy in Microsoft apps. The system stores the dictionary on your device, and it can share it with Microsoft. You can prevent this data from being collected if you wish:
- Open your system's settings by clicking the cogwheel in the Start menu or using the Windows + I key combination;
- Go to Privacy & security;
- Under Windows permissions, select Inking & typing personalization;
- Turn off Custom inking and typing dictionary;
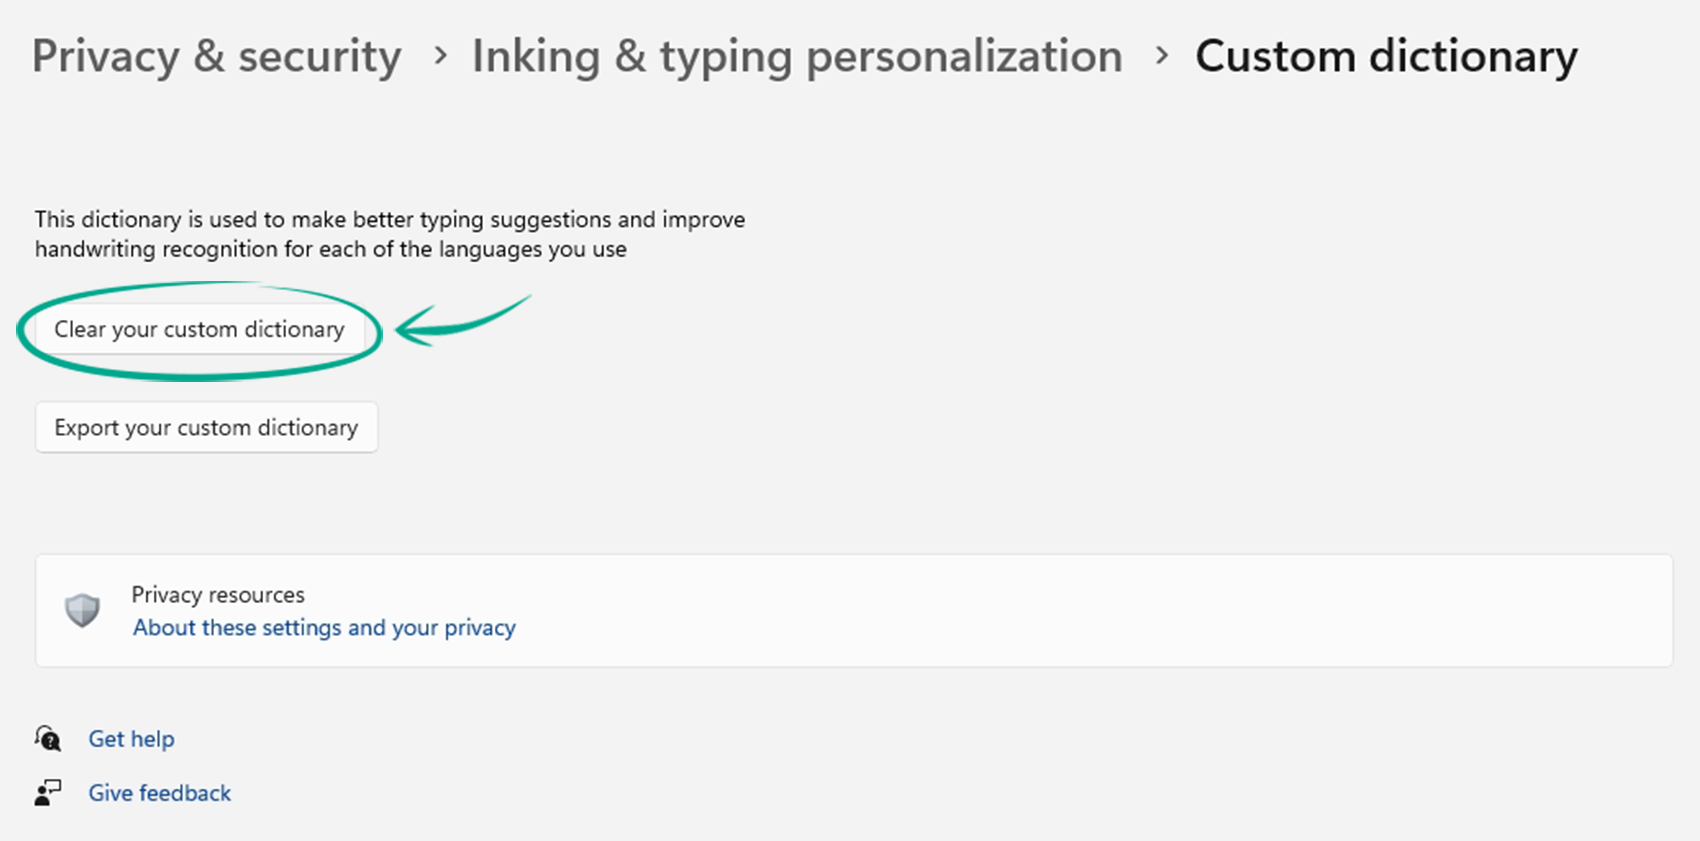
- To remove previously saved words, click Custom dictionary and then Clear your custom dictionary.
Downside: The system will not be able to use your user dictionary to recognize handwriting or provide typing suggestions in Microsoft applications.
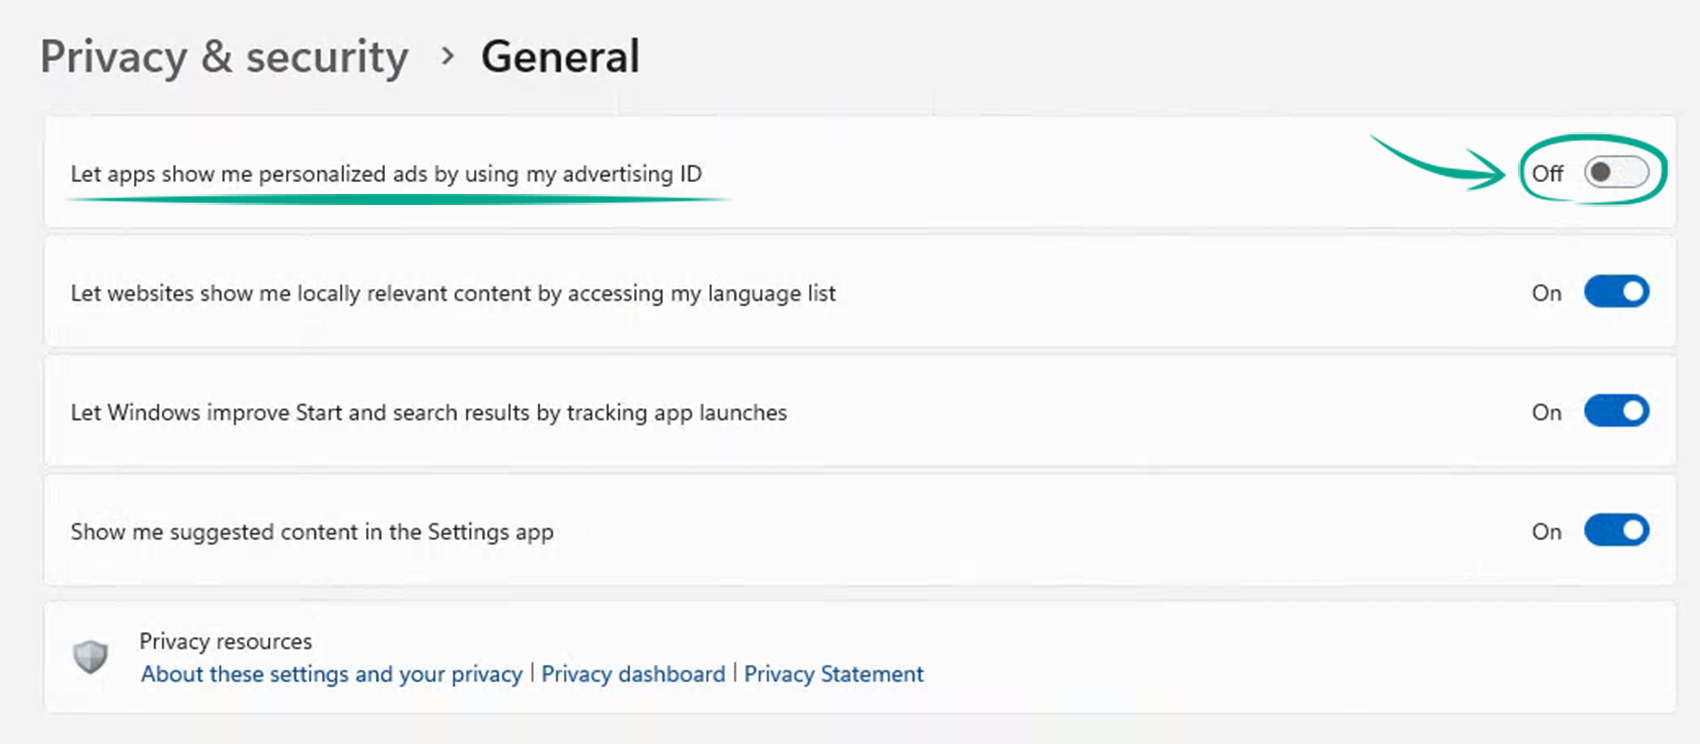
What for: So that Microsoft and advertisers do not learn too much about you.
An advertising ID is a unique code linked to your account and used for ad personalization. To prevent Microsoft Corporation and advertisers from learning too much about you, you can disable the collection of certain data for ad customization and turn off the advertising ID:
- Open your system's settings by clicking the cogwheel in the Start menu or using the Windows + I key combination;
- Go to Privacy & security;
- Under Windows permissions, select General;
- Turn off Let apps show me personalized ads by using my advertising ID to prevent apps and sites from collecting information about you to customize ads they show to you.
Note that Microsoft will keep showing you offers and ads, but they will not be personalized.
What for: To stop the OS from sending data about your computer to Microsoft.
Windows 11 shares with Microsoft certain information about the way you use the system. By default, all of it is diagnostic data, such as memory status after a system or app crash that may contain fragments of files you were using when the crash occurred, extended error logs, information about web sites you visited, and many more This is necessary for collecting statistics and improving the way certain features, such as SmartScreen, work. If you do not want to share this information with Microsoft, you can limit the amount of information that is sent and delete any collected data:
- Open your system's settings by clicking the cogwheel in the Start menu or using the Windows + I key combination;
- Go to Privacy & security;
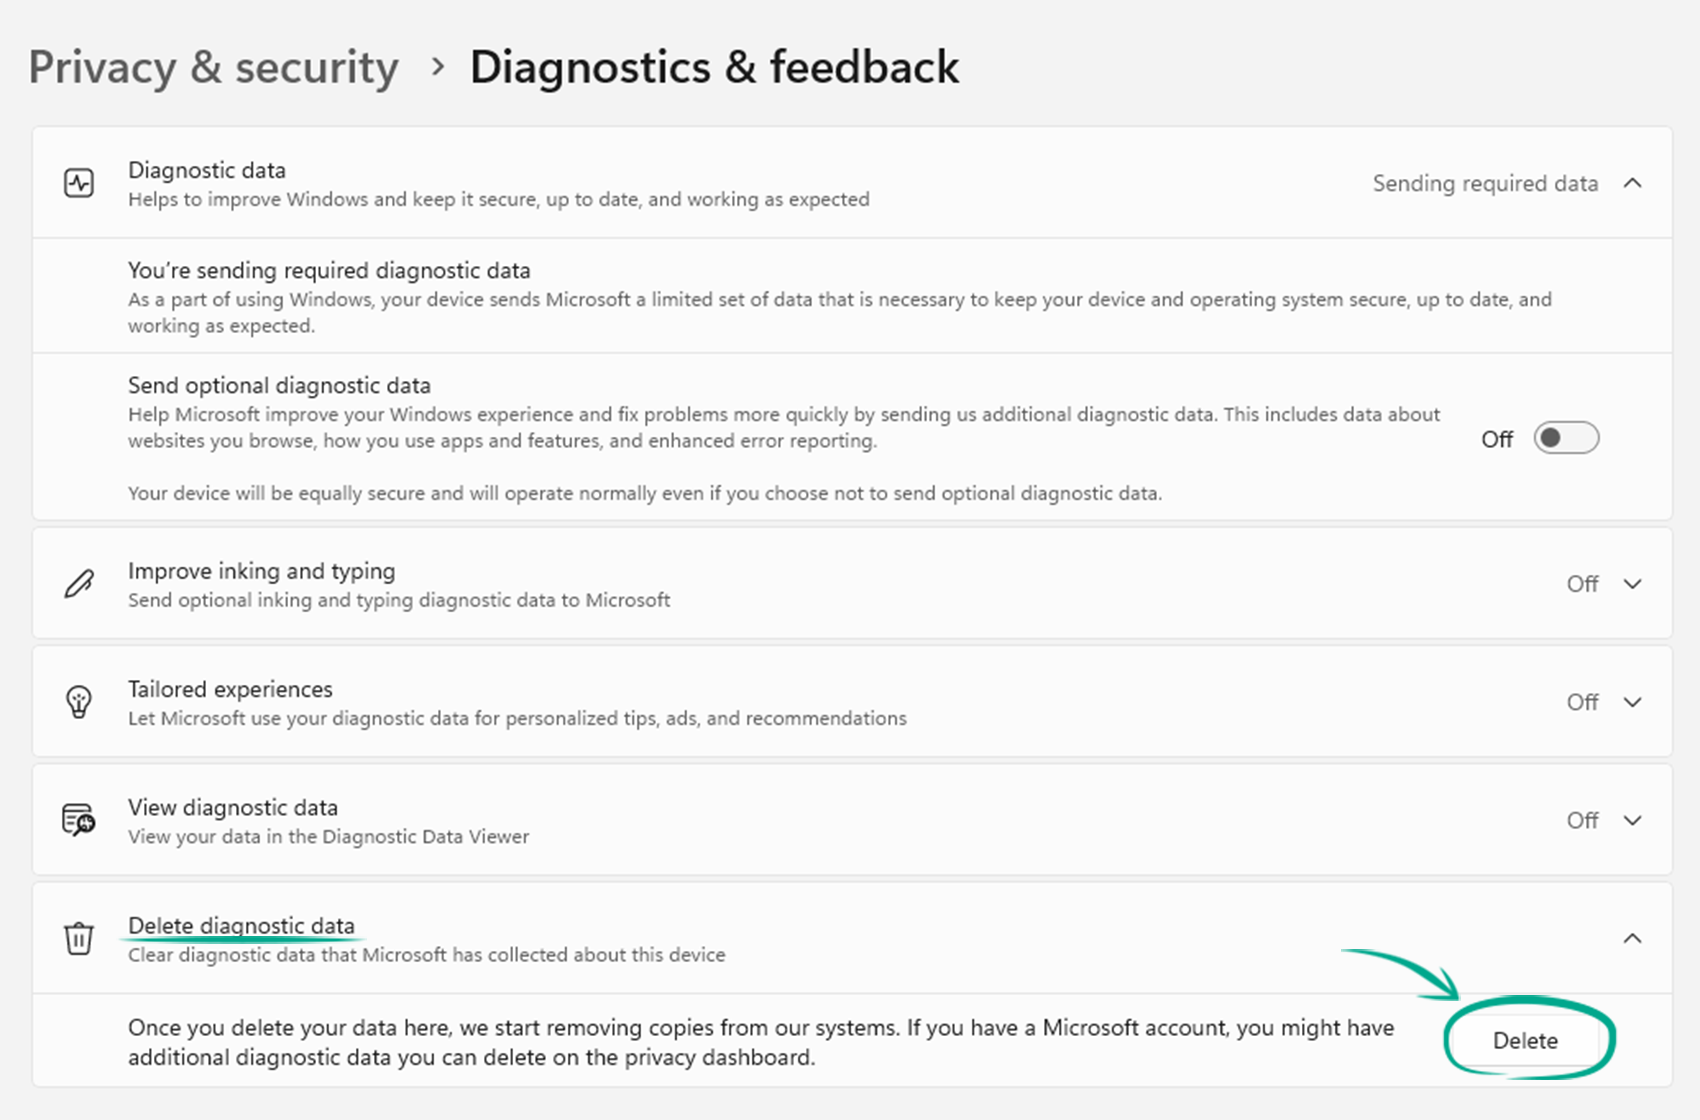
- Under Windows permissions, select Diagnostics & feedback;
- Turn off Send optional diagnostic data;
- To clear the diagnostic data log, scroll down to the Delete diagnostic data option and click Delete.
Please note: Diagnostic data is not the only kind of data that Windows collects. For example, if you do not turn off personalized typing suggestions, voice recognition or geolocation, these services will continue to transmit data about you to Microsoft.
What for: So that your computer does not store your location history.
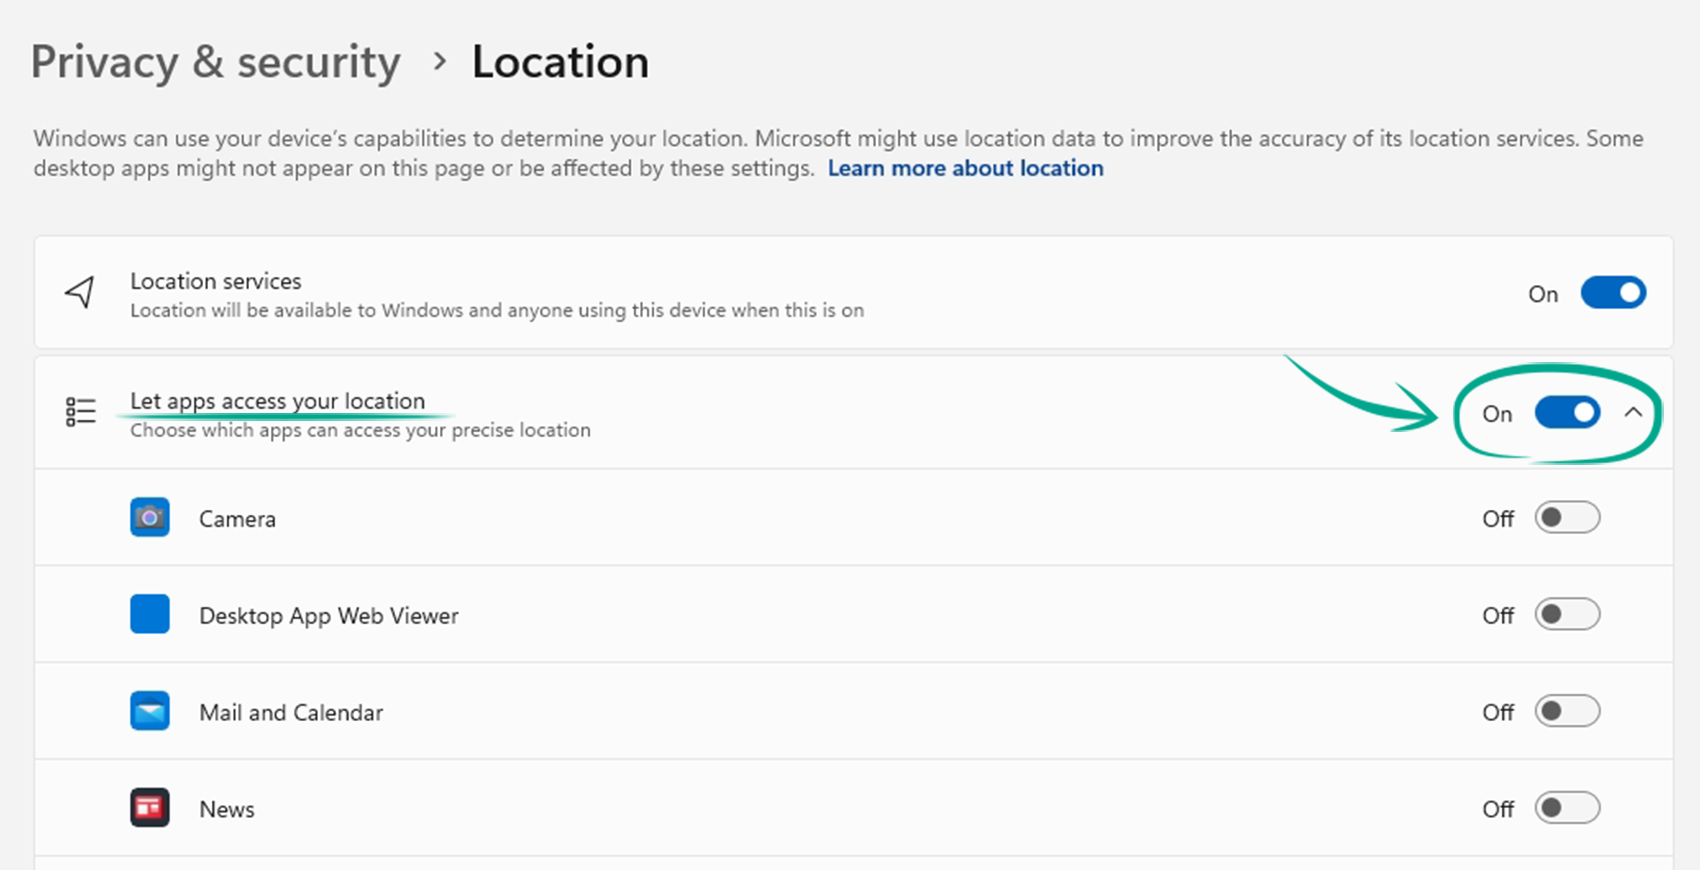
The operating system as well as some apps collect data about your location. This information is sent to Microsoft and app developers' servers, and it is also stored on your computer. The system uses geolocation data for navigation, local weather forecasts, automatic time zone detection and other features. If you do not want to share your location with Microsoft, turn off location services:
- Open your system's settings by clicking the cogwheel in the Start menu or using the Windows + I key combination;
- Go to Privacy & security;
- Under App permissions, select Location;
- Turn off Location services;
- To prevent apps from using device location data:
- For all apps, turn off Let apps access your location;
- For individual apps, turn off the appropriate options in the Microsoft Store app list.
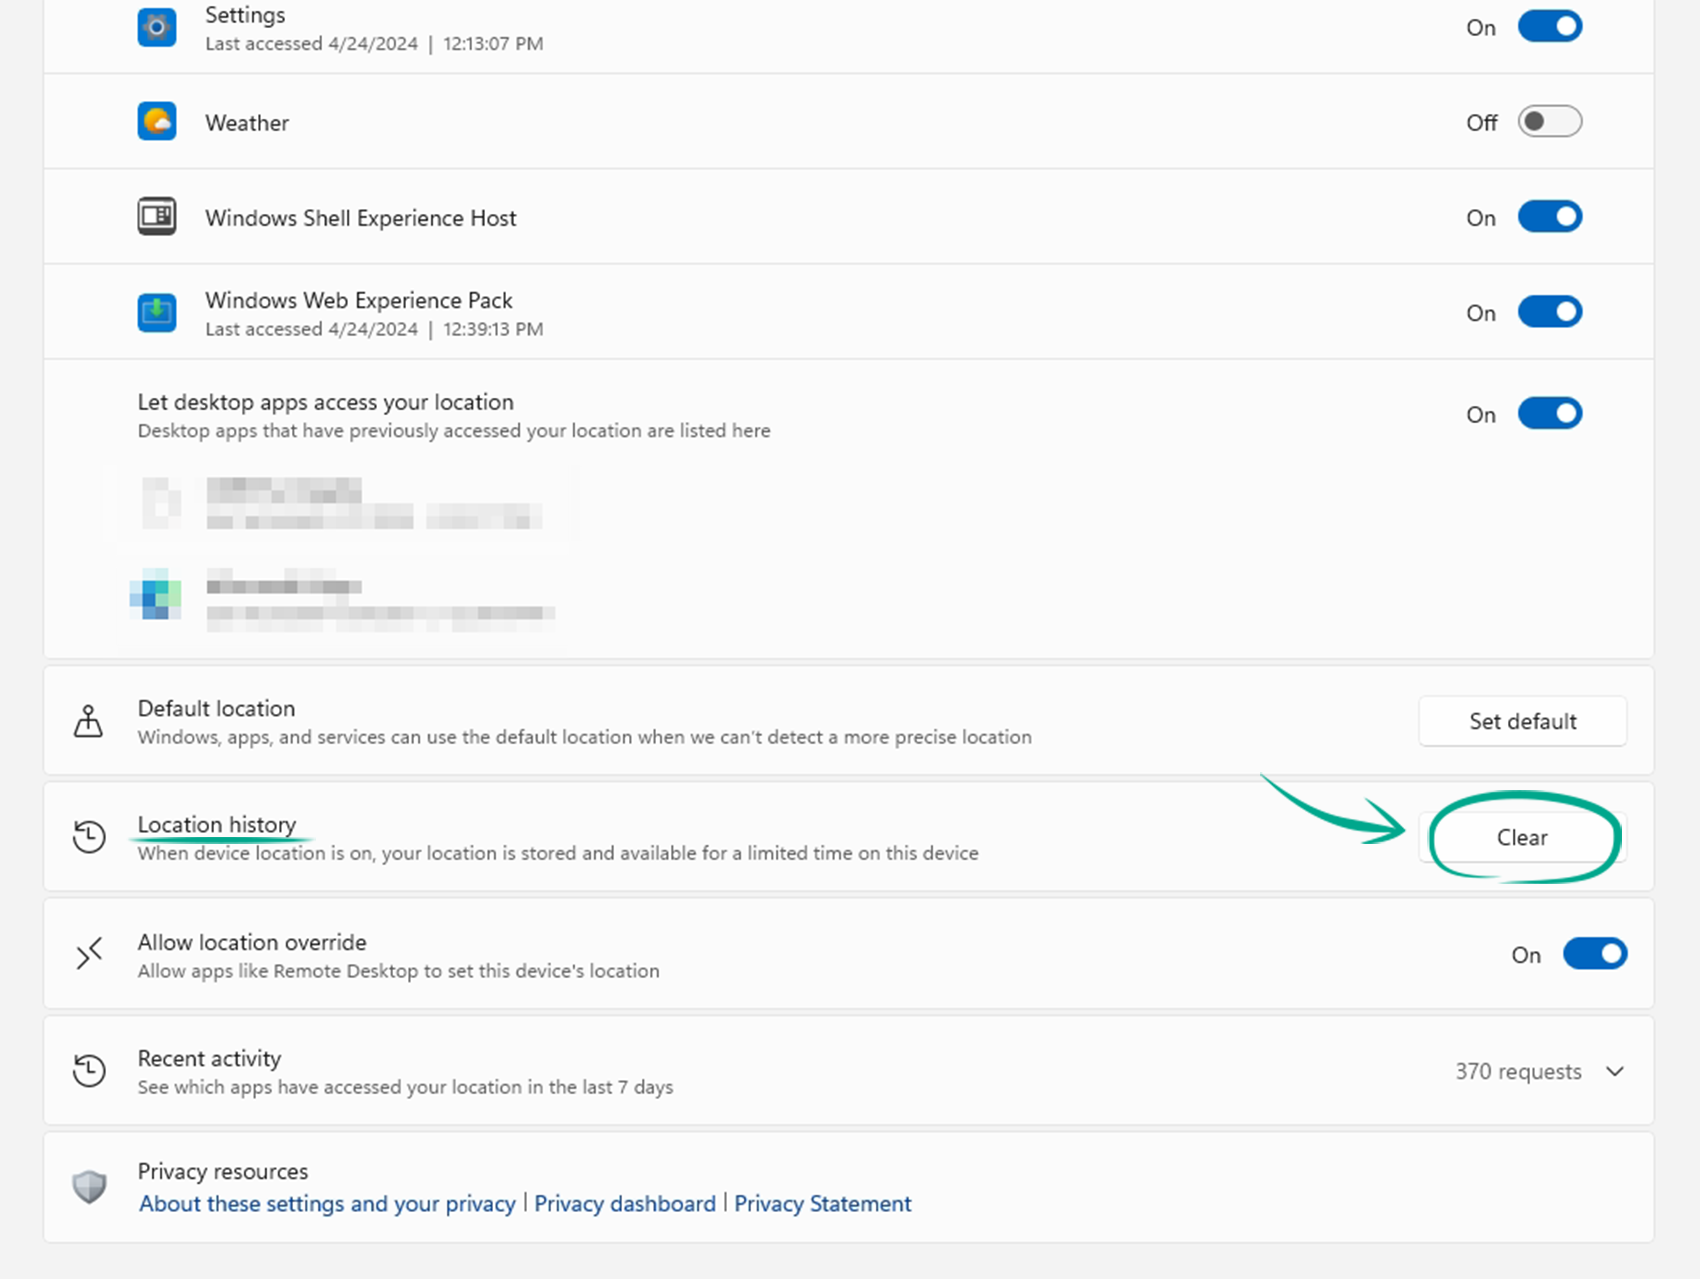
- To delete your location history from a device, find the Location history option and click Clear.
Note that even if you disable geolocation access, certain apps can still get your computer's approximate location by using Wi-Fi, Bluetooth or a cellular modem.
Downside: After you disable geolocation you cannot use the lost device search feature.
What for: So that your voice samples are not sent to Microsoft.
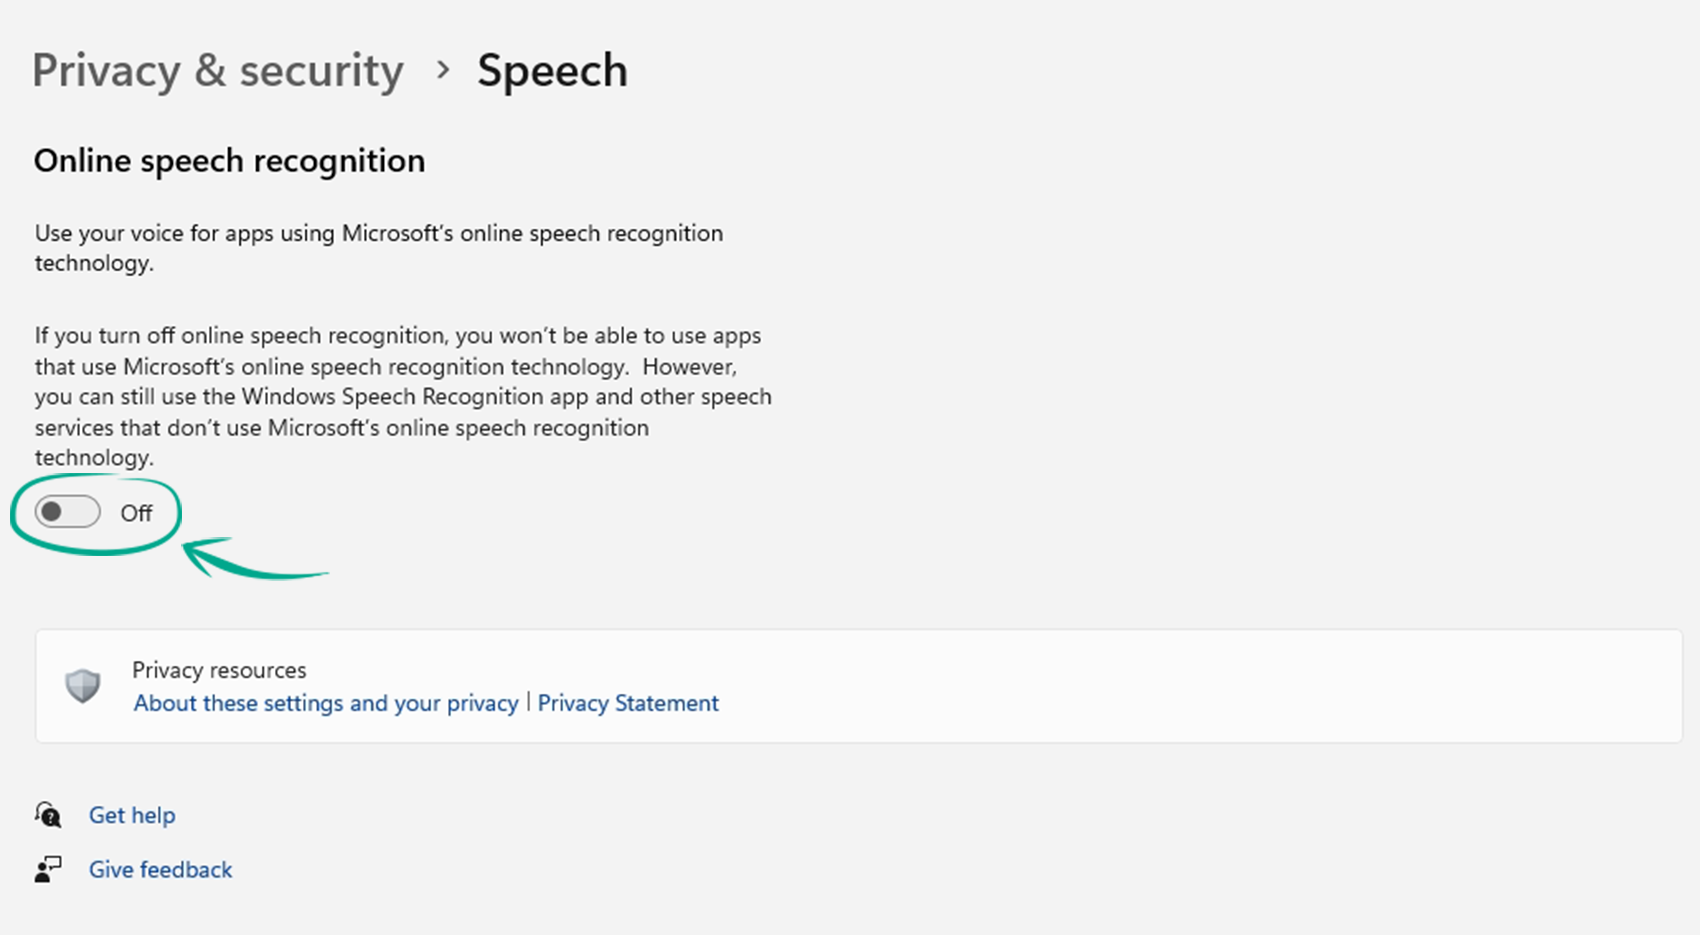
Windows 11 lets you use voice commands to control apps that support the technology, as well as for speech to text and voice search. Voice commands may be processed locally on the device or by Microsoft cloud-based services. The latter option provides more accurate command recognition. If you'd rather not share samples of your speech with Microsoft, you can turn off the cloud-based speech services:
- Open your system's settings by clicking the cogwheel in the Start menu or using the Windows + I key combination;
- Go to Privacy & security;
- Under Windows permissions, select Speech;
- Turn off the option if it's on.
Downside: Voice commands may be recognized less accurately.
If you blocked access to the microphone, voice services would be unavailable. The reverse does not work, though: preventing voice commands from being sent via cloud-based services does not block app microphone access.