
How to hide your data from prying eyes
What for: So that only you can unlock your device.
The safest way to unlock your screen is by using a password or a fingerprint scanner. A PIN code is easier to crack because it contains only numbers. A secret pattern is too easy to observe and remember. Finally, a facial recognition system can be deceived by a photo or 3D mask.
- Use a strong password that meets the following criteria:
- Is at least 8 characters long;
- Contains lowercase and uppercase letters, numbers, and special characters ($, @, etc.);
- Is not too simple, such as 12345678 or qwerty;
- Is not the same as any of your other passwords, including for your Google account;
- Is not an actual word or easy-to-guess phrase;
- Does not consist of information that strangers could easily find out (your name, date of birth, pet's name, and so forth — or those of your friends or relatives).
To set a password:
- Open Settings;
- Go to the Security & privacy section;
- Tap Device lock under Settings;
- Select Screen lock;
- Tap Password;

- Enter a strong password and tap Next;
- Enter your password again and tap Confirm;
- The system will suggest three options for displaying notifications on the lock screen:
- Show all notification content. This means you will see both the notification and the message text on the lock screen;
- Show sensitive content on unlocked screen only. You will see the notification from the app, but the text will be hidden. This is the recommended option;
- Don't show notifications. Notifications will be completely hidden on the lock screen.
You can change the notification option any time. To do so, follow these steps.
Please keep in mind that even if you are planning to unlock by fingerprint, you should first set a strong password. Your device provides the capability to sign in with a password or PIN code in case the fingerprint scanner malfunctions. A simple combination will be easy to crack if your phone ends up in the wrong hands.
To configure sign-in by fingerprint:
- Open Settings;
- Go to the Security & privacy section;
- Tap Device lock under Settings;
- Select Fingerprint Unlock;

- The system will first suggest choosing a backup login option: graphical key, PIN, or password. Select Password;
- Choose the way notifications will be displayed on the lock screen;
- Scroll to the bottom of the page that opens and tap Accept;
- Tap Start;
- Follow the on-screen directions to scan your fingerprint several times;
- Tap Done;
- You can add other fingerprints while you're at it by tapping Add a fingerprint or do it later.
App notifications can appear on the screen of your device even when it is locked. Some notifications probably contain information that you would prefer not to share. For example, you may receive a text message containing a confirmation code from your bank. You can configure your system to show only the app icon instead of a notification while your device is locked, or you can completely block the display of notifications.
To edit notification settings:
- Open the Settings menu;
- Go to the Notifications section;
- If you want to conceal the text of notifications, turn off Sensitive notifications;

- If you want to completely disable notifications during sleep mode, tap Notifications on lockscreen and select Don't show any notifications.
Downside: You will have to unlock your phone to read a notification.
What for: So that no one can unlock your device in your absence.
After your device goes to sleep, its screen turns off but it does not lock immediately. If a stranger can access your phone or tablet during this time, they can use your device without the password. Your device is locked after several seconds by default. However, you can increase this interval up to 30 minutes in your settings. We recommend that you configure your system to lock the screen immediately after your device goes to sleep.
First, check your screen timeout setting:
- Open Settings;
- Go to the Display section;
- Tap Screen timeout;
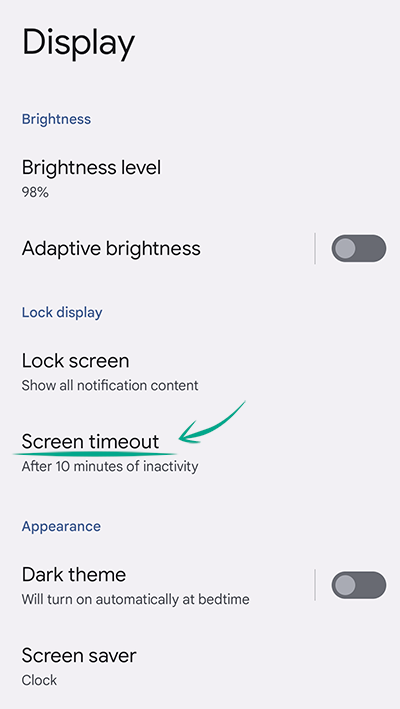
- Choose a time interval that is convenient for you;
- We suggest you refrain from activating Adaptive. This feature uses the camera to detect if anyone is looking at the screen. Images are not stored or sent anywhere.
To configure autolock:
- Open Settings;
- Go to the Security & privacy section;
- Under Device lock, tap the cogwheel to the right of Screen lock;
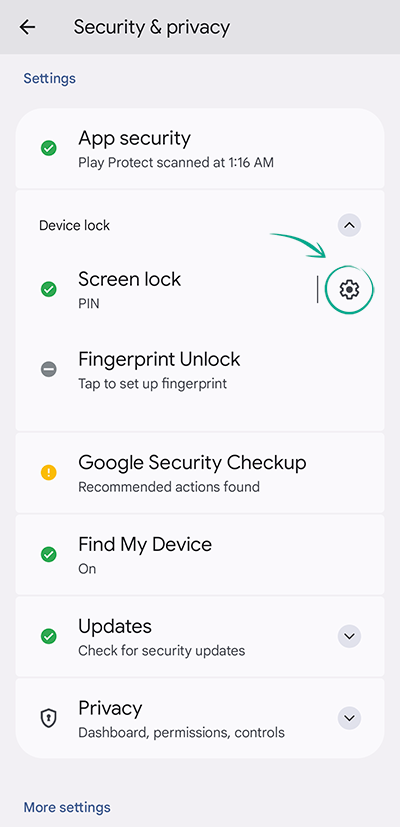
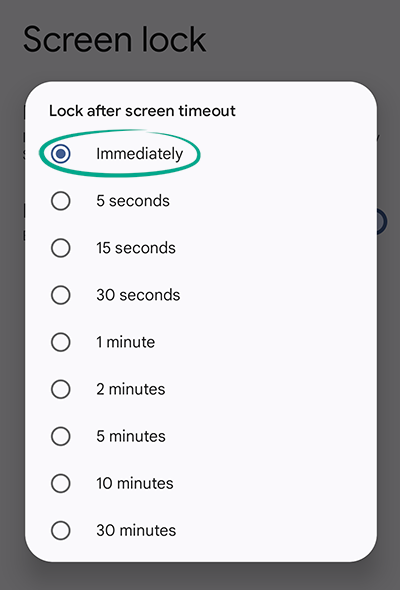
- Select Lock after screen timeout;
- In the opened list, select Immediately.
Downside: You will have to use your finger or password to unlock the device every time the screen is turned off. To make it easier to work with your smartphone, you can use the Smart Lock feature, which delays or cancels the screen lock under certain conditions:
- Open Settings;
- Go to the Security & privacy section;
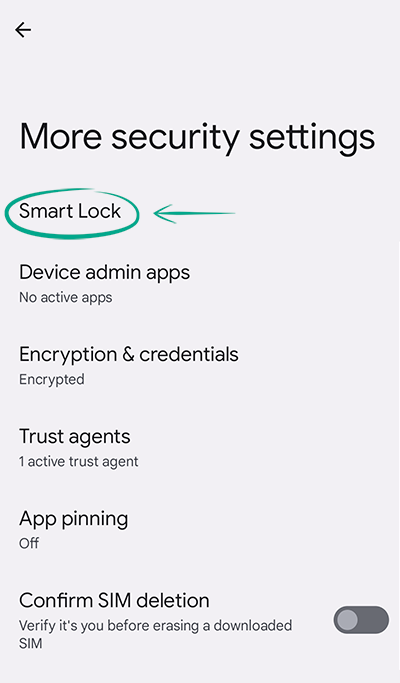
- Tap More security settings;
- Select Smart Lock;
- Enter the password;
- Tap OK;
- Choose when the autolock should not be applied:
- On-body detection. Your device will be unlocked while you hold it in your hands. Note that if the phone is in your pocket, and you are walking at a constant pace, the system interprets this as physical contact too. When you set the phone down or change your speed, it is locked after approximately 1 minute;
- Trusted places. You can use a map to indicate the places where your device should not be locked automatically, such as your home. To allow your phone or tablet to determine when you are within a secure area, you need to turn on Location. Please note that your location is determined with an accuracy of within approximately 80 meters. This means that your phone will be unlocked over a relatively large area (not just within your home but also in your yard);
- Trusted devices. You can indicate the Bluetooth devices that will prevent your phone from locking when it is connected to them. Keep in mind that the signal range may reach dozens of meters, so the phone will stay unlocked if you, say, leave it in a store and go to another store next door without turning off the trusted Bluetooth headset.
Important. Location and motion sensors have a major degree of inaccuracy, and a Bluetooth signal can extend over a relatively large distance. In addition, hackers can use special equipment to spoof location data or simulate the signal of a trusted device. Therefore, use of Smart Lock reduces your security.
How to keep your account from getting hacked
What for: To protect yourself against overly curious and malicious apps.
Your smartphone is protected by the Google Play Protect service by default. It scans all the apps that you download to your device regardless of its source. If an app is dangerous, conceals something from the user, or secretly collects private data, you will receive the appropriate notification. We recommend that you do not turn off this security tool. If you nonetheless have disabled it, you are advised to activate it:
- Open the Settings menu;
- Go to the Security & privacy section;
- Select App security; The Google Play app opens;

- Tap the gear icon in the upper right corner of the screen;
- Turn on Scan apps with Play Protect.
You can manually scan apps at any time. To do so, in the Play Protect section, tap Scan. Please note that the built-in app scanning service provides only the basic level of security. For best protection against threats, use a full-fledged anti-virus application for Android.
What for: To keep your protection up to date.
Any system may contain flaws that enable it to be hacked. Developers regularly fix vulnerabilities in the operating system and add new security functions, so you are advised to use the latest version of Android for the best security.
The system is updated automatically by default, but you can manually check for the availability of a new version at any time:
- Open Settings;
- Go to the System section;
- Select System update;
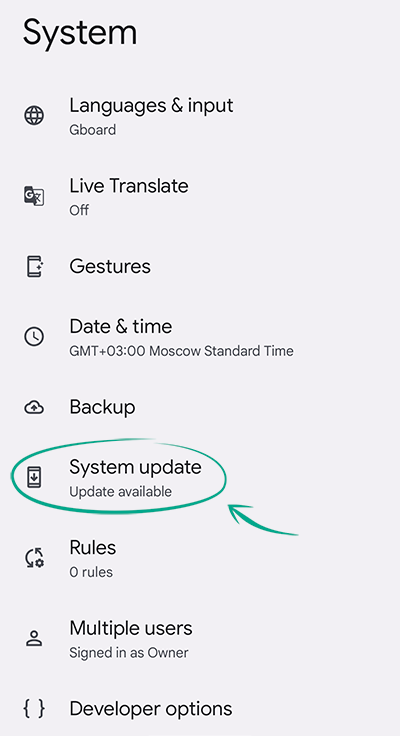
- If the system finds new updates, tap Download and install.
How to protect your data
What for: To find your device if it is lost or stolen.
This feature enables you to find your phone and lock it in case it is lost or stolen. It also lets you delete all data from your phone, call it, or contact the mobile service provider.
To enable the Find My Device feature:
- Open the Settings menu;
- Go to the Security section;
- Select Use Find My Device and enable the feature;
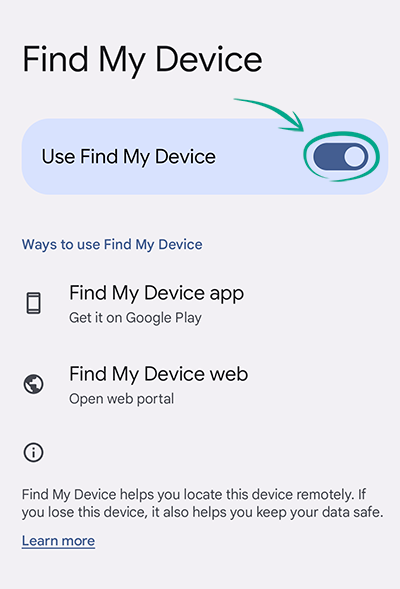
- If Location is turned off, you will see the message Turn on device location. Tap the warning text and activate location.
Please note that you will only be able to find your device if it is turned on, has an Internet connection, and is transmitting its location data.
Downside: Location services must always be enabled on your device. This means that your device will use up more battery, and your location information will be transmitted to Google.
What for: To not lose all your accounts at once.
When you sign in to an account of some service on a website or in an app, Google may prompt you to save the password so that it can be automatically inserted during your next authorization. It also lets you verify the security of your passwords that are saved in your Google account.
That is very important: if you are using identical passwords on different websites, the theft or leak of one of them could result in several of your accounts being hacked at once.
How to start a scan:
- Open the Settings menu;
- Go to the Google section;
- Tap Manage your Google account;

- Scroll to the right until you get to the Security tab;
- Under Your saved passwords, select Password Manager;

- Tap Check passwords and confirm your selection;
- On the identity confirmation window, tap Continue;
- Confirm your identity by unlocking the screen;
- On the unlocked screen, you can view, edit, or delete any passwords that have been compromised, are duplicated, or are too easy to crack.
Even though the storage is protected, data leaks are always a risk. To reduce the risk, delete your passwords from your account:
- Open the Settings menu;
- Go to the Google section;
- Select Manage your Google account;
- Scroll to the right until you get to the Security tab;
- Under Your saved passwords, select Password Manager;
- You will see a list of accounts for which you have saved passwords;
- Tap the icon of the app or website whose password you want to delete;
- Confirm your identity by unlocking the device;
- Tap Remove.
Please note that you may have also saved account credentials in other services other than Google Password Manager. They will still be available there.
Downside: You will have to manually enter your password on websites and in apps each time. You can eliminate this downside by installing a password manager with a reliable data encryption and security system.
What for: To back up your data.
On devices running Android, important information and settings may be automatically saved in Google Drive. If you lose or break your phone, you can use your backup copy to restore your contacts, text messages, call log, installed apps, and phone settings.
To enable data backup to the cloud:
- Open the Settings menu;
- Go to the System section;
- Select Backup;
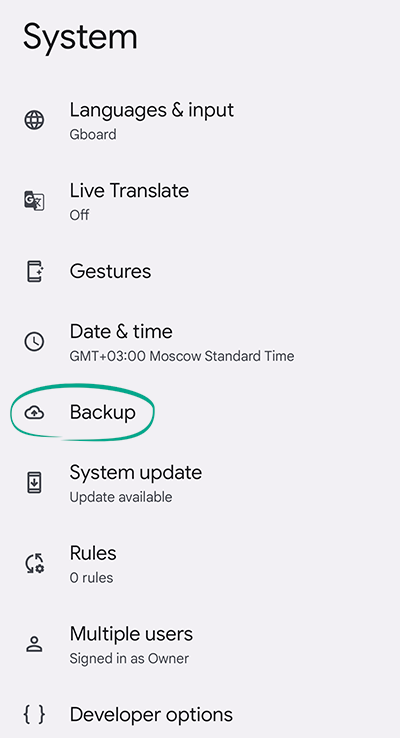
- Turn on Backup by Google One;

- To manually perform a backup, tap Backup now.
In this same section, you can enable synchronization of your photos and videos with Google Photos:
- Tap Photos & videos;
- Turn on Backup;
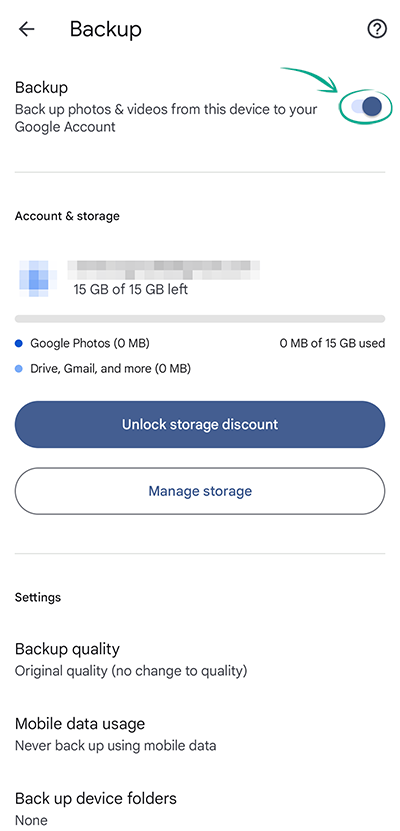
- By default, Google Photos downloads and synchronizes the contents of all folders containing photos and videos on your device. If you don't want files from a specific folder to be saved in the cloud, select Back up device folders and tap the name of the folder whose data does not need to be synchronized;
- To choose the quality of the files to be saved, tap Backup quality and select one of the following options:
- Original quality means that the photos and videos will be uploaded in their original resolution. Please note that you cannot save more than 15 GB of data in Google Drive for free;
- Storage saver means that the resolution of photos is reduced to 16 megapixels and the resolution of videos is reduced to 720p.
Downside: Saving data in the cloud increases the risk of data leaks. Do whatever you can to secure your Google account.
What for: To prevent data leaks and to not share your payment information with Google.
* Neither Google Pay nor Google Wallet currently allows adding a card issued by a Russian bank or making transactions with previously added cards, as certain international payment systems no longer support Russian bank cards.
The Google Pay* (Google Wallet in some countries) service lets you use your phone to pay for purchases via the NFC module. This can be very convenient. However, if you link a card to the service, you are providing Google with additional access to your data. For example, the company obtains the right to share your location data with your bank, and may transmit your payment data or even private information to third parties. Google also collects information about transactions and your account, including your card numbers, account numbers, and the totals of your transfers.
If you do not want your data to be stored in Google Pay / Google Wallet*, you can delete this data:
- Open the Settings menu;
- Go to the Google section;
- Select Settings for Google apps;
- Tap Google Pay / Google Wallet*;
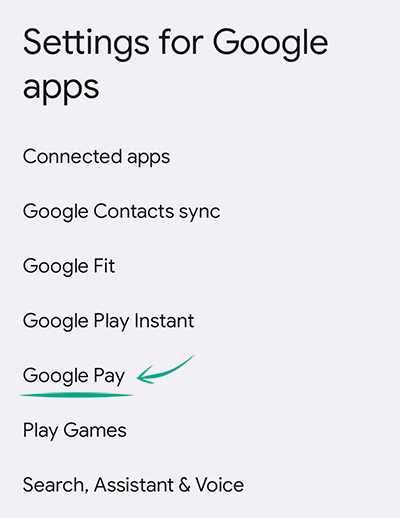
- Select a card;
- Tap three dots icon in the upper right corner of the screen and select Remove payment method;
- Select the services you want to remove the payment card from: Wallet or Wallet and Google Account;
- Tap Yes, remove.
Downside: You will not be able to use Google Pay or Google Wallet.
Note that data from your cards may still reside in other payment services, such as Samsung Pay or Play Market.
How to protect yourself from snooping
What for: So Google does not know where you go.
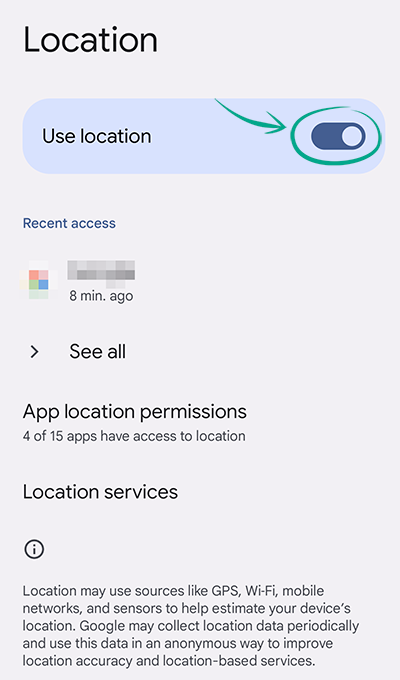
The operating system and some apps on your device collect information about your location. It is used for directions, targeted ad selection, and other purposes. If you do not want developers to receive this information, turn off Location services:
- Open Settings;
- Go to the Location section;
- Turn off Use location.
Downside: You will no longer be able to use the services and apps that require access to your location. For example, you will not be able to use navigation or find a lost smartphone with the search service.
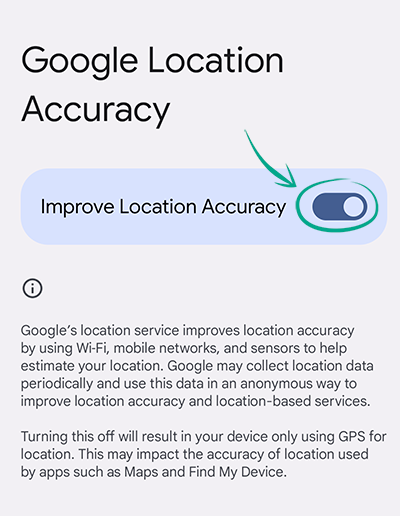
Google can determine your location via GPS, Wi-Fi signals, mobile network, and device sensors. Although this increases the accuracy of your location, it provides the company with even more of your data. To turn off this feature, do the following in the Location section:
- Tap Location Services;
- Select Google Location Accuracy;
- Turn off Improve Location Accuracy.
You can also limit the transfer of location information without completely turning it off. To do so, prevent apps from receiving access to your location information in the background:
- Open Settings;
- Go to the Location section;
- Select App location permissions;
- Tap the name of the app whose access you want to restrict;
- Select Allow only while using the app.

What for: To prevent your movements from being stored on Google servers.
Google may save a list of all the locations where you have been. This location log is used to choose targeted ads, perform searches, and some other functions. For example, this option lets you automatically receive information about traffic jams between your home and workplace. If you do not want your travel information to be saved on Google servers, you can clear this log and stop adding to it:
- Open Settings;
- Go to the Location section;
- Tap Location Services;
- Select Google Location History and turn it off;
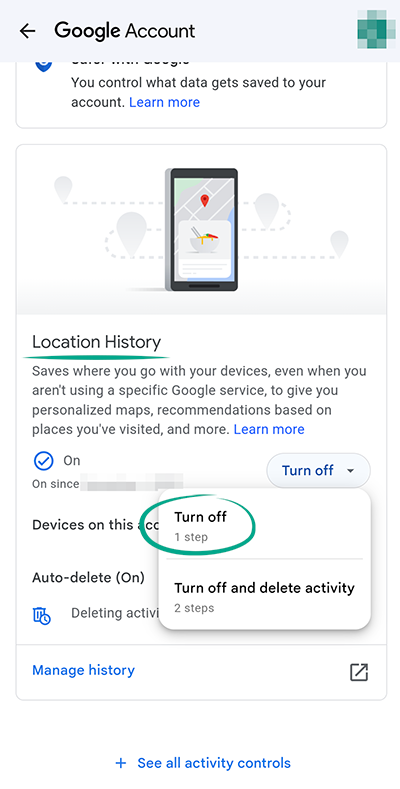
- Tap OK.
To fully clear the log:
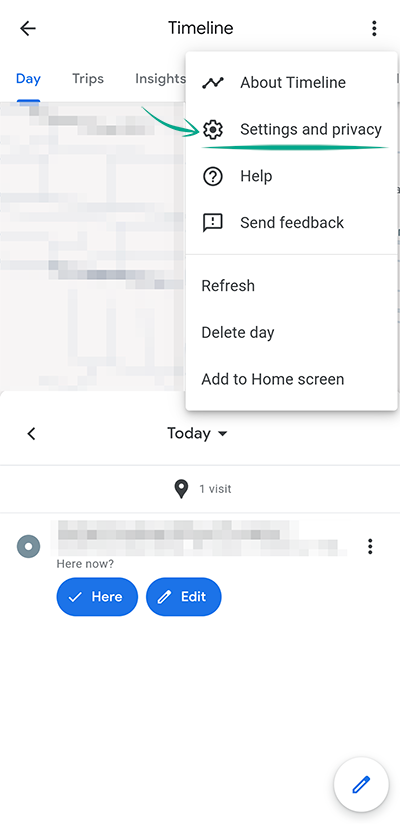
- On the Activity controls page, tap Manage history. The system will redirect you to Google Maps;
- Tap the three dots in the upper right corner of the screen;
- Select Settings and privacy;
- Under Location Settings, select Delete all Location History;
- Select the I understand and want to delete check box and confirm your selection.
To delete location data for a specific period:
- Tap Delete Location History range;
- Define the time period;
- Tap Continue;
- Select the I understand and want to delete check box and confirm your selection.
To enable automatic deletion of data every 3, 18 or 36 months:
- Tap Automatically delete Location History;
- Choose how often Google should clear the history;
- Tap Next:
- Tap Confirm.
Downside: This prevents Google from creating albums that contain photos from specific locations. Also, the system will not be able to use information about places you visited to personalize ads and search.
What for: To prevent Google from knowing who you talk to.
By default, the contacts on your phone are synchronized with your Google account. This enables you to view your address book on any of your devices in any browser in which you have signed in to your account. However, Google may use the information about your acquaintances for its own purposes, such as for choosing targeted ads. If you do not want this information to be stored on the company's servers, you can disable synchronization:
- Open the Settings menu;
- Go to the Google section;
- Select Settings for Google apps;
- Tap Google Contacts sync;
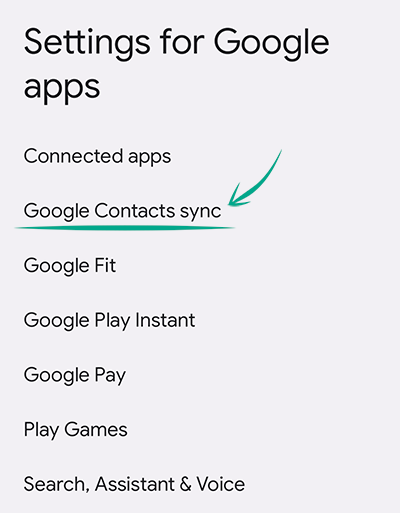
- Tap Status;
- Turn off Automatically sync.
Downside: Contacts will become unavailable on your other devices, and you will have to manually add them to a newly purchased phone.
How to hide your data from Google Assistant
What for: To prevent Assistant from exposing your secrets to others.
Google Assistant can receive commands even when your phone is asleep, and it can show search results on a locked screen. For instance, it can also display or read aloud reminders, e-mails, and contacts. This can expose your private data.
To prevent it from exposing this information, block Assistant from showing results on a locked screen:
- Open Settings;
- Go to the Google section;
- Select Settings for Google apps;
- Tap Search, Assistant & Voice;
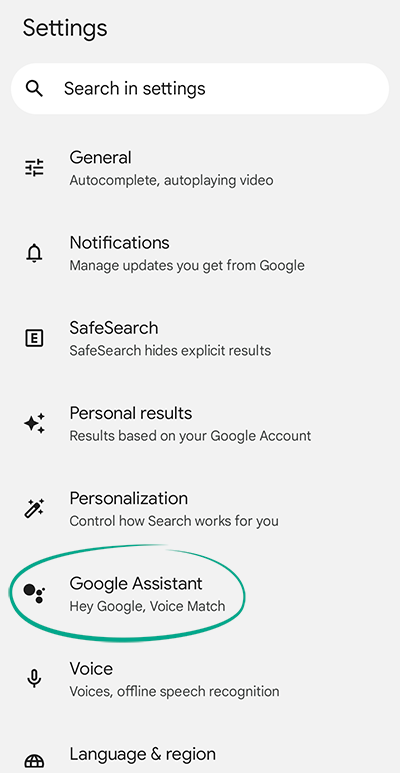
- Select Google Assistant;
- In the Popular settings section tap Personal Results and turn it off.

What for: To prevent Assistant from knowing your every move.
Google Assistant can collect information about your search queries, location, and your activities when using apps. This data is used to increase the accuracy of recommendations and personalization of Google services. You can prevent Assistant from accessing this data:
- Open Settings;
- Go to the Google section;
- Select Settings for Google apps;
- Tap Search, Assistant & Voice;
- Select Google Assistant;
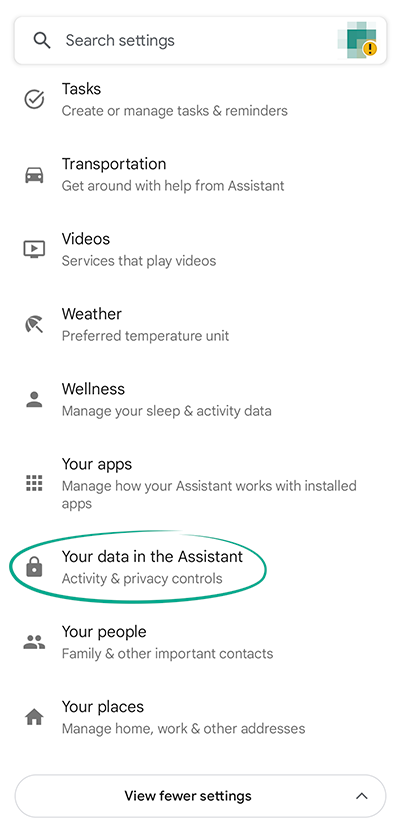
- Scroll down the page to Your data in the Assistant;
- Scroll down to Google-wide info & controls;
- Tap Web & App activity;
- Tap Turn off (1 step);

- To clear the activity log, tap Turn off (3 steps) instead of Turn off (1 step);
- Tap Next;
- In the app list, select Google Assistant;
- Tap Next;
- Tap Delete.
Assistant will still be able to search for information. However, the search results and recommendations will not include your preferences.
What for: To prevent Assistant from gathering information about you.
If you do not want Google Assistant to save data about you and transmit it to developers, you can completely disable it:
- Open Settings;
- Go to the Google section;
- Select Settings for Google apps;
- Tap Search, Assistant & Voice;
- Select Google Assistant;
- Scroll down the page until you get to the General section and select your device from the list;
- Turn off Google Assistant and tap Disable.
To delete all your activity history, tap the three dots in the upper right corner of the screen:
- Select Web & App Activity;
- Under Web & App Activity, find See and delete activity. Tap View all;
- Tap Filter by date & product;
- In the drop-down list at the top of the page, select All time;
- In the Filter by Google product list, select Google Assistant and tap Apply;
- Tap Delete results;
- Tap Remove.
Downside: After turning off Assistant, you will not be able to use its tips, voice search, or other capabilities of this service. If you are not ready to stop using it completely, you can limit some of its functions.
What for: To prevent Assistant from knowing which apps you use.
Google Assistant can save data on installed apps, such as the names and version numbers. This enables the service to better determine how to execute your command. For example, it identifies which player should be used to play a movie or music.
To block Assistant from accessing information about installed apps:
- Open Settings;
- Go to the Google section;
- Select Settings for Google apps;
- Tap Search, Assistant & Voice;
- Select Google Assistant;
- Scroll down the page to Your data in the Assistant;
- Scroll down to Google-wide info & controls;
- Tap App info from your devices;

- Turn off the toggle switch.
Downside: Assistant will not be able to determine which app is most suitable for executing a command. For example, this could prevent it from playing music via the player that you use the most.
What for: To prevent Assistant from knowing who you talk to.
Information about your contacts enables Voice Assistant to choose who to call when you voice a command such as "OK Google, call mom." However, data from your address book is sent to Google servers.
To stop Assistant from accessing this data:
- Open Settings;
- Go to the Google section;
- Select Settings for Google apps;
- Tap Search, Assistant & Voice;
- Select Google Assistant;
- Scroll down the page to Your data in the Assistant;
- Scroll down to Google-wide info & controls;
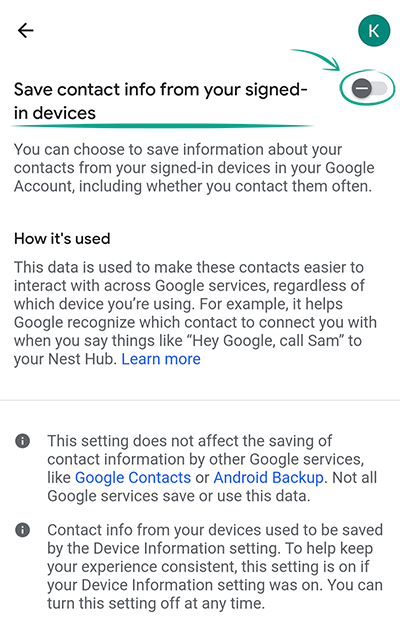
- Tap Contact info from your devices;
- Turn off the toggle.
What for: To prevent Assistant from recording your voice commands.
Google Assistant may send samples of your voice to developers to improve the accuracy of voice recognition. You can opt out of this:
- Open Settings;
- Go to the Google section;
- Select Settings for Google apps;
- Tap Search, Assistant & Voice;
- Select Google Assistant;
- Scroll down the page to Your data in the Assistant;
- Scroll down to Google-wide info & controls;
- Tap Audio recordings;
- Under Web & App Activity, turn off the Include voice and audio activity option;
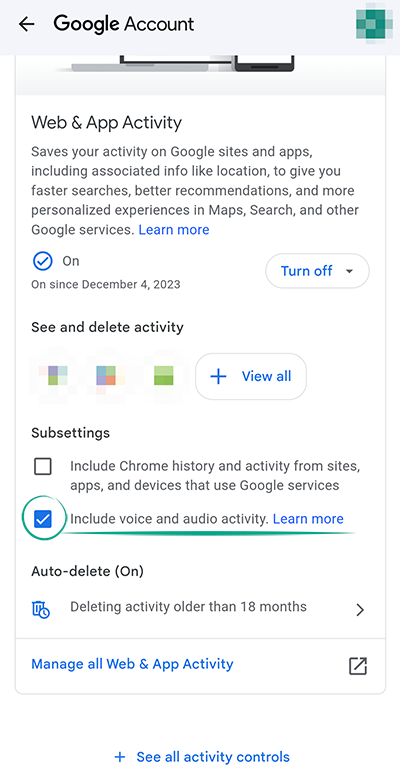
- Scroll down and tap Stop saving.
How to take control of apps
What for: So that developers collect less information about you.
Apps often request more permissions than they require for their operation. Normally, this is because developers want to collect as much data from you as possible and use that data for advertising. Some applications may blatantly abuse these permissions. For example, they may send text messages, make phone calls, or take photos and videos without your knowledge. You should only grant these permissions if you are sure that they are absolutely necessary.
Fortunately, in the latest versions of Android, an app can be installed and started even without being granted all the permissions they request. For example, if a messenger requests permission to access your camera but you do not intend to send any photos or videos to your friends, you can deny this permission.
To check the permissions of apps and revoke unnecessary access:
- Open Settings;
- Go to the Security & privacy section;
- Select Privacy;
- Tap Permission manager;

- Select the relevant permission. To see the entire list, tap Additional permissions;
- Tap the app name and select Don't allow to revoke its access.

If you attempt to revoke a permission that an app requires to continue working properly, you will see a warning. Even in this case, you can still deny access if you are confident in your decision.
You can always grant an app any necessary permissions again if it fails to start or fails to support the features you need.
What for: So that malware does not replace a familiar service.
Every important action on your device is assigned to a specific app. For example, even if you have multiple browsers, websites will be loaded in only one of them by default. These apps are referred to as your default applications. Malicious applications may attempt to obtain this status so that they can intercept text messages from your bank, for example.
You can check which apps are assigned as your default apps. If a specific function is performed by an application that you do not recognize, we recommended that you change it:
- Open Settings;
- Go to the Apps section;
- Select Default apps;
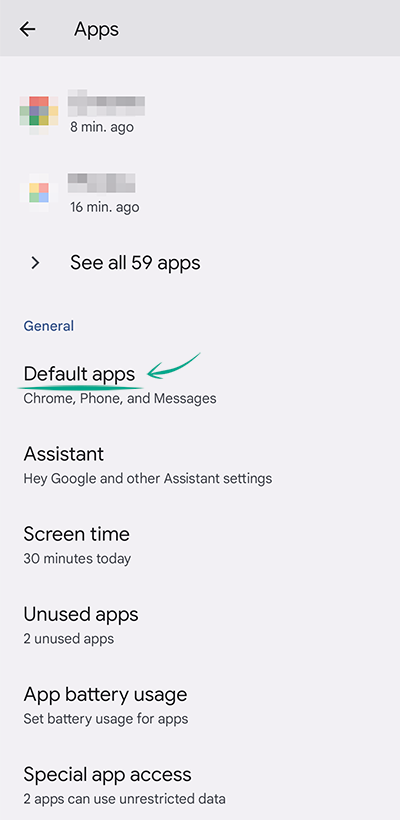
- If you see that a specific function is handled by an app that you do not recognize, tap it and select a different one.
What for: To prevent abuse of those rights.
Special access rights enable apps to work in the background, display images over other apps, use mobile Internet without limitations, send fee-based text messages, and even modify device settings.
Some services genuinely require these privileges. For example, an exercise app needs to work in the background so that it can track how far you run. However, some applications abuse these permissions. As an example, the permission to display windows over other apps helps malware steal data. When you are about to enter your bank card number and security code, a Trojan can covertly insert its own entry box over the app interface and intercept this information.
To check which applications have special access rights:
- Open Settings;
- Go to the Apps section;
- Tap Special app access;
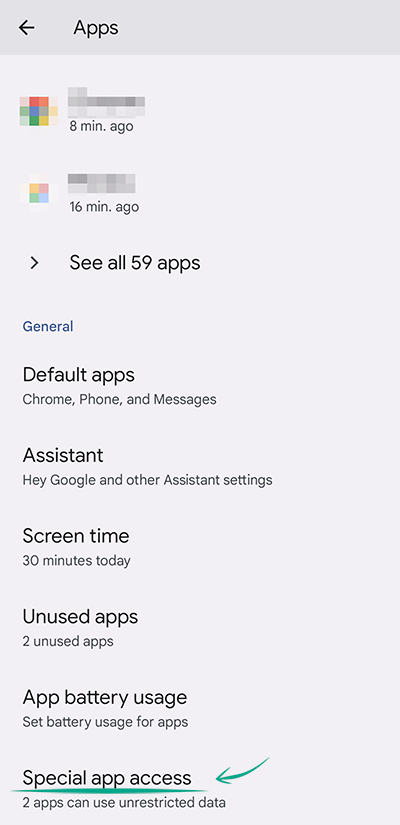
- Check all permissions in the list and revoke them from those apps that you do not trust;
- Tap the name of the app;
- Revoke the permission.
If you attempt to revoke a permission that an app requires to continue working properly, you will see a warning. You can restore any revoked permissions at any time.
How to get rid of unwanted notifications and ads
What for: To keep your peace of mind.
Some apps may send you a large number of notifications that could be distracting and irritating. An endless flow of notifications could also cause you to easily miss something that is actually important.
You can disable certain types of notifications or completely block apps from sending them:
- Open the Settings menu;
- Go to the Notifications section;
- Tap App settings;
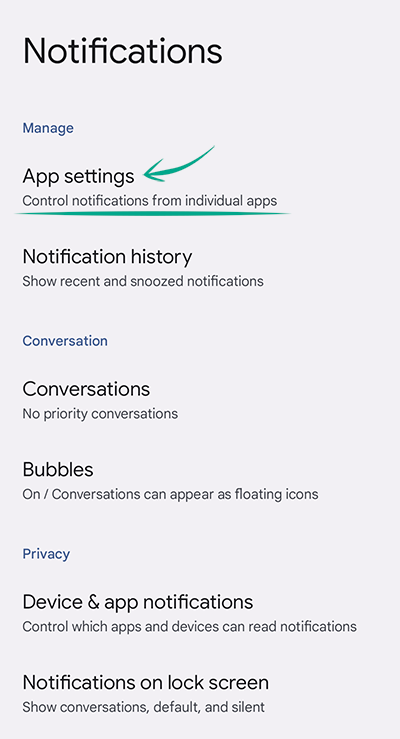
- In the list of apps, select the one that distracts you the most. You can use the Most frequent filter;
- If you want to completely block an app from sending notifications, deactivate the toggle for All notifications;
- If you want to block only certain notifications, deactivate the toggles next to the relevant events.
If you are irritated by notifications but do not know which app is sending them, you can view all the recent notifications and disable the unnecessary ones:
- Open the Settings menu;
- Go to the Notifications section.
Tap Notification history. You can configure notifications of specific apps directly from the notification itself. To do so, when you receive a notification:
- Swipe the screen from top to bottom;
- Tap and hold your finger on the notification that you want to configure;
- When the gear icon appears, tap it;
- If you want to completely turn off all notifications from the app, disable Allow notifications.
What for: To prevent Google and apps from knowing what you like to do.
Google services may use your account data and information about your activities to select targeted ads. If you do not want to see ads based on your interests, you can disable personalization:
- Open Settings;
- Go to the Google section;
- Tap Manage your Google Account;
- Scroll to the right until you get to the Data & privacy section;
- Under Personalized ads, tap My Ad Center;
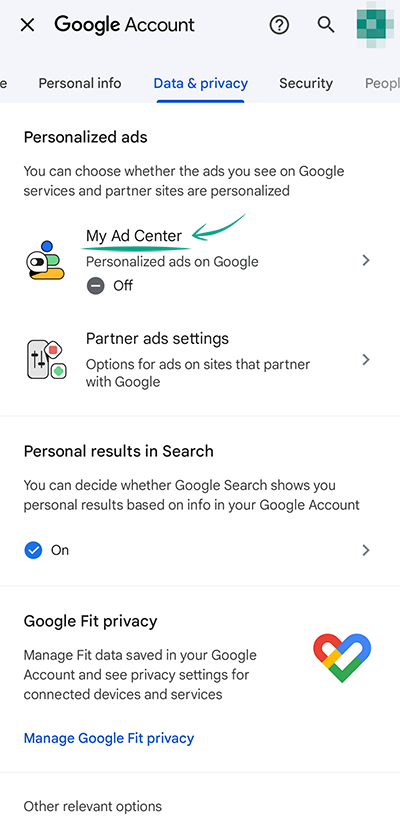
- At the top of the page, you'll see Personalized ads. Tap On;
- Tap Disable;
Please note that even if you disable personalization, you will still see ads, just not ones based on your interests. Instead, Google will take into account your location and the websites you have visited.
In addition, you can block Google and its partners from choosing the targeted ads that you see on websites, even if you are not signed in to your Google account. To do that:
- Under Personalized adds, tap Partner ad settings;
- Turn off Get personalized ads when you visit sites that partner with Google;
- Scroll down and turn off Also save data in your Google Account from sites and apps that partner with Google.
Keep in mind that companies that don't partner with Google will still be able to track your online activity and use the data collected this way.
What for: To block out notifications.
If notifications tend to ruin your concentration, you can enable Do Not Disturb mode. In this mode, you will not receive alerts regarding notifications.
To manually turn on Do Not Disturb:
- Open the Settings menu;
- Go to the Notifications section;
- Select Do Not Disturb;

- Go back to the previous screen using the arrow and tap Turn on.
Important. After you manually enable Do Not Disturb mode, you will not receive any notifications until you disable this mode in the settings.
If you do not want to miss an important call or message, you can configure a list of exclusions in the menu:
- Tap People and select Calls or Messages depending on which notifications your exclusion will apply to;

- Select from whom you want to always receive notifications regarding calls or messages:
- From anyone;
- From contacts only;
- Starred contacts. To add a contact to the starred list tap the gear icon next to Starred Contacts, then Add starred contacts.
Under Alarms & other interruptions, you can choose if you want to hear the alarm signal, touch sounds, get calendar event notifications and so on when Do Not Disturb is on.
If you want to block automatically notifications at nights or during events from your Calendar in the Do Not Disturb menu:
- Select Schedules;

- If you do not want notifications to disturb you at night, tap Sleeping.

- By default, Do Not Disturb mode is enabled every night from 10PM to 7AM. To set up a custom schedule, tap the name of the menu item. In the opened menu, you will be able to specify the days of the week and the time;
- If you do not want to be distracted by notifications during events from your Calendar, tap Event. To select a calendar or set up schedule exceptions, tap the name of the menu item.
What for: To prevent your dependence on devices from interfering with your life.
If you find it hard to pull yourself away from your device screen even during family dinner or before bed, you can use Bedtime mode. During the selected time, the system will go into a special mode and you will have less temptation for distractions.
To turn on Bedtime mode:
- Open the Settings menu;
- Go to Digital Wellbeing & parental controls;
- Tap Bedtime mode;

- You can enable Do Not Disturb for Bedtime Mode if you want to;
- Tap Next;
- Configure Bedtime Mode to your liking and tap Done;
- You can allow the application to make a summary of your sleep.
During this time, the screen will be black-and-white, and you will not receive notifications.
Please note that your defined settings for exclusions and schedules will be applied for Do Not Disturb mode.
What for: Less distraction.
If you are worried that you spend too much time using a specific app, you can set a limit on its usage:
- Open the Settings menu;
- Go to Digital Wellbeing & parental controls;
- To limit the time spent in a specific app, tap Dashboard;

- Select an app from the list;
- Tap App Timer and specify how much time you want to use the app.
When this period expires, the app will close and will be unavailable until the end of the day. However, if you suddenly need to use the app immediately, you can always delete the timer in this same menu.