


How to keep your account from getting hacked
What for: So that attackers cannot crack it.
A Google account lets you synchronize music, photos, contacts, and other data across devices. However, if it is hacked, criminals will gain access to all of that data. Another danger is that if someone has access to your Google account, they can remotely lock out any connected devices and erase all data from them.
Make sure that your account is protected by a strong password that complies with the following requirements:
- Is at least 8 characters long;
- Contains lowercase and uppercase letters, numbers, and special characters ($, @, etc.);
- Is not an actual word or easy-to-guess phrase;
- Is not the same as your passwords for any other accounts;
- Does not consist of information that strangers could easily find out (your name, date of birth, pet's name, and so forth — or those of your friends or relatives).
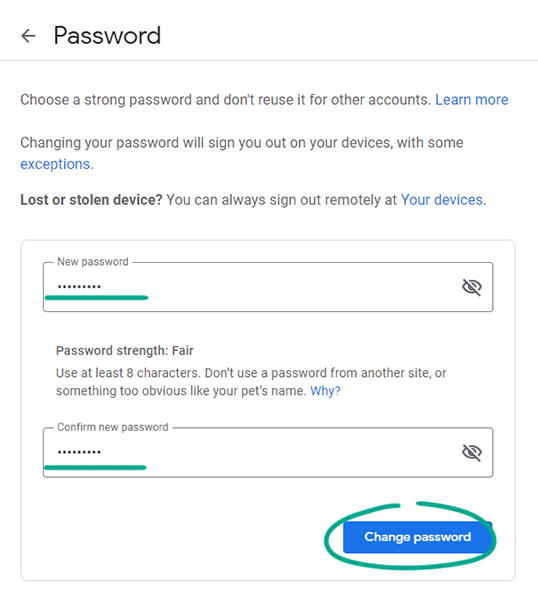
To change the password:
- Go to the Manage my Google Account page: https://myaccount.google.com;
- In the menu on the left, select Personal info;
- Click Password;

- Enter the current password for your Google account.
- If you have activated identity verification using a trusted device or two-step verification, you’ll have to pass the verification step instead of entering a password;
- Enter a new strong password twice and click Change password.
What for: So you definitely don’t get hacked.
You can increase the security of your Google account by enabling two-step verification. Every time you try to log in from a new device, the system will ask for a one-time code. A notification will be sent to gadgets already logged in to the account. Thus, even if someone tries to hack your account, you will still be able to prevent them from logging in. 
You can verify a login:
- Using a smartphone. When you try to log in to an account from an unknown device, a message will appear on the phone with your Google account asking you to verify the login. This is the default method for owners of Android smartphones. You’ll find a list of devices that have attempted to log in but are awaiting verification on the Settings page;
- Using a one-time code received by text or a phone call;
- Using a security key, which is a specialized device with a built-in encryption key that connects to a computer for login verification.
To enable two-step verification using a trusted device:
- Go to the Manage my Google Account page: https://myaccount.google.com;
- Select Security in the menu on the left.
- Click 2-Step Verification;
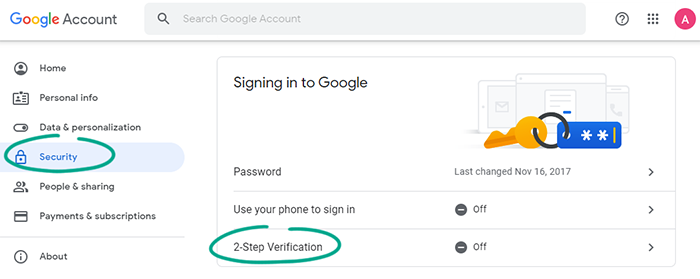
- Click Get started.
- Enter your Google account password and click Next;
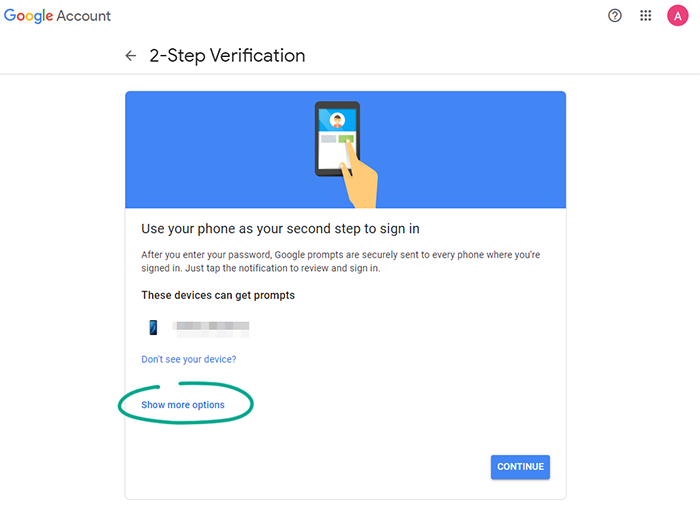
- Check if your device can get prompts from Google and click Continue;
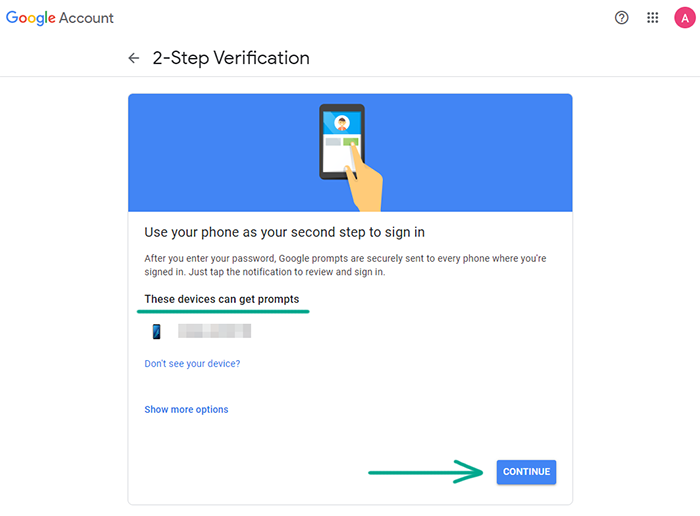
- If you can’t find your device in the list, click Don’t see your device? link and follow instructions;
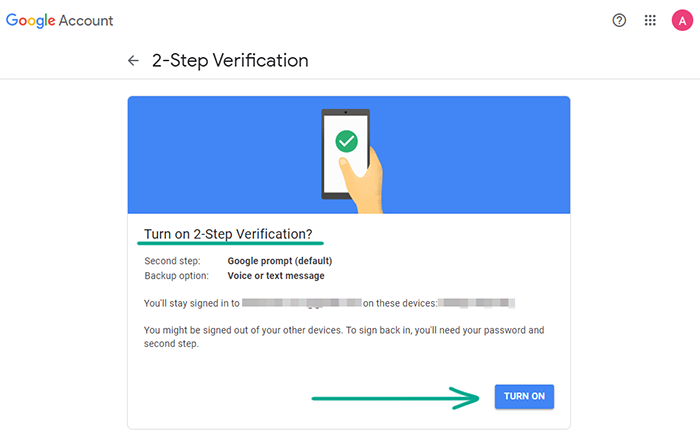
- Google will suggest selecting a backup authentication method for in case your trusted device is unavailable. To choose to receive the code in a text or a phone call:
- Enter the phone number you want to use to receive the codes;
- Choose how you want to receive the code (Text message or Phone Call) and click Send;

- Enter the code you receive and click Next;
- To select backup codes as an additional verification method:
- Click Use a different method;
- Print out or download the backup codes;
- Click Next.
- Click Turn on.
If you do not want to use a trusted device, choose another method of receiving the code — by text or a phone call. You can do that in the Security section:
- Click 2-Step Verification;
- Click Get started.
- Enter your Google account password and click Next;
- Click Show more options;
- Select Text message or voice call;
- Enter the phone number you want to use to receive the codes;
- Choose how you want to receive the code (Text message or Phone Call) and click Next;
- Enter the received code and click Next;
- Click Turn on.
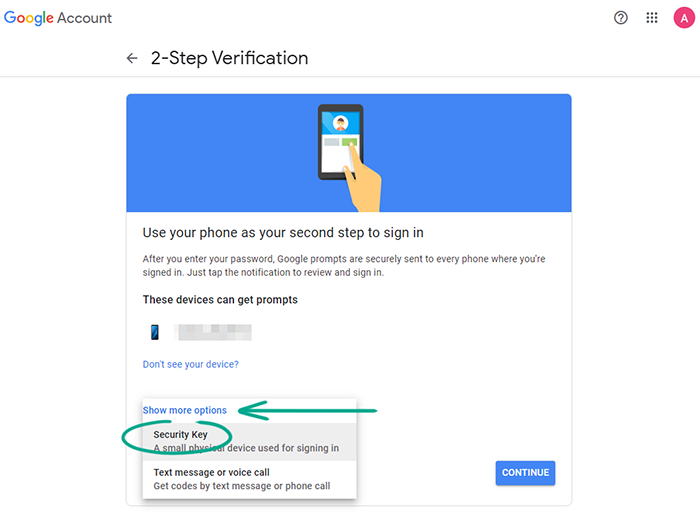
You can enable two-step verification using a security key in the same section:
- Click 2-Step Verification;
- Click Get started.
- Enter your Google account password and click Next;
- Click Show more options;
- Select Security Key;
- Prepare the security key dongle and click Next;
- Connect the security key dongle to your computer. When it appears in the list of devices on your screen, click Next;
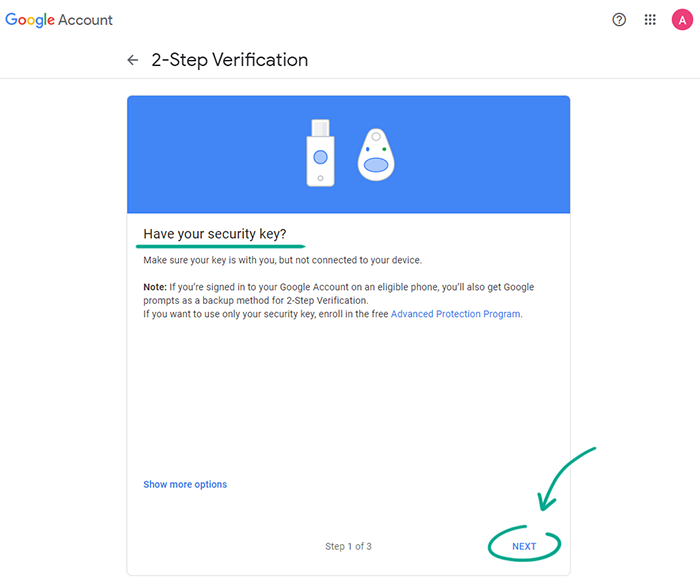
- Click Turn on.
After you have enabled two-step verification, you can add several more login methods:
- Using backup codes that work even if your phone is not available.
- With the Google Authenticator app.
Use a trusted device, an incoming phone call, a special app, a security key, or backup codes for secure additional verification; an attacker can use malware or a communication protocol vulnerability to intercept a text message with a one-time code.
What for: To prevent hackers from changing your account password.
The identity verification feature protects your account from being hacked. For example, if a hacker wants to take over your account, they can try to reset your password and create a new one. But before, you must complete a verification step of your choice:
- Using a text message sent to your phone number;
- With an e-mail sent to your backup e-mail address.
We recommend that you activate all methods for the highest level of security:
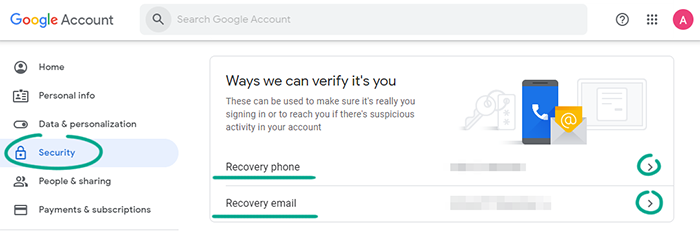
- Go to the Manage my Google Account page: https://myaccount.google.com;
- Select Security in the menu on the left.
- In the Ways we can verify it’s you section, enter:
- One or several phone numbers where you can be reached;
- A backup e-mail address that you have access to.
How to keep corporations out of your business
What for: To prevent your movements from being stored on Google servers.
Google may save a list of all the locations where you have been. This location log is used to choose targeted ads, perform searches, and some other functions. For example, this option lets you automatically receive information about traffic jams between your home and workplace. If you do not want your travel information to be saved on Google servers, you can clear this log and stop adding to it:
- Go to the Manage my Google Account page: https://myaccount.google.com;
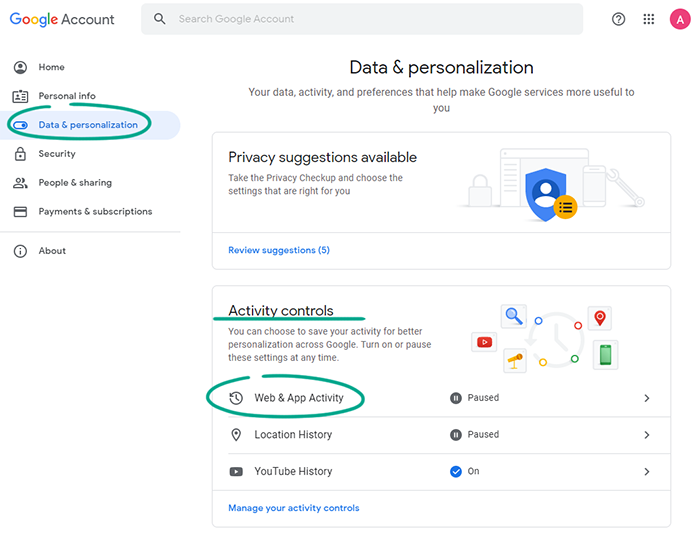
- In the menu on the left, select Data & personalization;
- Click Location History in the Activity controls section;
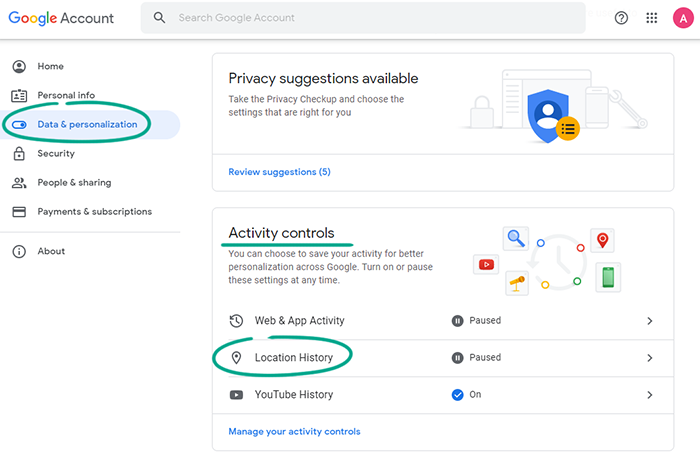
- Turn off the toggle next to Location History;
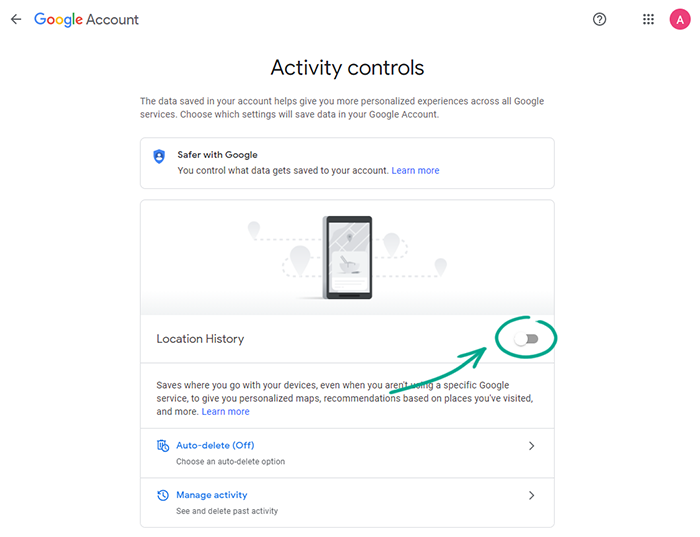
- Review the information in the window that opens and click Turn off.
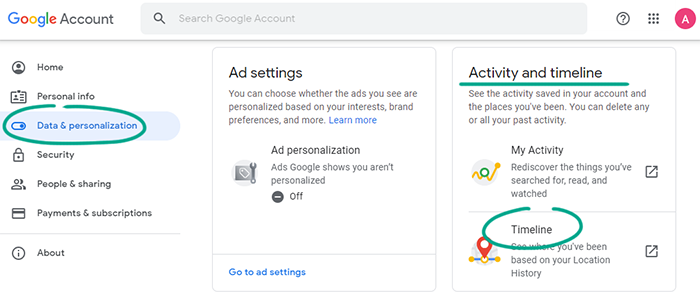
To delete your location history, perform the following steps in the Data & personalization section:
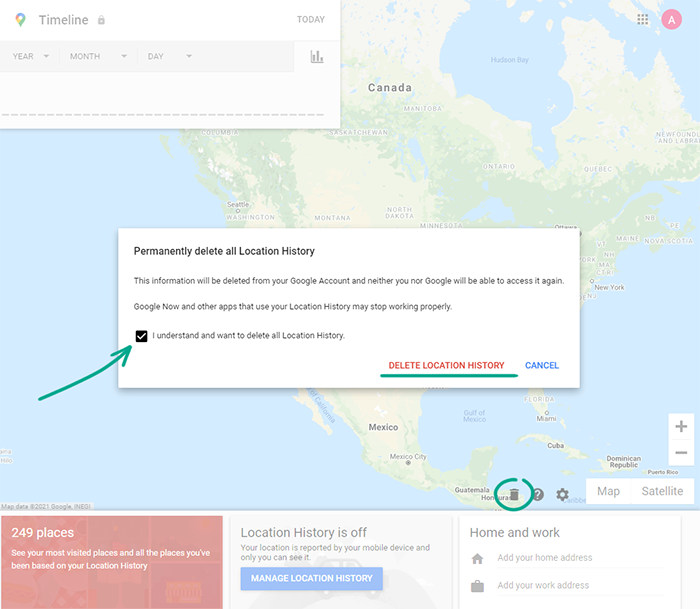
- Click Timeline in the Activity and timeline section;
- Click the trash can icon in the bottom right corner of the screen;
- Tick the I understand and want to delete all Location History check box;
- Click Delete Location History.
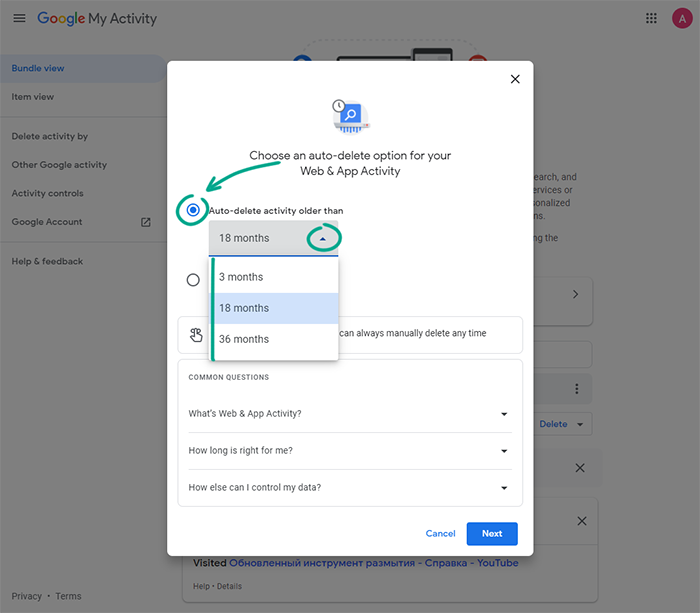
You can also enable automatic deletion of data every 3, 18 or 36 months in the same section:
- In the bottom right corner of the screen, click the gear icon and select Automatically delete Location History;
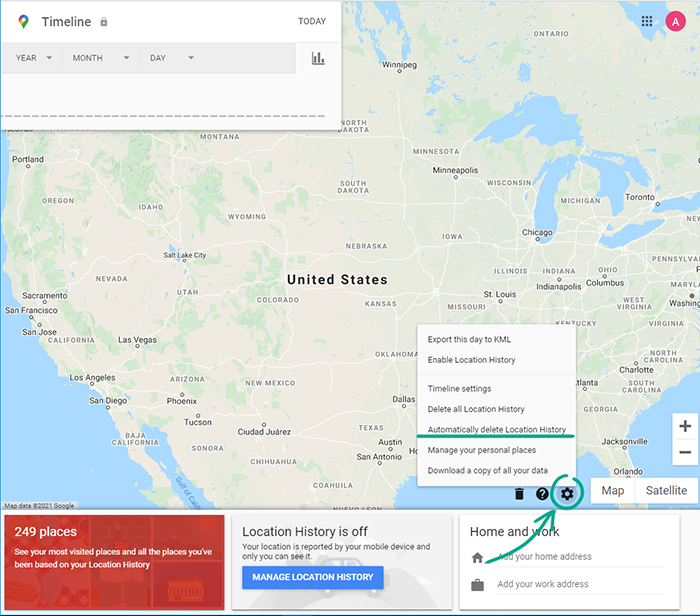
- Tick Auto-delete activity older than, select 3, 18, or 36 months, and click Next;
- Click Confirm.
Downside: Google will not be able to use information about your locations for purposes of ad and search personalization. The system will also not be able to create albums containing photos based on a specific location.
What for: To keep Google from knowing which apps you use and which sites you visit.
By default Google collects information about your search queries, location, and app activities. This data is used to increase the accuracy of recommendations and personalization of Google services.
If you would prefer not to share this information, you can disable access to it:
- Go to the Manage my Google Account page: https://myaccount.google.com;
- In the menu on the left, select Data & personalization;
- Click Web & App Activity in the Activity controls section;
- Turn off the toggle next to Web & App Activity.
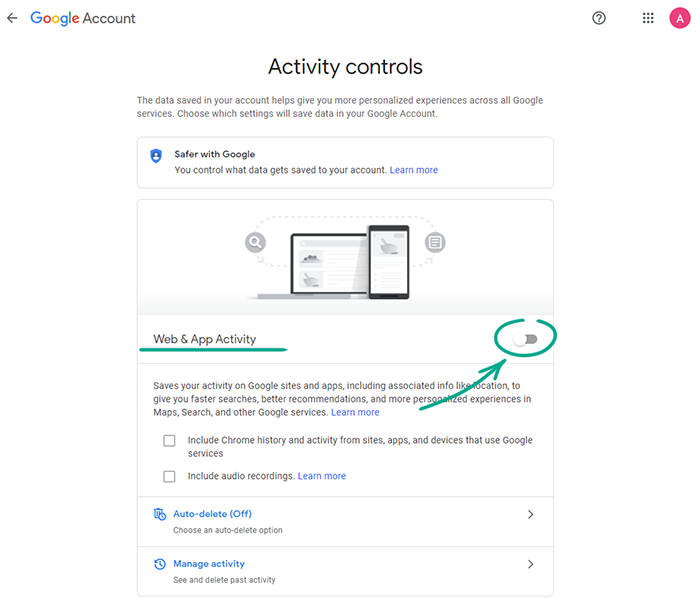
- Review the information in the window that opens and click Turn off.
To delete your entire app activity log and your search history, follow these steps on the same page:
- Click Manage Activity;
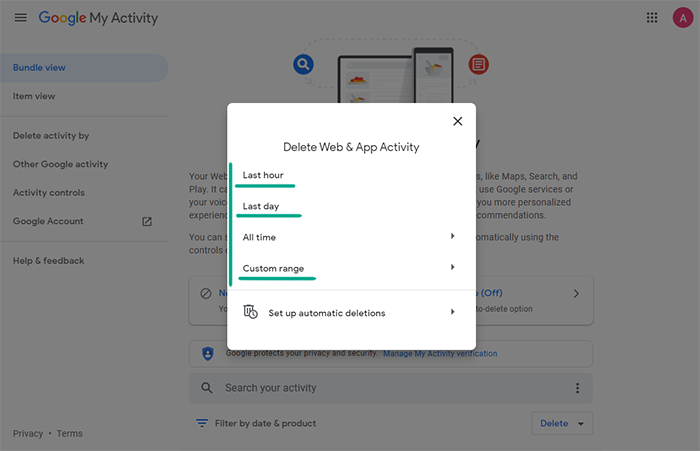
- Click the three-dot icon to the right of the search bar in the upper part of the screen and select Delete activity by;

- Select All time and click Delete;
- Tap OK.
To wipe data for a specific period, perform the following steps in the Manage history section:
- Click the three-dot icon to the right of the search bar in the upper part of the screen and select Delete activity by;
- Click Last hour, Last day, or Custom range if you would like to set the time period yourself.
To enable automatic deletion of data every 3, 18 or 36 months, perform the following steps in the Manage history section:
- Click the three-dot icon to the right of the search bar in the upper part of the screen and select Delete activity by;
- Click Set up automatic deletions;
- Tick Auto-delete activity older than, select among 3, 18, or 36 months, and click Next;
- Tap Confirm.
What for: So that Google does not know who you frequently talk to.
Google can save data about the contacts on the devices that you use to log in to your Google account. Such data includes not only phone numbers and e-mail addresses, but also information about how often you communicate with a particular person. Syncing data across devices is convenient, but the information can also be used to target advertising, and it can be shared with third parties such as Google affiliates. If you prefer not to share this information, prevent the data from being saved:
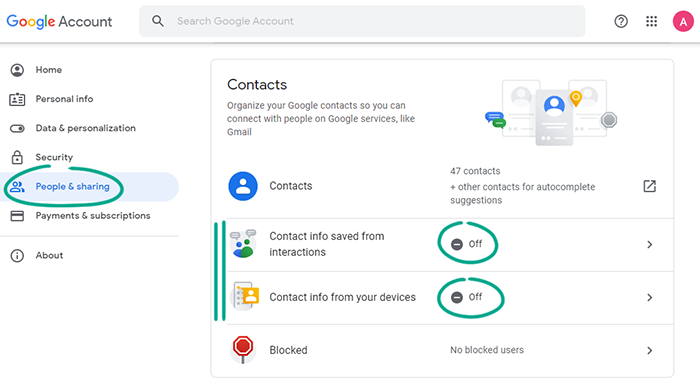
- Go to the Manage my Google Account page: https://myaccount.google.com;
- Select People & sharing in the menu on the left;
- Turn off the Contact info saved from interactions and Contact info from your devices features.
What for: So that Google does not know which videos you have watched.
Your account holds your YouTube search and watch history. This information can be used to target advertising, and it can be shared with third parties such as Google affiliates. If you prefer not to share this information, prevent the data from being saved:
- Go to the Manage my Google Account page: https://myaccount.google.com;
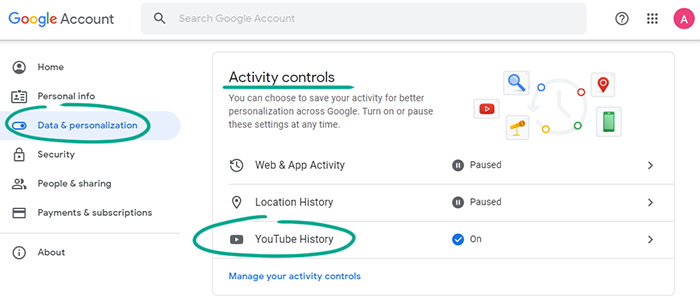
- Select Data & personalization in the menu on the left;
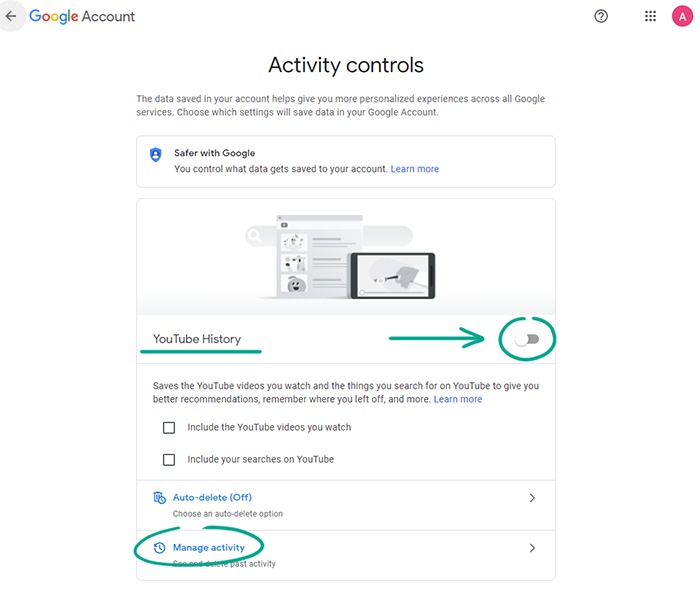
- Tap YouTube History in the Activity controls section;
- Turn off the toggle next to YouTube History;
- Click Disable.
To completely delete your YouTube search and watch history, perform the following actions in the YouTube History section:
- Click Manage Activity;
- Click the three-dot icon to the right of the search bar and select Delete activity by;
- Select All time;

- Click Delete.
- Click OK.
To wipe data for a specific period, perform the following steps in the YouTube history section:
- Click the three-dot icon to the right of the search bar in the upper part of the screen and select Delete activity by;
- Click Last hour, Last day, or Custom range if you would like to set the time period yourself.
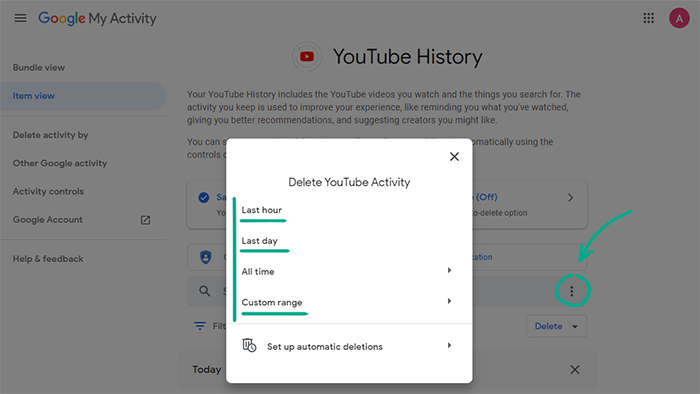
To enable automatic deletion of data every 3, 18 or 36 months, perform the following steps in the YouTube History section:
- Click Manage Activity;
- Click the three-dot icon to the right of the search bar and select Delete activity by;
- Click the Set up automatic deletions button;
- Tick Auto-delete activity older than, select 3, 18, or 36 months, and click Next;
- Click Confirm.

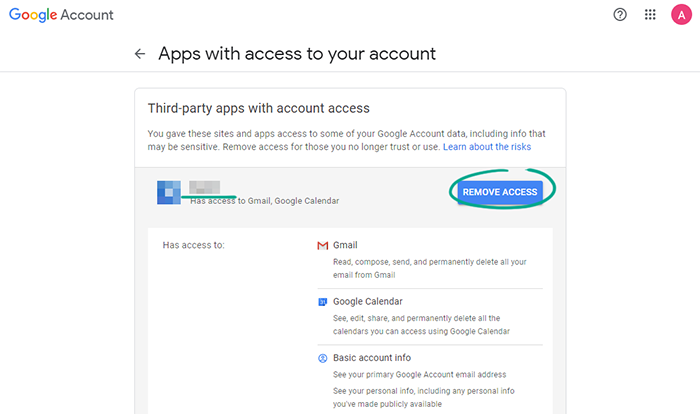
What for: To stop the developers of third-party apps from collecting information about you.
Certain sites and apps may request access to your account data, such as your date of birth, gender, and phone number. Developers use this information to show you targeted ads and to collect statistics about their audience. If you would prefer not to share this information, limit access to it:
- Go to the Manage my Google Account page: https://myaccount.google.com;
- Select Security in the menu on the left;
- Click Manage third-party access in the Third-party apps with account access section;
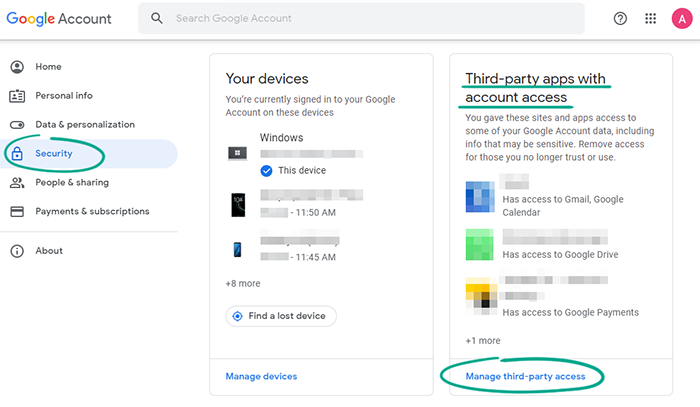
- Select the apps you want to keep from viewing your information, click Remove access, and then OK.
How to prevent your personal data from being exposed
What for: So that strangers do not know too much about you.
Certain data — including your date of birth, gender, and phone number — from your account is visible to other users by default. To prevent strangers from viewing this information, deny access to it:
- Go to the Manage my Google Account page: https://myaccount.google.com;
- Select People & sharing in the menu on the left;
- Click About me in the Choose what others see section;
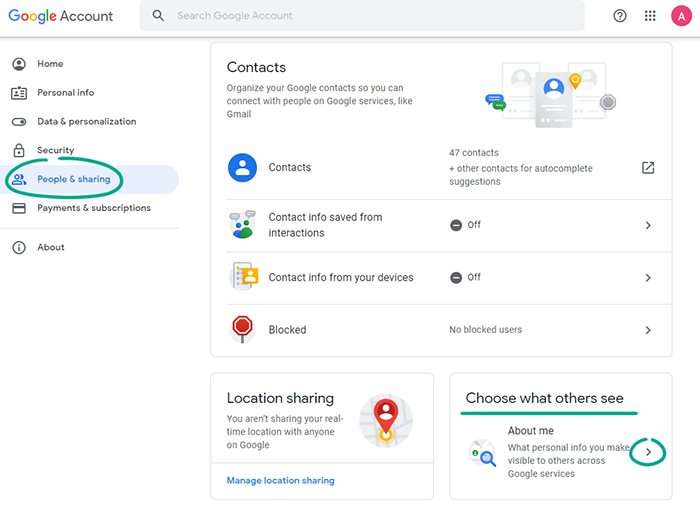
- Select the fields containing information that you want to deny access to, and specify that only you can see it.
You may not limit access to certain data, such as photos and names.
What for: To keep strangers from learning where you are.
Certain Google services can show your location to other users. By default, the feature is disabled. However, you can activate it by, for example, sending your current location to one of your contacts. We recommend reviewing who is allowed to access your location data and denying strangers access to it:
- Go to the Manage my Google Account page: https://myaccount.google.com;
- Select People & sharing in the menu on the left;
- Click Manage location sharing in the Location sharing section;
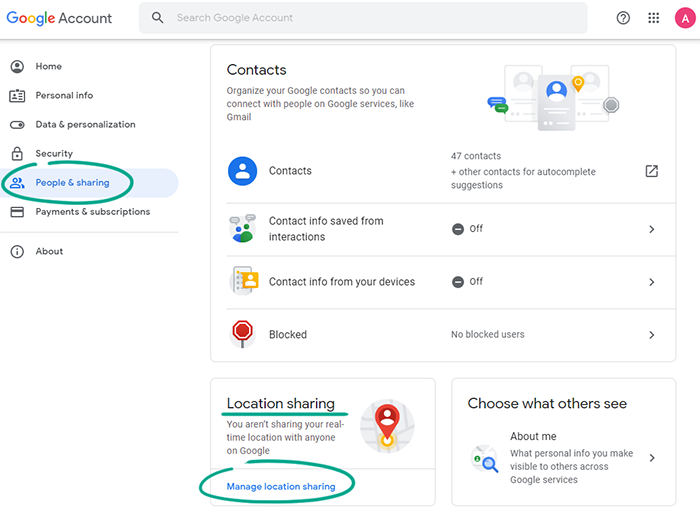
- In the What others can see section, remove any users who have access to your location data. To do that, click the cross to the left of their name or pseudonym.
What for: So that strangers cannot see your name and photos in ads.
Google can add user ratings and reviews on an advertised product or service to their ads (such as in paid search engine results). The profile photo and the name of the user who wrote the review or added the rating are published as well. If you do not want strangers to see your personal data in ads, you can disable the feature:
- Go to the Manage my Google Account page: https://myaccount.google.com;
- Select People & sharing in the menu on the left;
- Click Manage shared endorsements in the Share recommendations in ads section;
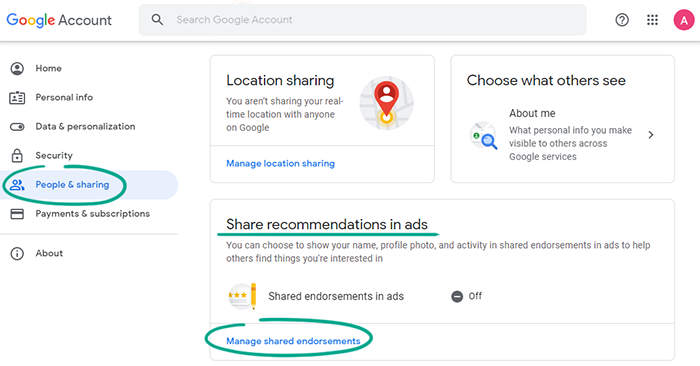
- Untick Based upon my activity, Google may show my profile name, profile photo, and activity in shared endorsements in ads, which is located at the bottom of the page.
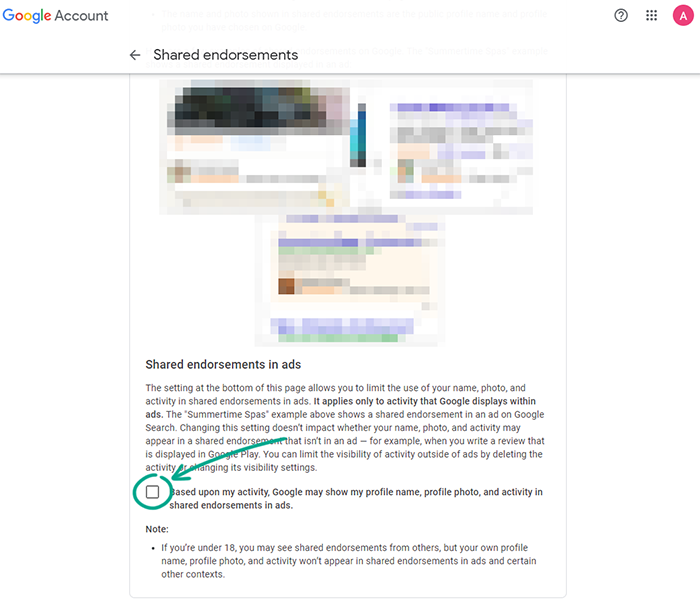
Downside: If you disable the sharing of your recommendations, you will not see other people’s ratings and reviews in ads.
How to protect your data
What for: To protect yourself from data leaks.
Google Password Manager allows you to store your autofill data and use it to log in to third-party accounts. Thanks to synchronization, this feature is available on all devices logged in to your account. It also lets you verify the security of your passwords that are saved in your Google account.
That is very important; if you are using identical passwords on different websites, the theft or leak of one of them could result in several of your accounts being hacked at once.
How to start a scan:
- Go to the Manage my Google Account page: https://myaccount.google.com;
- Select Security in the menu on the left;
- Click Password Manager in the Signing in to other sites section;
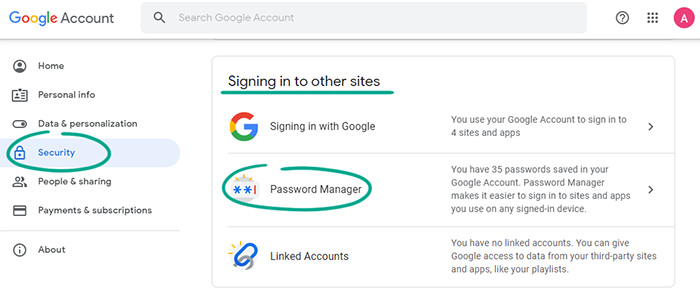
- Click Go to Password Checkup and confirm your selection;
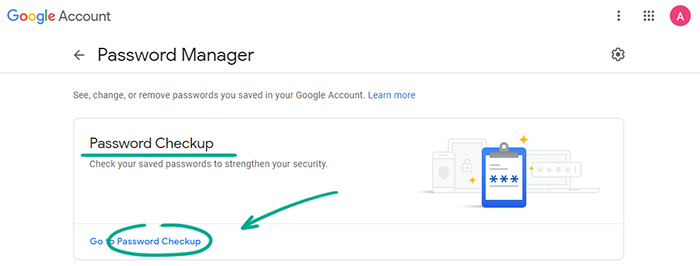
- Enter your account password;
- Once the check is complete, you can view, edit, or delete any passwords that have been compromised, are duplicated, or are too easy to crack.
Even though the storage is protected, data leaks are always a risk. To reduce the risk, delete your passwords from your account:
- Go to the Manage my Google Account page: https://myaccount.google.com;
- Select Security in the menu on the left;
- Click Password Manager in the Signing in to other sites section;
- Perform the following actions for each of the sites in the list:
- Click the name;

- If necessary, enter your Google account password and click Next;
- Click Delete.
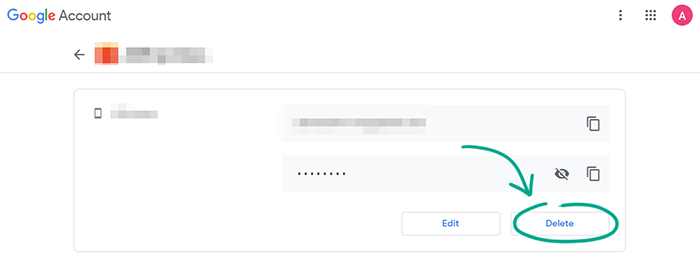
- Select Delete in the opened dialog window.
Note that you may have also saved account credentials in services other than Google Password Manager, such as your browser. They will still be available there.
If you delete your Autofill data, you will have to enter your password manually on websites and in apps each time you use them. To avoid the inconvenience, you can install a password manager with a reliable data encryption and security system.
What for: To prevent data leaks and to not share your payment information with Google.
The Google Pay service lets you purchase goods using the card that is attached to your account. This can be convenient. However, if you add a payment method to your account, you are granting Google additional access to your data. For example, the company obtains the right to share your location data with your bank, and may transmit your payment data or even private information to third parties. Google also collects information about transactions and your account, including your card numbers, account numbers, and the totals of your transfers.
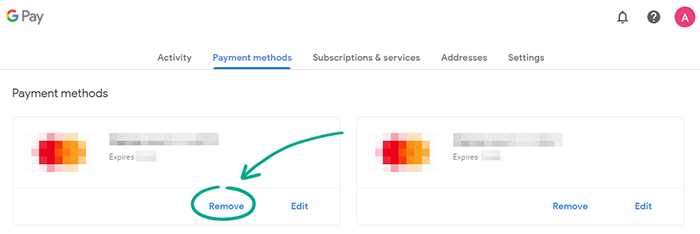
If you do not want your data to be stored in Google Pay, you can delete this data.
- Go to the Manage my Google Account page: https://myaccount.google.com;
- Select Payments & subscriptions in the menu on the left;
- Click Manage payment methods;

- Click Remove under the bank card that you want to delete and confirm your choice.
Downside: You will not be able to use Google Pay.
How to clean up your traces
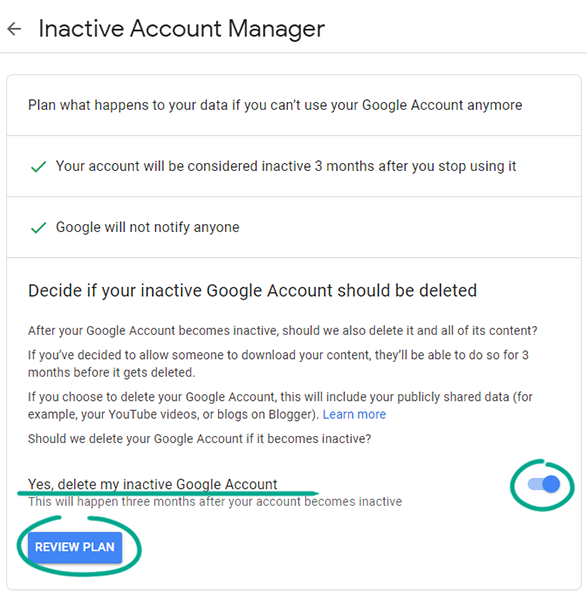
What for: To maintain control over your data even if you decide to quit using your Google Account.
If you stop using your account or lose access to it, all of your data will still remain on the company’s servers. That means the videos you uploaded on YouTube will still be available, Google Photos will continue to store your photos, and so on. You can configure the system so that your Google account will be deactivated and all of your data will be deleted after a certain period of time.
- Go to the Manage my Google Account page: https://myaccount.google.com;
- Select Data & personalization in the menu on the left;
- Click Make a plan for your account in the Download, delete, or make a plan for your data section;
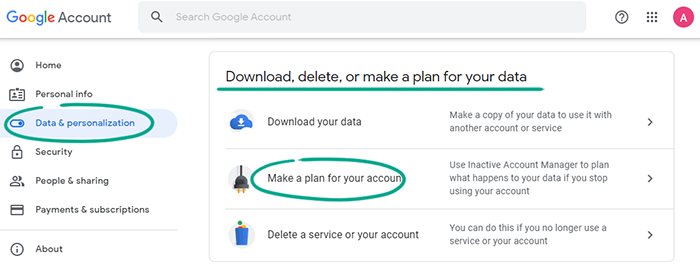
- Click Start;
- In the Decide when Google should consider your Google Account inactive section tap the Edit button and select the inactivity period after which your account should be deactivated. Google will send you a notification when the conditions are satisfied and your account will soon be deactivated;
- Check the phone number, your main and backup e-mail addresses that Google will use to send messages about your inactivity. You should have access to all of them so that you do not miss the notification;
- Tap Next;
- Tap Add person and enter the phone number and e-mail address of the person who will receive a notification that your account has become inactive. If you wish, you can indicate if this person will be able to download an archive with your data, and what information it will contain.
- Tap Next;
- If you want, activate the toggle next to Yes, delete my inactive Google account;
- Click Confirm your plan, tick Receive email reminders that Inactive Account Manager is turned on, and click Confirm plan.
Remember that along with your Google account, all data from connected services, such as YouTube, Google Photos, and others, will also be deleted.
What for: So that you won’t lose any information if your account is hacked or blocked.
You can download a file with all of your Google profile data. With it, you can learn what kind of information the company collects about you as well as save it in case your account gets blocked or hijacked.
- Go to the Manage my Google Account page: https://myaccount.google.com;
- Select Data & personalization in the menu on the left;
- Click Download your data in the Download, delete, or make a plan for your data section;

- Select the services from which you want to download data. All Google apps that you use are ticked by default;
- Click Next step;
- Select how you want to receive your data archive:
- Send download link via e-mail
- Add to Disk
- Add to Dropbox
- Add to OneDrive
- Add to Box

Select how frequently you would like to back up your data. You can create a one-time backup or elect to generate an archive once every two months;
Change the file format if you want. By default, Google will send you a ZIP file archive. However, if the size of the backup copy exceeds 2 GB, you will receive it in several parts or in ZIP64 format, which not all operating systems support. Using the alternative TGZ format enables creating archives up to 50 GB in size.
Select the maximum size of a single file archive. If the total size of the archive exceeds this limit, Google will send it in several files;
Click Create export.
Depending on the amount of data you request, generating the archive may take anywhere from several hours to several days. When the file is ready, you will receive a download link by e-mail.