
How to keep your account from getting hacked
What for: So you don’t get hacked.
If you use a short and simple password for your VK account, cybercriminals can hijack your account. Use a strong password that meets the following criteria:
- Is at least 8 characters long;
- Contains lowercase and uppercase letters, numbers, and special characters ($, @, etc.);
- Is not an actual word or easy-to-guess phrase;
- Is not the same as your passwords for any other accounts;
- Does not consist of information that strangers could easily find out (your name, date of birth, pet's name, and so forth — or those of your friends or relatives).
To change the password:
- Click the icon with the profile photo in the upper right corner of the screen;
- Select Settings in the drop-down list;

- Click Change next to Password;

- Enter the current password for your account and then enter the new password twice;
- Click Change password.
What for: So you definitely don’t get hacked.
VK can prompt you to enter a one-time code every time you log in to your account. That way, even if cybercriminals get hold of your username and password, they will not be able to log in to your account without this code. Codes can be received by text message at the phone number you specify or generated in an authentication app (such as Google Authenticator or Authy).
To enable two-factor authentication:
- Click the icon with the profile photo in the upper right corner of the screen;
- Select Settings in the drop-down list;
- Go to the Security section;
- Select Enable in the 2-step verification section;

- Click Enable verification;
- Enter your current password and click Confirm;
- Make sure that your number is displayed on the screen and click the Get code button. VK will send you a text message with a one-time code or call your number;

- In the dialog box, enter the code from the text message or the last four digits of the number from which you received the call and click Send code;
- Click Setup completed.
By default, two-factor authentication by text message (SMS) is enabled. If you log in to your account using the mobile app, you may receive codes in direct messages from the VK administration.
A text message with the code can be intercepted by malware, which is why using a two-factor authentication app is a safer option. To do so, under 2-step verification locate the Code-generating app item, click Enable, and follow the instructions.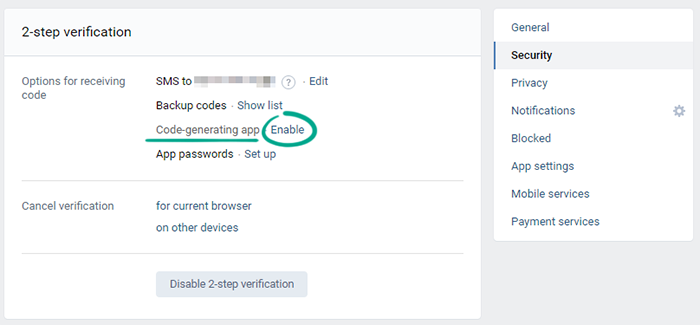
Remember to print out the backup codes that can be used for account login if your mobile device becomes unavailable. Store these codes in a safe place.
Downside: After enabling two-factor authentication you will be able to restore account access by e-mail only, and the access recovery feature based on your phone number will be unavailable.
What for: To detect and stop any suspicious activity.
VK lets you view the history of your account logins so you can detect any suspicious activity before it’s too late. If you see that somebody logged in to your account from an unknown device, you can terminate that session or all sessions except the current one.
To view your activity log in VK:
- Click the icon with the profile photo in the upper right corner of the screen;
- Select Settings in the drop-down list;
- Go to the Security section;
- Click Show activity history.
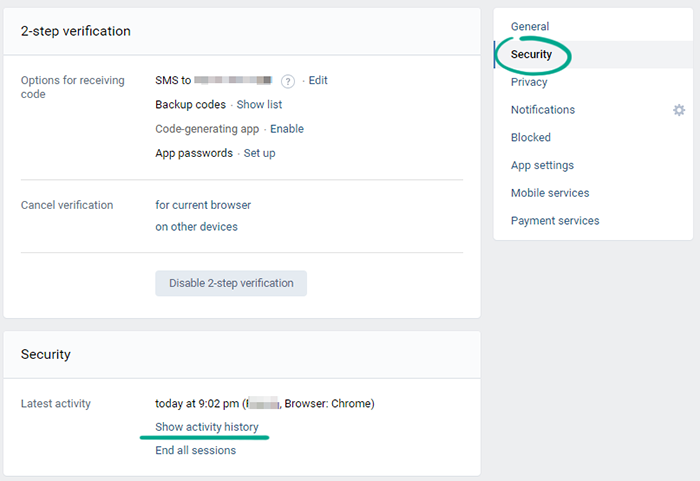
Active sessions appear in bold. To log out of your account on all devices except the current one, click Terminate all sessions.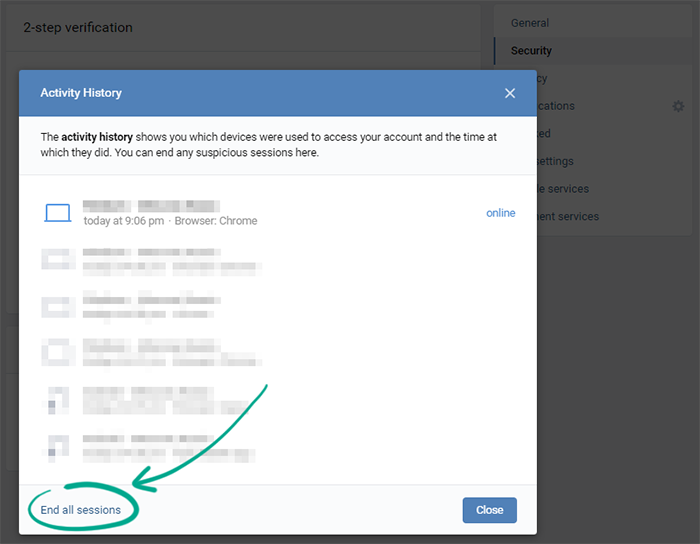
If you see that someone else has logged in to your account, immediately change your password and enable 2-step verification.
For added protection, you can check the list of devices where you receive security alerts and remove the devices that you no longer use:
- Click the icon with the profile photo in the upper right corner of the screen;
- Select Settings in the drop-down list;
- Go to the Security section;
- Click the link next to Linked devices;
- Enter your account password;
- Click Remove next to the device that you want to remove from the list of trusted devices.
How to keep corporations out of your business
What for: To prevent potential data leaks.
Various sites and apps offer additional tools for use with VK. To this end, they request permission to access your account details. Such sites and apps do not normally inform you explicitly about the specific permissions you grant them.
Some developers can use this info for advertising purposes. They may also be able to click the Like button, send friend requests to other users, and post on your wall on your behalf.
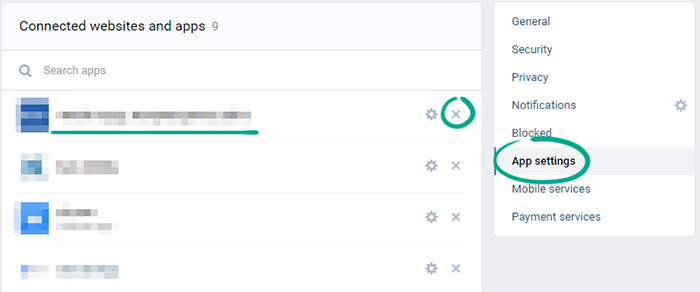
To check what data the app has access to:
- Click the icon with the profile photo in the upper right corner of the screen;
- Select Settings in the drop-down list;
- Go to the App settings section;
- Click the cogwheel next to the app you need;
- To block access to your data, click the cross next to the app you need.
How to defeat spammers and trolls
What for: To get rid of unpleasant people in the virtual space.
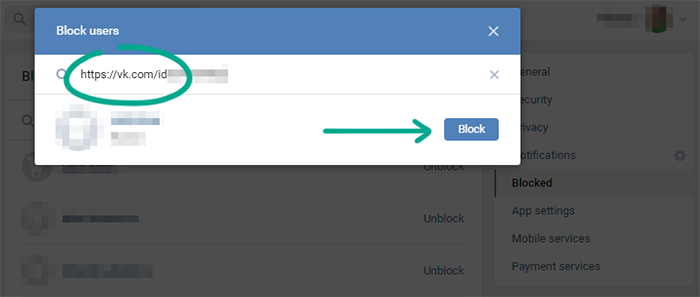
To stop a specific user from viewing your wall, replying to your comments, or sending you private messages, you can blacklist the user:
- Copy the link to the profile of the user you want to block;
- Click the icon with the profile photo in the upper right corner of the screen;
- Select Settings in the drop-down list;
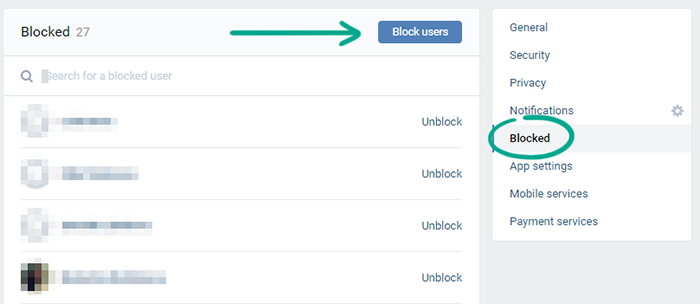
- Go to the Blocked section;
- Click Block users;
- Paste the link you copied earlier into the entry field;
- Click the Block button next to the user’s name.
The user will not be notified that you have blocked him. However, if the user tries to message or call you, he will see a message that you have blacklisted him.
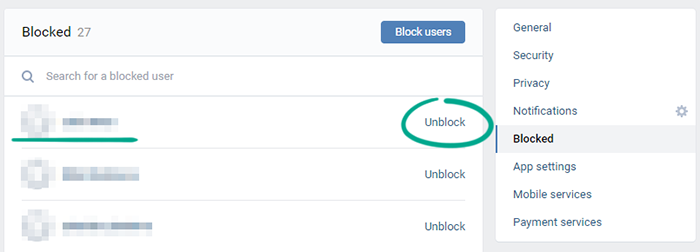
To remove a user from the black list:
- Click the icon with the profile photo in the upper right corner of the screen;
- Select Settings in the drop-down list;
- Go to the Blocked section;
- Click Unblock next to the name of the user you want to unblock.
What for: To get rid of spam in comments.
By default, all VK users can leave comments under posts on your wall. Spammers, trolls, or simply users you find unpleasant can abuse this feature. You can limit the ability to comment on your posts in several ways.
Disable comments under specific posts
You can do so both when creating a post and after publishing it.
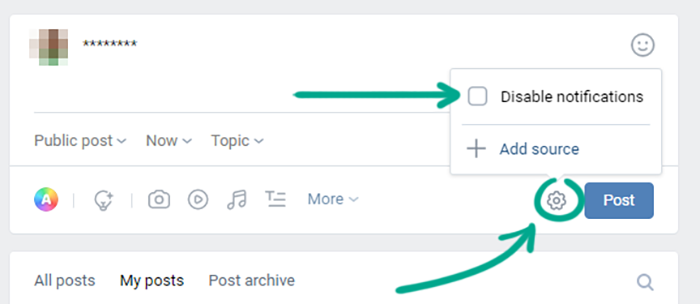
I. To disable comments while creating a post:
- Click the cogwheel next to the Post button;
- Select Disable comments in the drop-down list.
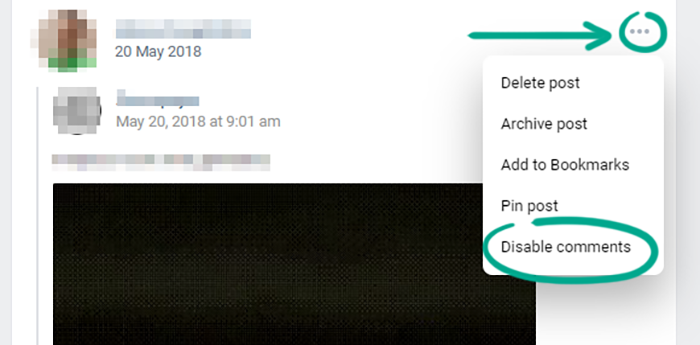
II. To disable comments under a post that has been already published:
- Click the arrow to the right of your profile name above the post for which you want to limit comments;
- Select Disable comments in the drop-down list.
Limit who can comment on your posts
To choose who can comment on your posts:
- Click the icon with the profile photo in the upper right corner of the screen;
- Select Settings in the drop-down list;
- Go to the Privacy section;
- Click Who can comment on my posts:
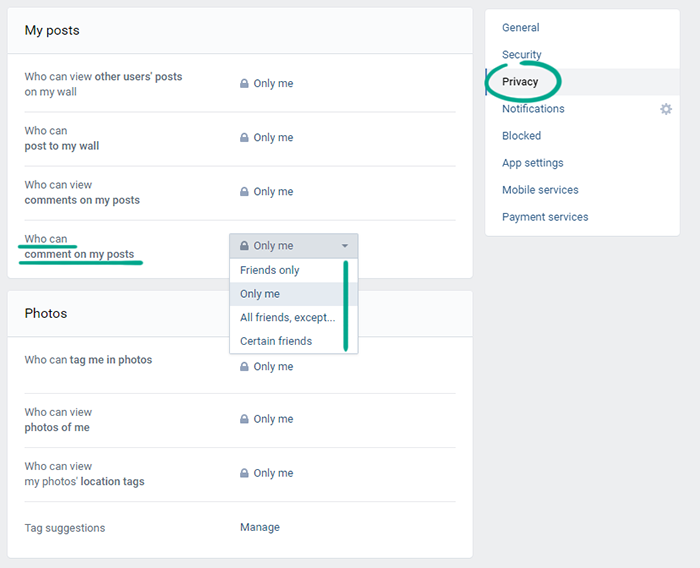
- Select Friends only to prevent strangers from leaving comments on your wall;
- Select Everyone but... to select friends who are not allowed to leave comments on your wall;
- Select Certain friends to specify friends who are allowed to leave comments on your wall;
- Select Certain lists of friends to specify a list of friends who are allowed to leave comments on your wall;
- Select Only me so that nobody except you will be able to leave comments on your wall.
Completely disable comments on your wall
You can fully disable comments under your posts:
- Click the icon with the profile photo in the upper right corner of the screen;
- Select Settings in the drop-down list;
- Select Disable wall comments.
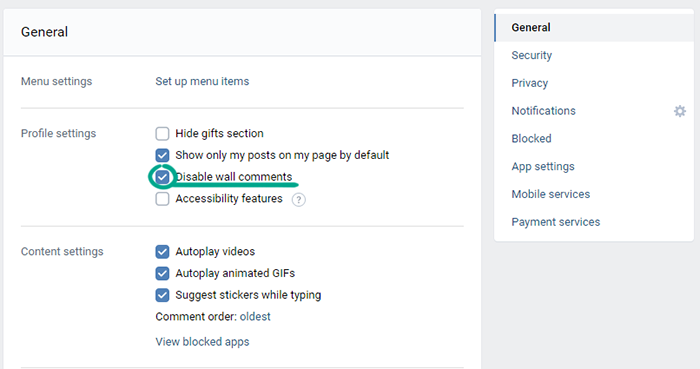
Keep in mind that after fully disabling comments on your wall you will not be able to enable comments under specific posts. In addition, the Who can comment on my posts item in the Privacy section will be inactive.
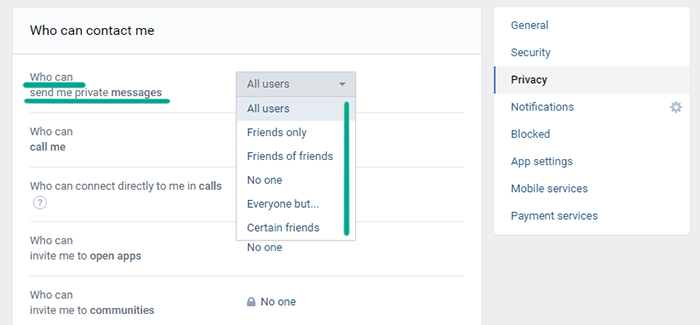
What for: So you don’t get bothered by strangers.
VK does not limit the number of people who can contact you even when your profile is private.
You can limit this ability manually:
- Click the icon with the profile photo in the upper right corner of the screen;
- Select Settings in the drop-down list;
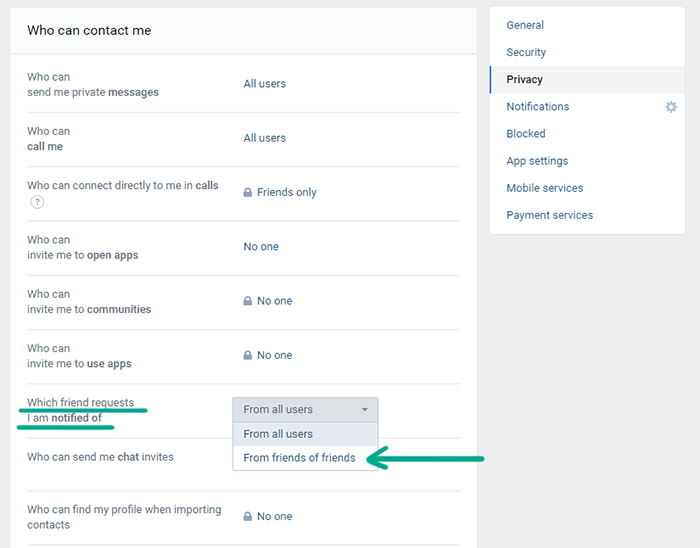
- Go to the Privacy section;
- Click the link to the right of Who can send me private messages and choose one of the options:
- Friends of friends;
- Friends only;
- Everyone but...;
- Certain lists of friends;
- Certain friends;
- No one;
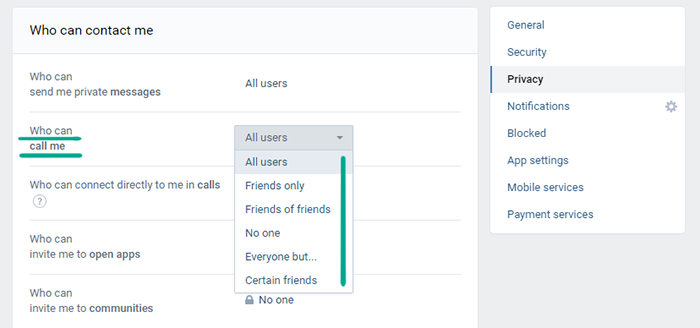
- Click the link to the right of Who can call me and choose one of the options:
- Friends of friends;
- Friends only;
- Everyone but...;
- Certain lists of friends;
- Certain friends;
- No one;
- Click the link to the right of Which friend requests I am notified of and select From friends of friends.
By default, your VK account can be found by the phone number linked to it. And if a company knows your number, you might receive private messages from its VK community, even if you are not subscribed to it.
To stop users and companies from finding your profile using your phone number:
- Click the icon with the profile photo in the upper right corner of the screen;
- Select Settings in the drop-down list;
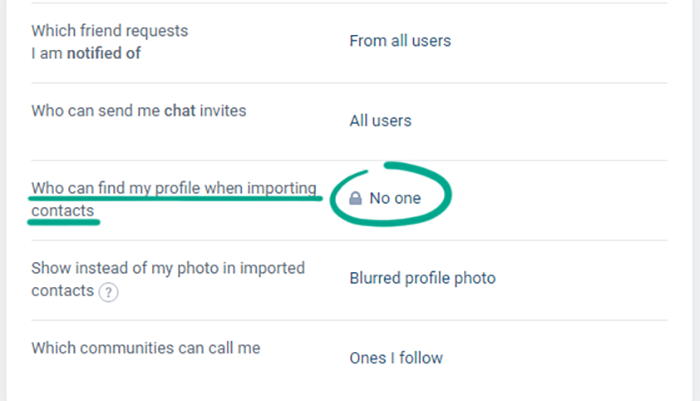
- Go to the Privacy section;
- Click the link to the right of Who can find my profile when importing contacts and select No one;
- Scroll the page down and click the link to the right of Which companies can send me messages using my phone number and select None.

How to hide posts from unwanted people
What for: To hide your data from strangers.
By default, your posts and profile data are visible to all VK users. To prevent strangers from viewing your wall, you can limit access to it.
To make your profile private for everybody except friends:
- Click the icon with the profile photo in the upper right corner of the screen;
- Select Settings in the drop-down list;
- Go to the Privacy section;
- Scroll down and click the link next to Profile type;
- Select Private;
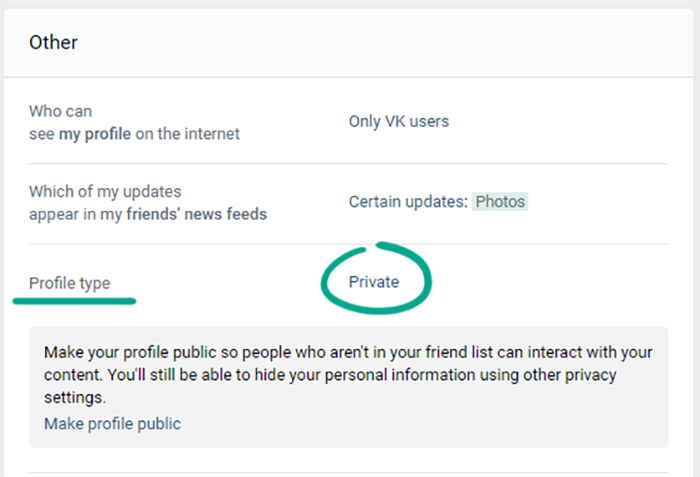
- Click Confirm.
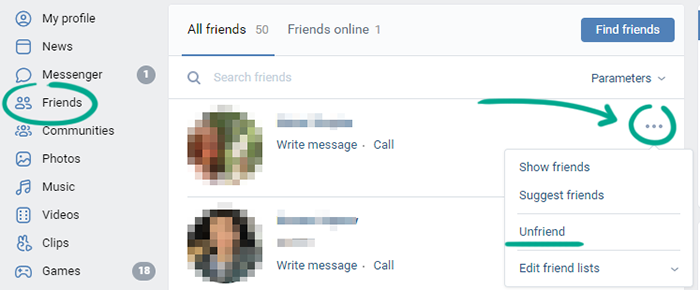
Keep in mind that your friends on the social network will still be able to see all your posts. To stop any one of them from viewing your posts, remove him or her from your friend list:
- Click Friends in the menu on the left;
- In the list, locate the user you want to unfriend and click the three dots icon next to the user’s name;
- Select Unfriend.
The user will not be notified that you have removed him. However, if the user visits your profile, he will see the Following button and will be able to guess that you unfriended him. He can also see you in the list of outgoing friend requests.
Even after you make your profile private, other VK users will still see:
- Your name;
- Date of birth;
- Profile photo;
- Mutual friends;
- Place of employment;
- City;
- Status;
- Information about your online status or when you went online last;
- Number of posts.
You can limit the visibility of your date of birth, city, and place of employment by following instructions on how to configure data visibility.
How to prevent your personal data from being exposed
What for: To decide for yourself who can see what.
If you do not want to make your profile private, you can still configure the visibility of your publications, comments, audio files, photos, and other data.
To choose who can view specific information in your profile:
- Click the icon with the profile photo in the upper right corner of the screen;
- Select Settings in the drop-down list;
- Go to the Privacy section. You will see a list of possible access settings:
- Who can view the main information on my profile;
- Who can view photos of me;
- Who can view the Saved photos album;
- Who can view my list of groups;
- Who can view my music;
- Who can view my gifts;
- Who can see my photo’s location tags;
- Who can view my hidden friends;
- Who can view other users’ posts on my wall;
- Who can view comments on my posts;
- Who can view my stories;
- Who can reply to my stories with stories;
- Who can give feedback on my stories;
- Click the links next to these items one at a time and choose a group of users for each item. All or some of the following options are available for various items:
- All users;
- Friends of friends;
- Friends only;
- Everyone but...;
- Certain lists of friends;
- Certain friends;
- Only me.

The number of available visibility options depends on whether your profile is public or private.
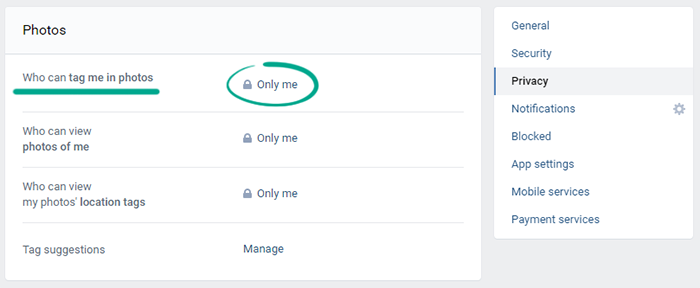
What for: To stay anonymous.
By default, all your friends can tag you in VK photos. All social network users who have access to an image can locate you based on the photo tag. This may be inconvenient if you prefer not to upload your actual photos to your profile.
To stop users from tagging you in photos:
- Click the icon with the profile photo in the upper right corner of the screen;
- Select Settings in the drop-down list;
- Go to the Privacy section;
- Click the link to the right of Who can tag me in photos;
- Select Only me.
What for: So you don’t show up in search engines.
Search engines can index your VK wall and return a link to your profile in search results. This can be abused by cybercriminals to prepare attacks or by unscrupulous companies that send ads. To prevent this from happening, you can block third-party sites and search engines from accessing your information:
- Click the icon with the profile photo in the upper right corner of the screen;
- Select Settings in the drop-down list;
- Go to the Privacy section;
- Scroll the page down and click the link to the right of Who can see my profile on the Internet;
- Select Only VK users.

Downside: Your friends without VK accounts will have a harder time finding your profile.
What for: To view what data VK has on you, remove the data you don’t need, and make a backup copy of the data you want.
You can download a file with your VK profile data to find out what kind of information the social network collects about you as well as save it in case your account gets blocked, removed, or hijacked.
To download the archive:
- Go to the dedicated VK data protection page by clicking the link in this paragraph of our instructions or in the Help section:
- Click the icon with the profile photo in the upper right corner of the screen;
- Select Help in the drop-down list;

- Go to the Privacy section;
- Click How do I get a copy of my VK data?;
- Click the archive download link that appears;

- Click the Request Data Copy button;
- Choose the data you want to include in the archive by checking or clearing the corresponding check marks;
- Click the Submit request button;

- Enter your account password;
- Click Submit.
It may take several days to prepare the archive. You will receive a download link in a message from the VK administration.
How to get rid of unwanted notifications
What for: To hide notifications from strangers and avoid getting distracted.
VK notifications are displayed in your browser window even when you’re on a different website. The downside is that strangers can also see them if, say, you leave your computer unattended for a moment.
To disable Web notifications:
- Click the icon with the profile photo in the upper right corner of the screen;
- Select Settings in the drop-down list;
- Go to the Notifications section;
- Click the link to the right of Receive browser notifications;
- Select Disabled.

If you do not want to disable all notifications, you can disable notifications about specific events such as new friend requests or broadcasts.
To do so, under Notifications click All to the right of the event and select Disabled.
If you are bothered by e-mail messages with VK notifications, opt out of receiving them:
- Click the icon with the profile photo in the upper right corner of the screen;
- Select Settings in the drop-down list;
- Go to the Notifications section;
- Click the link to the right of Notification frequency at the bottom of the page under Email notifications;
- Select Never.

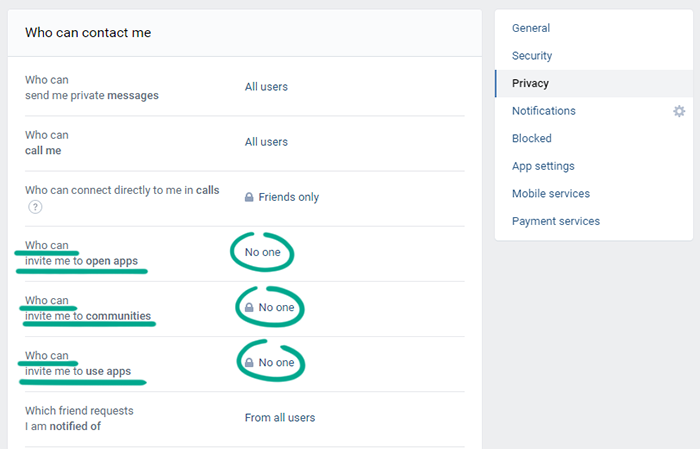
What for: To remove irrelevant notifications.
By default, all VK users can send you invitations to join a community, and your friends can also invite you to activate apps in VK. They can then be use private messages to challenge you in applications (e.g., invite you to compete). If you are bothered by such notifications, you can disable the feature:
- Click the icon with the profile photo in the upper right corner of the screen;
- Select Settings in the drop-down list;
- Go to the Privacy section:
- Click the link to the right of Who can invite me to open apps and select No one;
- Click the link to the right of Who can invite me to communities and select No one;
- Click the link to the right of Who can invite me to use apps and select No one.
What for: To hide from prying eyes.
By default, VK’s notifications include the sender's name and text message. This information appears on the screen of your device even when it is locked. The content of such notifications can be visible to strangers, so we recommend disabling the display of this unwanted text.
To configure the appearance of notifications:
- Click the icon with the profile photo in the upper right corner of the screen;
- Select Settings in the drop-down list;
- Go to the Notifications section;
- Turn off the toggle switch next to Enable sound notifications;
- Turn off the toggle switch next to Show message text in notifications.

How to clean up your traces
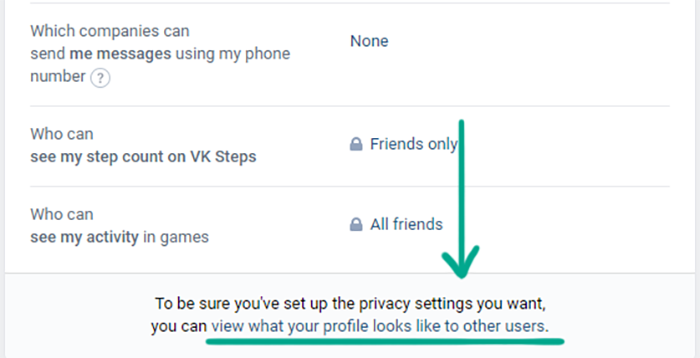
What for: To verify all your privacy settings.
You can check how other users see your wall and make sure that privacy settings are in line with your expectations.
- Click the icon with the profile photo in the upper right corner of the screen;
- Select Settings in the drop-down list;
- Go to the Privacy section;
- At the bottom of the page, click the view what your profile looks like to other users link.
By default, you will see your profile as it appears to a VK user who is not your friend or follower. You can check how your profile appears to any one of your friends:
- Click the Unknown user filed at the top of the page to open a search panel;
- Enter the name of the user on whose behalf you wish to see your page;
- Click the user’s name;
- To return to the menu, click Back to settings.
What for: To retain important financial information.
VK Pay lets you pay for goods and services in online stores through your account. This is convenient, but in the event of a leak or hack, your information may fall into the hands of cybercriminals. Linking your bank card to the account also increases the risk of accidental purchases, for example when your device ends up in the hands of a child. To avoid this, unlink your cards from your account:
- Click the icon with the profile photo in the upper right corner of the screen;
- Select Settings in the drop-down list;
- Go to the Payment services section;
- Click the link showing the number of payment methods;
- Click unlink next to each payment method that you added;
- Enter your password to confirm this action.