
How to keep your account from getting hacked
What for: So you don't get hacked.
Before letting you access your TikTok account, the app by default requests a one-time code sent to the e-mail or phone that you use as your login. If you're unable to enter that code for any reason, TikTok prompts you to log in with your password. Furthermore, your password can be used as a step in two-factor authentication. You'll also need your password for some other actions, such as linking TikTok to external applications.
If you use a short and simple password, cybercriminals can guess it and hijack your account. A long and complex password is more secure. Use a strong password that:
- Is at least 8 and up to 20 characters long;
- Contains lowercase and uppercase letters, numbers, and special characters ($, @, etc.);
- Is not an actual word or easy-to-guess phrase;
- Is not the same as your passwords for any other accounts;
- Does not consist of information that strangers could easily find out (your name, date of birth, pet's name, and so forth — or those of your friends or relatives).
To change your password:
- Go to the Profile tab;
- Tap the three horizontal lines in the upper right corner of the screen;
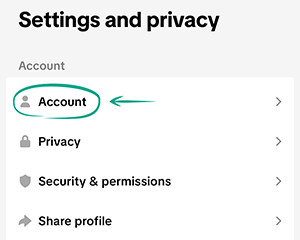
- Select Settings and privacy;
- Go to the Account section;
- Select Password;
- Enter your new password and tap Continue.
What for: So you definitely don't get hacked.
Before letting you access your TikTok account, the app by default requests a one-time code sent to the e-mail or phone that you use as your login. However, if a threat actor gains access to your phone or e-mail, they can grab that code and log in to your TikTok account. To avoid this scenario, set up two-factor authentication.
You can use your other one-time code (if you receive codes via both your e-mail and phone), a code from an authenticator app, or your account password for two-factor authentication in TikTok.
To enable two-factor authentication:
- Go to the Profile tab;
- Tap the three horizontal lines in the upper right corner of the screen;
- Select Settings and privacy;
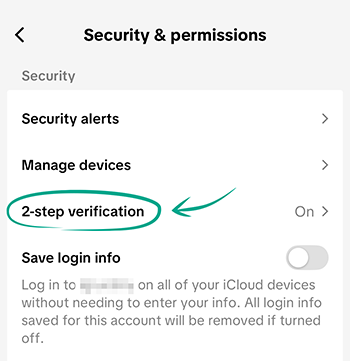
- Go to the Security & permissions section;
- Tap 2-step verification;
- Specify how TikTok will verify your identity. To do this, select at least two options from the list:
- Phone;
- Email;
- Authenticator;
- Password.
- Tap Turn on;
- The app will suggest a different action for each authentication method you selected in the previous step:
- Phone or Email. If you haven't yet linked a phone or e-mail to your account, TikTok will ask you to enter those and verify with a code sent to your phone or e-mail;
-
Authenticator. Generate a one-time code in a dedicated app, such as Kaspersky Password Manager (if you have a subscription), Authy, or Google Authenticator. To link an authenticator app:
- Scan the QR code or copy the long string of characters below it and add the account manually to your authenticator app;
- Tap Next;
- Enter the code from your authenticator app.
- Even if you haven't selected a phone code as one of your authentication methods, TikTok may ask you to link a phone number to your account. This is optional — you can tap Skip in the upper-right corner of the screen;
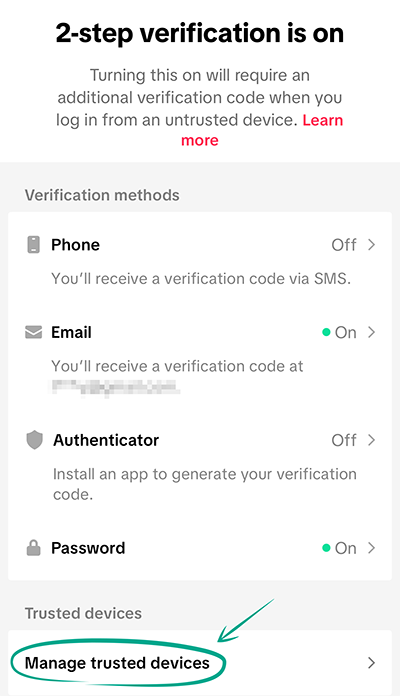
- After you confirm your selected authentication methods, a screen will appear with the following prompt: Add to trusted devices? When logging in from a trusted device, you won't need to go through two-step verification. If you want to add your current device to the trusted list, tap Add. If not, tap Skip.
Note: If an e-mail is linked to your account, the app will always request a code from your e-mail first when you attempt to log in to TikTok, and only then will suggest other authentication methods.
You can also add a device to the trusted list during login. To do this, select the following check box at the bottom of the screen: Trust this device to avoid 2-step verification for future logins. Be careful and do not do this if you are logging in to your account from someone else's device.
To add your device to the trusted list:
- Go to the Profile tab;
- Tap the three horizontal lines in the upper right corner of the screen;
- Select Settings and privacy;
- Go to the Security & permissions section;
- Tap 2-step verification;
- At the bottom of the page, tap Manage trusted devices;
- Tap Add trusted device;
- A list will open showing all devices used to log in to your account, including the current one. Select the current device and tap Add to the right of it.
If your old phone ends up in the hands of strangers, they will be able to log in to your account bypassing two-factor authentication. To avoid this scenario, periodically check your trusted devices list and keep only those you are currently using.
- Go to the Profile tab;
- Tap the three horizontal lines in the upper right corner of the screen;
- Select Settings and privacy;
- Go to the Security & permissions section;
- Tap 2-step verification;
- At the bottom of the screen, tap Manage trusted devices;
- A list of all devices considered trusted will open. The list displays the device models. The device you are using to check the list is labeled as This device. If you see an unfamiliar device, remove it from the trusted list by tapping the trash can icon next to it;
- Tap Delete.
What for: So that only you can log in to your account.
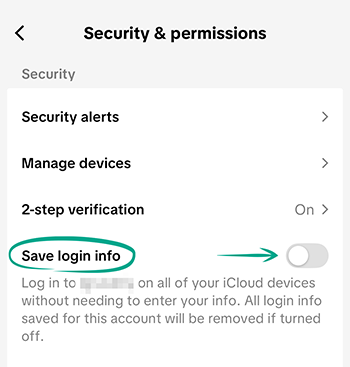
When you enter your login credentials in TikTok for iOS, the app automatically selects Save login info on your iCloud devices to log in automatically next time. This check box is easy to overlook. However, if your device lands in the wrong hands, or if you log in to TikTok from someone else's device, strangers might gain access to your account. To avoid that, disable password saving:
- Go to the Profile tab;
- Tap the three horizontal lines in the upper right corner of the screen;
- Select Settings and privacy;
- Go to the Security & permissions section;
- Toggle off Save login info.
Note: The app will continue prompting you to save your password every time you log in.
What for: To take timely security measures.
If you logged in to TikTok from someone else's phone or suspect your account has been hacked, you can check security alerts and information about important account activities.
To check security alerts:
- Go to the Profile tab;
- Tap the three horizontal lines in the upper right corner of the screen;
- Select Settings and privacy;
- Go to the Security & permissions section;
- Select Security alerts;
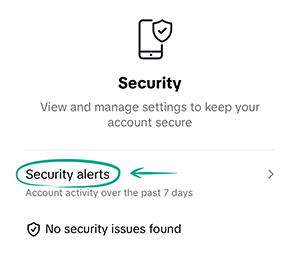
- Tap Security alerts a second time; In the opened window, you will see information about suspicious activity over the last 7 days. If the window is empty, everything is fine and no suspicious activity has been detected;
- Click Done.
If any of the events look suspicious, check the list of devices used to log in to your account and end any unauthorized TikTok sessions:
- Go to the Profile tab;
- Tap the three horizontal lines in the upper right corner of the screen;
- Select Settings and privacy;
- Go to the Security & permissions section;
- Select Manage devices;
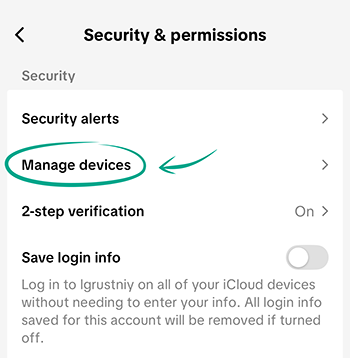
- Remove any devices that you do not recognize from the list. Tap the trash can icon next to the name of the device you want to remove;
- Tap Remove.
To view more detailed information, visit Account history. It records key actions affecting profile security, such as logins, password updates, and changing or unlinking phones and e-mails. For each event, the date, time, device, and location of the action are indicated.
To view your account history:
- Go to the Profile tab;
- Tap the three horizontal lines in the upper right corner of the screen;
- Select Settings and privacy;
- Open Activity center;
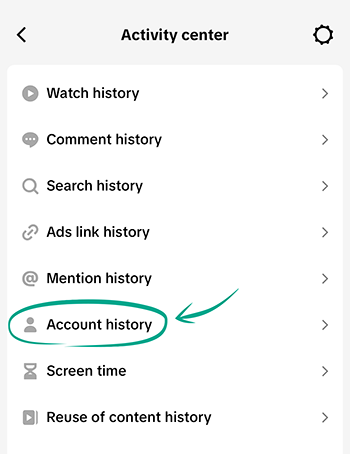
- Tap Account history;
- Review the list of events associated with your account.
Note: If you notice unfamiliar devices or suspicious activity, change your account password as quickly as possible.
What for: To reduce the risk of data leaks.
Some websites and apps offer additional tools for TikTok bloggers. To this end, they request permission to access your account details. Such sites and apps do not normally inform you explicitly about the specific permissions you grant them. Most often, this includes access to your name, profile photo, and the videos in your account. To revoke third-party access to your TikTok data:
- Go to the Profile tab;
- Tap the three horizontal lines in the upper right corner of the screen;
- Select Settings and privacy;
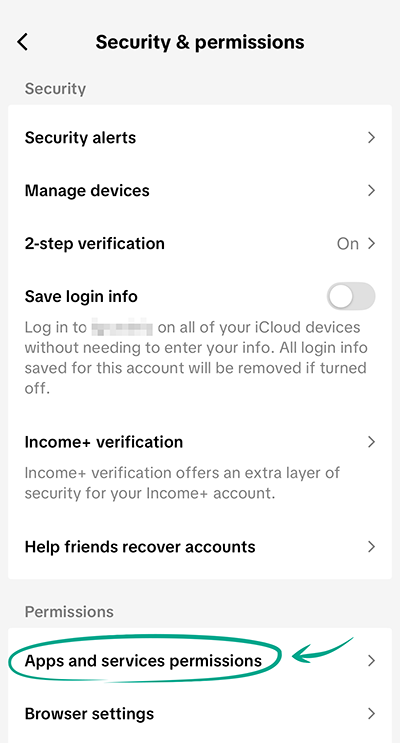
- Go to the Security & permissions section;
- Select Apps and services permissions;
- This opens a list of services. Tap the service you want to revoke access from;
- At the bottom of the screen, tap Remove all permissions;
- Tap Remove to confirm your decision.
Note: Removing access from a service does not automatically end your current session in that service. To completely unlink TikTok from the service, you need to log out manually.
What for: To reduce the risk of being hacked.
The phone number linked to your account can be used as the primary login method and for access recovery. However, linking your phone number exposes you to SIM swapping where attackers exploit your carrier to gain access to your accounts. If you consider this threat relevant, remove your phone number:
- Go to the Profile tab;
- Tap the three horizontal lines in the upper right corner of the screen;
- Select Settings and privacy;
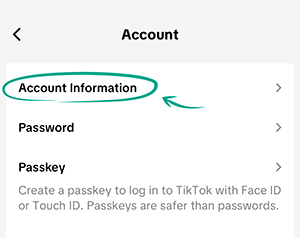
- Go to the Account section;
- Tap Account information;
- Tap Phone Number;
- Tap Unlink phone;
- Verify your identity by entering your account password or receiving a text message on your phone. Select one of two options:
- Your phone number;
- Password.
- Tap Next;
- Enter your password or the code from the text message;
- Tap Next;
- Tap Remove to confirm your decision.
Downside: You'll no longer be able to use one-time codes sent to your phone as the primary login method or as one of the two-factor authentication methods.
How to keep corporations out of your business
What for: To avoid storing payment information in the service.
The TikTok app has an in-app browser. It opens automatically when you tap links in videos, ads, or profiles, allowing you to view third-party websites without leaving the app. These sites may contain forms for logging in, subscribing, or making purchases. To make it easier to fill them out, TikTok prompts you to save your contact and payment information and use it for autofill in the future.
If you don't want TikTok to store this information, you can delete it and disable autofill:
- Go to the Profile tab;
- Tap the three horizontal lines in the upper right corner of the screen;
- Select Settings and privacy;
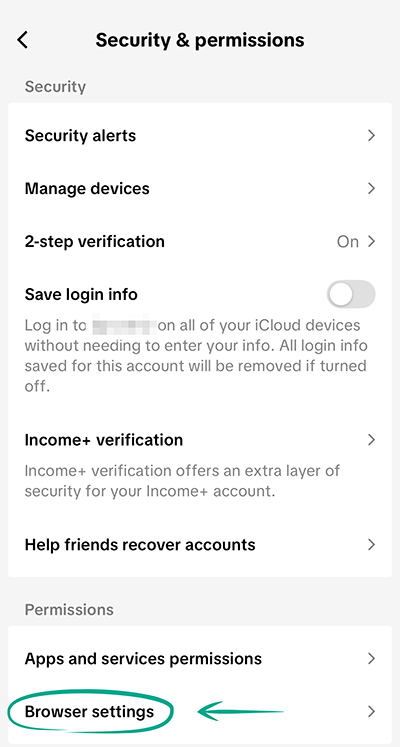
- Go to the Security & permissions section;
- Select Browser settings;
- Select All payment information and remove all data;
- Select Contact information and remove all data;
- Toggle off Autofill payment information and Autofill contact information.
Downside: You'll have to manually enter your information into forms every time.
What for: So no one knows where you are.
TikTok may use your location to personalize ads and video recommendations. If you do not want to share geolocation data, you can disable this setting and delete it. To disable geolocation:
- Go to the Profile tab;
- Tap the three horizontal lines in the upper right corner of the screen;
- Select Settings and privacy;
- Select Privacy;
- Tap Location Services;
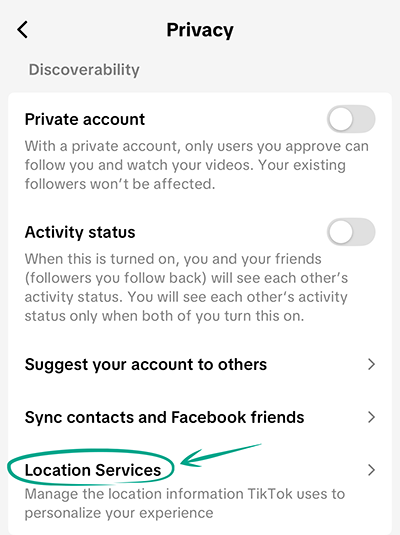
- Under Permission settings, select Never;
- Tap Delete certain location data;
- Tap Delete.
Note: Even if you forbid TikTok from using your precise location, the service will still know your approximate whereabouts from your IP address, SIM card, and regional settings, and will suggest videos and ads based on this information. This is how the app determines the user's location in countries where Location Services is hidden, such as the U.S. and Australia.
What for: To prevent TikTok from tracking your activity outside the platform.
To personalize ads, TikTok always considers your in-app activity, such as videos you've watched or posts you've liked. However, the platform may also receive data from third-party services and advertisers. Disable personalized ads if you wish to limit the use of off-platform information. In this case, TikTok will only consider your in-app activity, and the ads you see will be more generic.
To disable personalized ads and delete the off-platform data collected by the app:
- Go to the Profile tab;
- Tap the three horizontal lines in the upper right corner of the screen;
- Select Settings and privacy;
- Go to the Ads section;
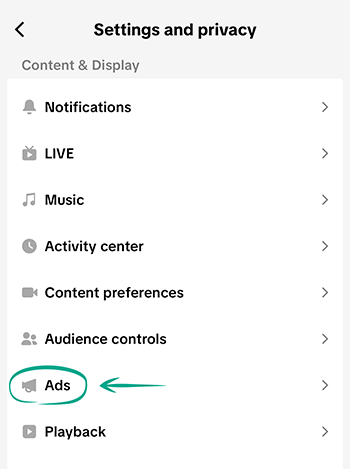
- Turn off Personalized ads. This action will also stop TikTok from collecting data from third-party services and advertisers;
- To delete previously collected activity data, go to the Manage your off-TikTok data section and click Clear off-TikTok data.
Note: Even after disabling personalization and deleting your data, ads will still appear on TikTok, but they will be less relevant. It may take up to 30 days to delete the off-TikTok activity data that has already been collected. Note that if you delete your data without disabling personalized ads, TikTok will resume collecting information from advertisers.
If you prefer not to disable ad personalization entirely but want to ensure that your interaction with a specific company does not affect the ads you see, you can block data collection from individual advertisers. To disable data collection by individual advertisers in TikTok:
- Go to the Profile tab;
- Tap the three horizontal lines in the upper right corner of the screen;
- Select Settings and privacy;
- Go to the Ads section;
- Click Disconnect advertisers;
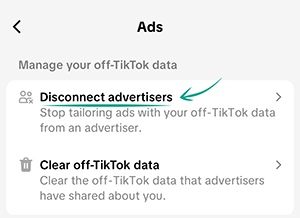
- Turn off the toggles next to the advertisers you want to exclude;
- In this same section, you can view a list of advertisers you have disconnected. Click Advertisers you have disconnected.
What for: So the app knows less about you.
When viewing ads on TikTok, you may follow links to external websites or built-in pages. All that activity is saved in a separate section. If you don't want the app to store information about your taps, you can clear your ads link history.
To delete your ads link history:
- Go to the Profile tab;
- Tap the three horizontal lines in the upper right corner of the screen;
- Select Settings and privacy;
- Open Activity center;
- Tap Ads link history;
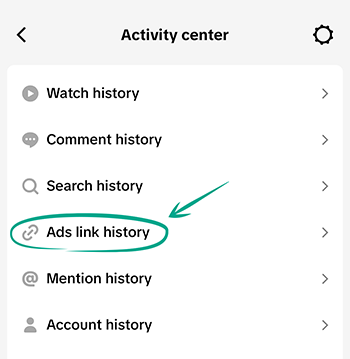
- Tap the three-dot icon in the upper right corner of the screen;
- Select Delete all.
What for: To prevent your contact details from ending up in the hands of cybercriminals in the event of a leak.
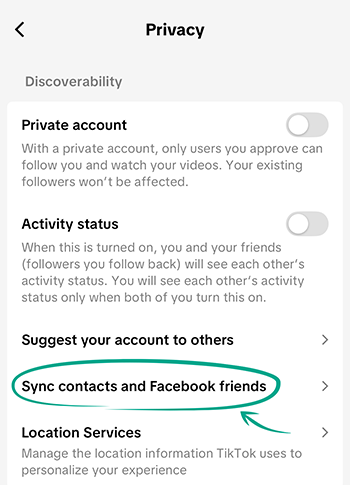
TikTok can use phone numbers and e-mail addresses from your contacts and Facebook friend lists to suggest profiles of people you know. It also uses this information for ad targeting, so it may share it with third parties, which increases the risk of a data leak. To disable syncing of your contacts and Facebook friends:
- Go to the Profile tab;
- Tap the three horizontal lines in the upper right corner of the screen;
- Select Settings and privacy;
- Go to the Privacy section;
- Tap Sync contacts and Facebook friends;
- If you have one or both of the Sync contacts and Sync Facebook friends options enabled:
- Tap Remove previously synced contacts and/or Remove previously synced Facebook friends;
- Tap Delete;
- Toggle off Sync contacts and/or Sync Facebook friends.
Downside: You may find it more difficult to find people you know on TikTok.
How to defeat spammers and trolls
What for: To keep your peace of mind.
TikTok lets you filter out posts containing specific words, phrases, or hashtags in their captions. This lets you hide unwanted posts.
To enable keyword filtering for posts:
- Go to the Profile tab;
- Tap the three horizontal lines in the upper right corner of the screen;
- Select Settings and privacy;
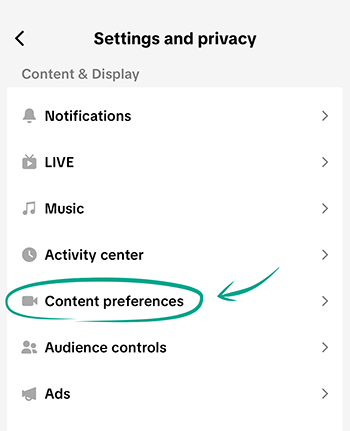
- Go to Content preferences;
- Tap Filter keywords;
- Click Add keyword;
- In the relevant field, enter the word you wish to filter out of your feeds;
- To filter posts that mention the word out of all feeds, click Select all. To selectively filter feeds, select one or more of the following:
- For you;
- Following;
- Friends;
- Live.
- Toggle on Smart filter to exclude words that have a similar spelling. For example, the keyword "cats" will also filter "c a t s" and "cat";
- Click Save.
Note: The filter is not case-sensitive. Words in lowercase will match those in uppercase, and vice versa.
What for: So that you do not see any spam or offensive remarks in comments.
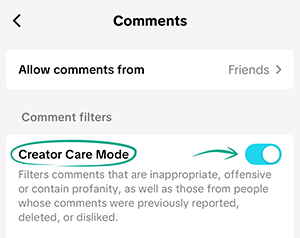
By default, TikTok automatically hides comments containing spam and insulting remarks. You can check if the filter is on and add your own excluded words to the standard list. Additionally, you can enable Creator Care Mode, which hides comments from users whose previous comments you have reported, deleted, or disliked.
To check if the auto-filter is enabled:
- Go to the Profile tab;
- Tap the three horizontal lines in the upper right corner of the screen;
- Select Settings and privacy;
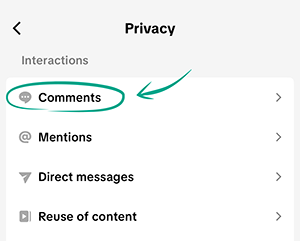
- Go to the Privacy section;
- Select Comments;
- Filter unwanted comments must be enabled.
To create your own list of excluded words or phrases:
- Go to the Profile tab;
- Tap the three horizontal lines in the upper right corner of the screen;
- Select Settings and privacy;
- Go to the Privacy section;
- Select Comments;
- Tap Filter specific keywords;
- Toggle on Filter specific keywords;
- Below Words you have blocked, enter the words or phrases you want to block;
- Click Done.
To enable Creator Care Mode:
- Go to the Profile tab;
- Tap the three horizontal lines in the upper right corner of the screen;
- Select Settings and privacy;
- Go to the Privacy section;
- Select Comments;
- Toggle on Creator Care Mode.
Note: All automatically hidden comments land in the Review filtered comments section where you can decide whether to approve them for publication or delete them permanently. This lets you control what is posted below your videos and restore comments that were hidden by mistake.
What for: To avoid unpleasant people.
If a TikTok user is leaving offensive comments, sending you spam, or is just being annoying, you can block this person. After that, they will not be able to watch your videos or send you messages. If you change your mind, you can always unblock the user.
Note: The user will not be notified of the block. Blocked users will be removed from your followers and no longer be able to find your profile or view your posts. You will automatically unfollow them and no longer be able to message or mention each other in comments. However, you might still see these users in multi-guest LIVEs, Duets posted by others, or shared group chats.
To block someone on TikTok:
- Open the profile of the user you wish to block;
- Tap the arrow icon in the upper right corner of the screen;
- Tap Block;
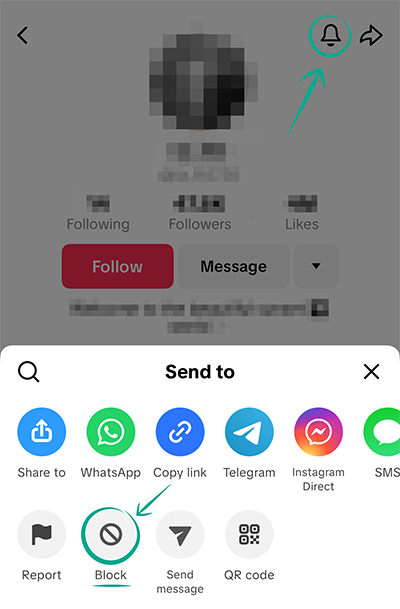
- In the opened window, tap Block to confirm your action.
You can block multiple users at the same time below your video:
- Open one of your posts;
- Tap Comments;
- Touch and hold a comment, then select Manage multiple comments;
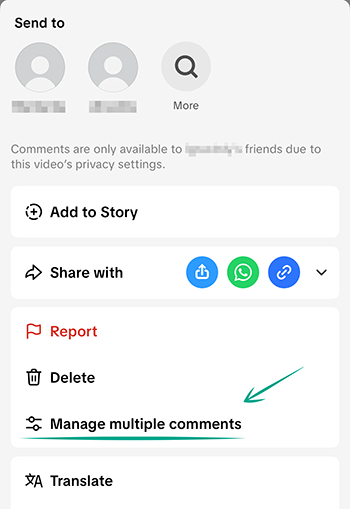
- Select the comments from the accounts you want to block;
- Tap More at the bottom of the screen;
- Tap Block accounts;
- In the opened window, tap Block to confirm your action.
To unblock a user:
- Go to the Profile tab;
- Tap the three horizontal lines in the upper right corner of the screen;
- Select Settings and privacy;
- Go to the Privacy section;
- Click Blocked accounts;
- Click Unblock next to the user you want to unblock.
Alternatively, you can unblock a user directly from their profile.
- Go to the profile of the user you want to unblock;
- Tap the pink Unblock button in the center;
- In the opened window, tap Unblock to confirm your action.
What for: To track and prevent unwanted use of your posts.
Other creators can use your TikTok posts for Duets, Stitches, stickers, and stories. You can monitor this content to see if your posts are being used in an offensive, inappropriate, or simply undesirable context. While you cannot selectively delete others' posts, if you delete your original post all its reuses by other users will also disappear.
Downside: Your original post along with all posts by other users that reused it will be permanently deleted. If the original is important to you, download it to your device beforehand.
To find all content reusing your posts and delete your original post:
- Go to the Profile tab;
- Tap the three horizontal lines in the upper right corner of the screen;
- Select Settings and privacy;
- Open Activity center;
- Tap Reuse of content history;

- Review the list of posts that have reused your videos;
- To delete a post and all its reuses:
- Tap the post;
- Tap the three dots in the upper right corner of the screen;
- Tap Delete all posts;
- Tap Delete.
How to do the same through the Duet and Stitch management menu:
- Go to the Profile tab;
- Tap the three horizontal lines in the upper right corner of the screen;
- Select Settings and privacy;
- Go to the Privacy section;
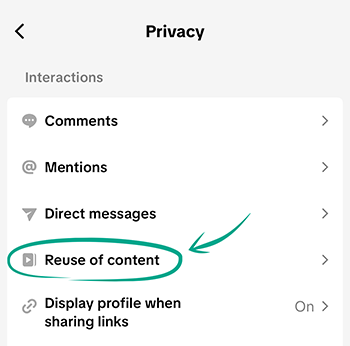
- Go to Reuse of content;
- Select Manage Duet and Stitch posts;
- Review the list of posts that have reused your videos;
- To delete a post and all its reuses:
- Tap the post;
- Tap the three dots in the upper right corner of the screen;
- Tap Delete all posts;
- Tap Delete.
What for: To remove irrelevant comments.
If nasty messages and ads keep showing up under your posts, you can restrict everyone but your friends from commenting on your posts, or completely disable comments on certain posts. To restrict comments on all posts:
- Go to the Profile tab;
- Tap the three horizontal lines in the upper right corner of the screen;
- Select Settings and privacy;
- Go to the Privacy section;
- Select Comments;
- Tap Allow comments from;
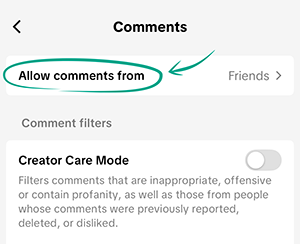
- Select Friends.
Note: Your followers (users you haven't followed back) won't be able to comment on your posts.
To disable comments for a video before posting:
- After you finish shooting and editing a post, tap Next;
- On the Post screen, tap Privacy settings;
- Disable Allow comments;
- Click Post.
To disable comments for an already posted video:
- Go to the Profile tab;
- Open the video that you would like to disable comments for;
- Select Privacy settings in the lower-right corner or tap the three dots in the right part of the screen;
- Disable the Allow comments option.
To disable comments for several published posts at the same time:
- Go to the Profile tab;
- Tap the three horizontal lines in the upper right corner of the screen;
- Select Settings and privacy;
- Select Activity center;
- Select Manage comments permission;
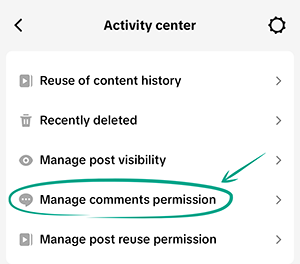
- Select the posts you want to disable comments for;
- Tap Next;
- Select Don't allow comments;
- Tap Update.
What for: To prevent others from using your videos for their own purposes.
By default, any TikTok user can reuse your content: they can create a Duet or Stitch their video with yours, make a Sticker from your post, or add it to their Story. However, your haters can abuse this feature to insult you or make fun of you. In addition to that, all of that creator's followers will see your video. It could be anyone, including those that you would rather not share your posts with.
To restrict reuse of your content to friends only:
- Go to the Profile tab;
- Tap the three horizontal lines in the upper right corner of the screen;
- Select Settings and privacy;
- Go to the Privacy section;
- Go to Reuse of content;
- Tap Allow reuse of content from and select Friends;
Note: Only users you follow and who follow you back will be able to reuse your content.
You can also disable content reuse for individual posts. To do this before posting the video:
- After you finish shooting and editing a post, tap Next;
- On the Post screen, tap Privacy settings;
- Turn off Allow reuse of content;
- Click Post.
To prevent the reuse of your content for a specific video that has already been posted:
- Go to the Profile tab;
- Open the video for which you would like to disable the Duet and React features;
- Select Privacy settings in the lower-right corner or tap the three dots in the right part of the screen;
- Turn off Allow reuse of content.
To prevent the reuse of your content for a specific video you've posted:
- Go to the Profile tab;
- Tap the three horizontal lines in the upper right corner of the screen;
- Select Settings and privacy;
- Select Activity center;
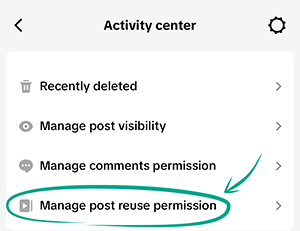
- Go to Manage post reuse permission;
- Select the posts you want to disable reuse for;
- Tap Next;
- Select Don't allow reuse of content;
- Tap Update.
What for: To prevent your name from appearing next to offensive posts.
Other TikTok users can mention your profile name in their posts with a link to it. The post will appear in your friends' feeds, and in the feeds of the author's followers and friends. To prevent being mentioned in an inappropriate context and to keep your information from being shared with strangers, limit who can mention you:
- Go to the Profile tab;
- Tap the three horizontal lines in the upper right corner of the screen;
- Select Settings and privacy;
- Go to the Privacy section;
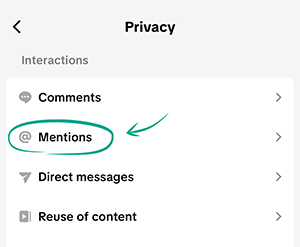
- Go to Mentions;
- Select Allow mentions from;
- Select an option:
- People you follow;
- Friends;
- No one.
What for: To avoid unwanted communication.
TikTok lets you limit those who can send you direct messages. This helps protect you from spam and unwanted contacts. By default, the app has relatively strict settings — only messages from friends and people you follow are accepted. Other groups, such as suggested friends or followers, cannot start a conversation with you without prior approval. To do this, they must send you a message request. You can change these restrictions:
- Go to the Profile tab;
- Tap the three horizontal lines in the upper right corner of the screen;
- Select Settings and privacy;
- Go to the Privacy section;
- Select Direct messages;
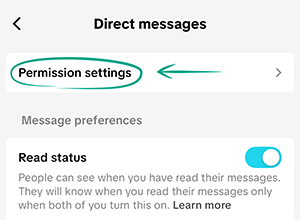
- Tap Permission settings to open the Who can send you messages section;
- Under Who can send you messages, configure Potential connections (your followers) and Others on TikTok (all other users). For each category, you can choose between two options:
- Requests: The user must send you a message request before they can start chatting with you.
- Don't receive: The users in the selected category won't be able to send you message requests.
To change the current setting for a category, tap Potential connections or Others on TikTok and select the appropriate option.
How to hide from prying eyes
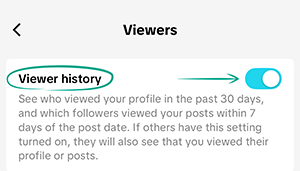
What for: To make sure no visit goes unnoticed.
TikTok has a profile viewer logging feature: It shows which users have visited your profile and viewed your posts. By checking this history, you can see who is interested in you and block them if you don't want them watching your posts.
Downside: By enabling this option, you also allow other users to see that you visited their profile and viewed their posts.
To enable viewer history on your profile page:
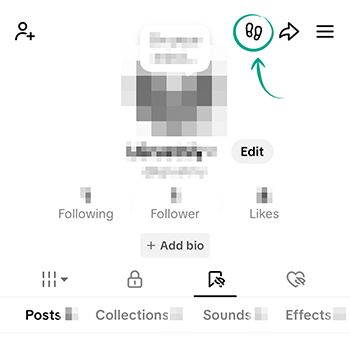
- Go to the Profile tab;
- Tap the footprints icon in the upper-right corner of the screen;
- Tap Turn on.
To enable view history via profile settings:
- Go to the Profile tab;
- Tap the three horizontal lines in the upper right corner of the screen;
- Select Settings and privacy;
- Go to the Privacy section;
- Select Viewers;
- Toggle on Viewer history.
To see the profile viewing history:
- Go to the Profile tab;
- Tap the footprints icon in the upper-right corner of the screen. This displays a list of all users who have visited your profile in the past 30 days.
Note: You can only track visits to your profile from users who also have this option enabled. Profile view history is available for 30 days, and watch history for 7 days.
What for: To prevent strangers from finding out about your interests.
TikTok lets you control what information about your actions is visible to other users. This applies to follow lists, liked posts, and sounds saved to favorites.
To hide this information from others:
- Go to the Profile tab;
- Tap the three horizontal lines in the upper right corner of the screen;
- Select Settings and privacy;
- Go to the Privacy section;
- Tap Following list and select Only you;
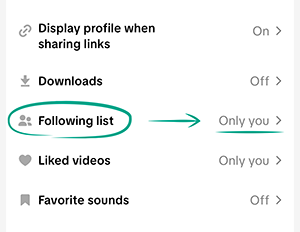
- Tap Liked videos and select Only you;
- Tap Favorite sounds and check that Make public is toggled off.
What for: To stay anonymous.
If you share a link to one of your posts via a messaging app or social media service with someone who has a TikTok profile, the link will open in their app along with a link to your profile. This option is enabled by default. If you do not want the app to suggest visiting your profile when opening links, you can disable it.
- Go to the Profile tab;
- Tap the three horizontal lines in the upper right corner of the screen;
- Select Settings and privacy;
- Go to the Privacy section;
- Tap Display profile when sharing links;
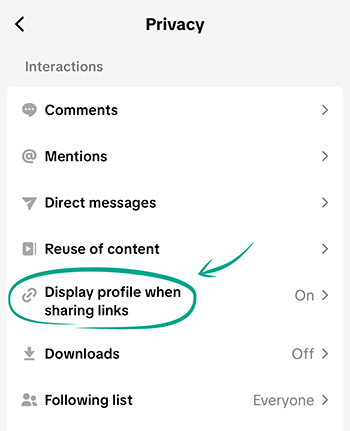
- Toggle off Display profile when sharing links.
What for: To prevent your personal information from ending up in the wrong hands.
TikTok may recommend your account to other users. You cannot disable this algorithm completely, but you can prevent your profile from being suggested to your phone contacts or Facebook friends.
- Go to the Profile tab;
- Tap the three horizontal lines in the upper right corner of the screen;
- Select Settings and privacy;
- Go to the Privacy section;
- Go to Suggest your account to others;
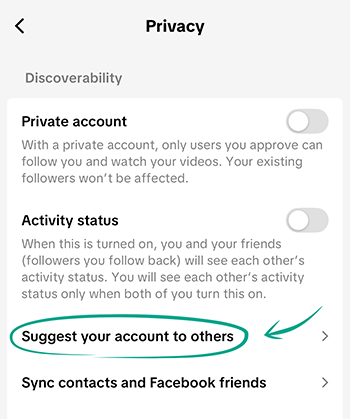
- Disable the relevant user groups to stop TikTok from recommending your profile to these users:
- Contacts;
- Facebook friends.
Note: Not adding a phone number to your profile, using a unique e-mail, and not linking TikTok to any other services significantly reduce the likelihood of your profile being suggested to contacts.
What for: To keep your personal information private.
Certain videos may contain information that you do not want to share. Of course, it would be best to not upload such videos to TikTok at all. However, if you need to do this for some reason, you can make the video private so that no one can see it except you.
To hide a new video:
- After you finish shooting and editing a post, tap Next;
- On the Post screen, tap Everyone can view this post, or Followers can view this post if you have a private account;
- Tap Who can view this post and select Only you;
- Click Post.
To change the settings for a video that has already been posted:
- Go to the Profile tab;
- Open the post you want to hide;
- Select Privacy settings in the lower-right corner or tap the three dots in the right part of the screen, then select Privacy settings;
- Under Who can see this post, select Only you.
To hide several posted videos at a time:
- Go to the Profile tab;
- Tap the three horizontal lines in the upper right corner of the screen;
- Select Settings and privacy;
- Tap Activity center;
- Go to Manage post visibility;
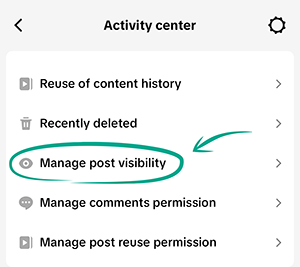
- Select the posts you want to hide;
- Tap Next;
- Select who can see your posts:
- Everyone;
- Friends;
- Only you.
- Tap Update.
What for: To keep strangers from accessing your TikTok activity history.
Activity Center contains sensitive data, such as account history, search history, ads link history, and other logs. To keep strangers from viewing that information, TikTok lets you activate extra security. When you try to open the menu section, the app will request Face ID, Touch ID, or a passcode, depending on which options your device supports.
To secure Activity Center:
- Go to the Profile tab;
- Tap the three horizontal lines in the upper right corner of the screen;
- Select Settings and privacy;
- Open Activity center;
- Tap the cogwheel in the upper right corner;
- Toggle on Unlock with Face ID:
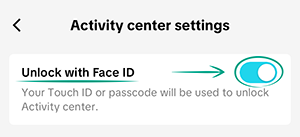
- The option can have different names depending on the authentication method available on your device: Unlock with Touch ID, Unlock with Face ID, or Unlock with passcode.
- Tap Allow;
- Confirm the action with Face ID, Touch ID, or a passcode.
Why: To protect your preferences from strangers.
TikTok saves all your searches in a dedicated app section. This comes in handy when you want to quickly revisit something you recently searched for, but it poses a privacy risk if another person has access to your device. To ensure no one sees your search history, you can clear all of it.
Downside: You cannot stop TikTok from logging your searches. Therefore, you'll have to delete your history every time you plan to leave your phone unattended or give it to another person.
To delete your search history:
- Go to the Profile tab;
- Tap the three horizontal lines in the upper right corner of the screen;
- Select Settings and privacy;
- Open Activity center;
- Tap Search history;
- Tap Select in the upper-right corner;
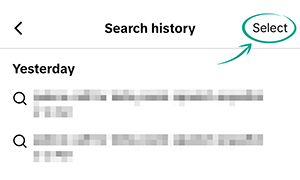
- Select all items you want to delete;
- To delete all your searches at the same time, tap Select all search history in the lower-left corner of the screen;
- Tap Delete if you've selected some records, or Delete all if you've selected all of them;
- Tap Delete.
What for: To hide your data from strangers.
By default, your posts are visible to all TikTok users. That could be anyone including those you would rather not share your personal information with. To keep your info hidden from others, you can make your profile private so that only approved followers can see your videos.
To make your profile private:
- Go to the Profile tab;
- Tap the three horizontal lines in the upper right corner of the screen;
- Select Settings and privacy;
- Go to the Privacy section;
- Turn on Private account.
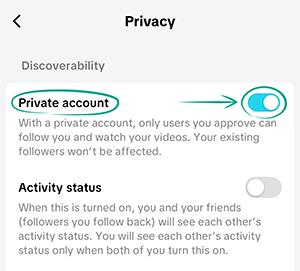
Note: When your profile is public, anyone can follow you. With a private profile, anyone who wants to follow you must send a request and wait for your approval. If you switch to a private account, your existing followers will still be able to see your videos. If you switch your account from private to public, all pending follow requests will be approved automatically.
To remove a user from your list of followers:
- Go to the Profile tab;
- Tap the number of followers under your profile image;
- Tap the three-dot icon to the right of the name of the follower you want to remove;
- Select Remove this follower;
- Tap Remove.
If a user is removed from your list of followers, they will not be notified about it.
How to keep your data from being stolen
What for: To back up your important data.
TikTok collects and stores a lot of information about you. The app contains data that you have specified in your profile as well as information about your activity (for example, likes and purchase history) and all of your settings. If your account is stolen or blocked, this data will be lost. To prevent this from happening, you can request an archive of your data from TikTok and download it to your phone or computer.
- Go to the Profile tab;
- Tap the three horizontal lines in the upper right corner of the screen;
- Select Settings and privacy;
- Go to the Account section;
- Select Download your data;
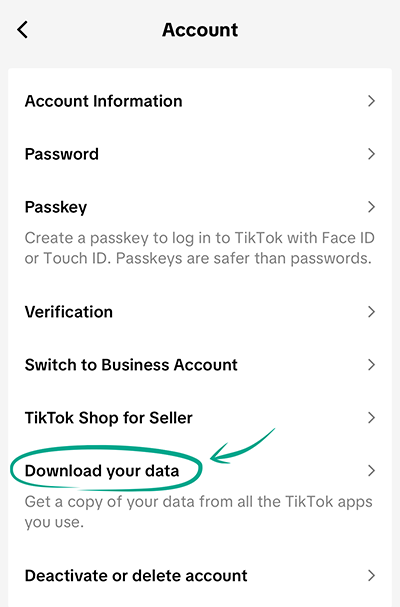
- You'll be prompted to download all available data by default. If you want to select specific categories, tap All data, then Custom, and select the items you need:
- Profile and posts;
- Activity;
- Messages.
- Click Done;
- Tap Request data.
Note: It may take up to four days for the ZIP archive to appear after your request. You will receive a notification as soon as it is ready.
To download the archive:
- Go to the Profile tab;
- Tap the three horizontal lines in the upper right corner of the screen;
- Select Settings and privacy;
- Go to the Account section;
- Select Download your data;
- Select Download data;
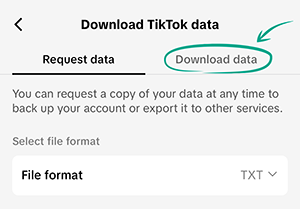
- Tap Download next to your request;
- Click Send Code;
- Enter the code sent to your e-mail or phone. After the code is verified, your download will start automatically.
What for: To ensure no one steals your content.
If you allow others to download your videos, anyone can save them and post them from their account. To stop others from downloading your videos:
- Go to the Profile tab;
- Tap the three horizontal lines in the upper right corner of the screen;
- Select Settings and privacy;
- Go to the Privacy section;
- Select Downloads;
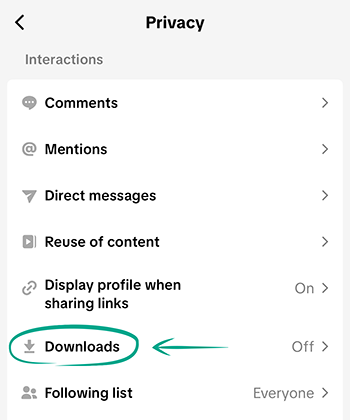
- Toggle off Video downloads.
Note: Users can still share links to your content.
How to improve your TikTok experience
What for: To control the amount of time you spend in TikTok.
If you're concerned about spending too much time on TikTok, you can set a daily screen time limit. When the limit is reached, the app will notify you and prompt you to enter the passcode 1234 to continue. This passcode is universal and cannot be changed by the user, so the feature serves more as a reminder to take a break.
To set a time limit:
- Go to the Profile tab;
- Tap the three horizontal lines in the upper right corner of the screen;
- Select Settings and privacy;
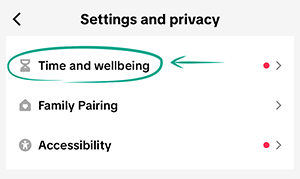
- Tap Activity center or Time and wellbeing;
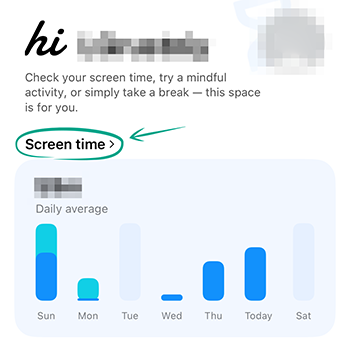
- Select Screen time;
- Select Daily screen time;
- Tap Set daily screen time. You can set a separate limit for each day or use the same limit for every day. Select one of the following items:
- Set the same limit every day;
- Set a custom limit per day.
- Select your daily time limit from the list:
- Tap Custom time to specify an exact period;
- Tap Done.
- Tap Next.
After your time limit is reached, you will receive a notification. To continue using the app, you will need to enter the passcode 1234 displayed on the screen.
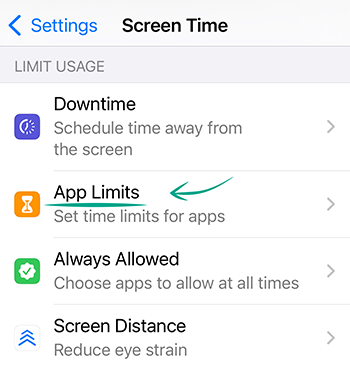
You can also use the iOS system settings to set a daily limit on app usage. When you reach the usage limit, the screen will dim and you will see a notification.
To set a time limit:
- Open Settings;
- Select Screen time;
- Tap App Limits;
- Select the appropriate option;
- Tap Add Limit;
- Tap the arrow to the right of Social and select all social media and messaging apps you want to apply the limit to;
- Tap Next;
- Set a time limit. Note that the limit will apply to all the selected apps;
- Tap Add.
Note: You can continue to use the TikTok app after you reach the limit. Just tap Ignore Limit in the notification.
What for: To take breaks on time.
This feature helps prevent excessive TikTok use. It's easy to lose track of time when you've been scrolling through your feed non-stop for a long time. Break reminders display an in-app notification suggesting you take a pause to rest, switch to other tasks, or simply give your eyes a break from the screen.
To activate the reminders:
- Go to the Profile tab;
- Tap the three horizontal lines in the upper right corner of the screen;
- Select Settings and privacy;
- Tap Activity center or Time and wellbeing;
- Select Screen time;
- Click Screen time breaks;
- Tap Schedule break;
- Select an interval that works for you:
- 10 minutes;
- 20 minutes;
- 30 minutes;
- Custom time: Set an interval manually and tap Done.
What for: To avoid distractions.
If you want to disable push notifications fully or partially, you can do so through your device settings. You can also set a custom schedule for push notifications within the app.
To disable push notifications completely:
- Open Settings on your device;
- Locate and select TikTok in the list of apps;
- Select Notifications;
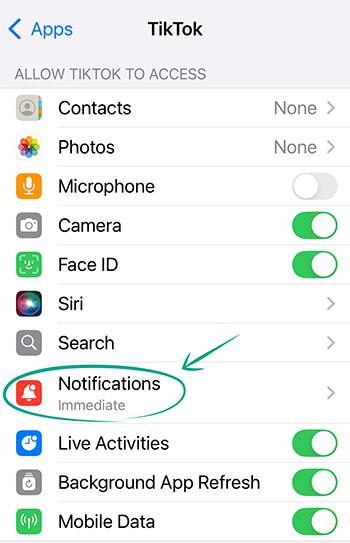
- Disable the Allow notifications option.
If you'd like to keep getting certain notifications, the TikTok app lets you choose which notifications it sends you.
- Go to the Profile tab;
- Tap the three horizontal lines in the upper right corner of the screen;
- Select Settings and privacy;
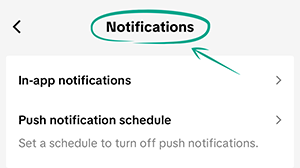
- Open Notifications;
- Toggle off unwanted options under:
- Interactions;
- Messages;
- Post suggestions;
- Personalized post suggestions;
- LIVE, including LIVE notification settings and Creator ranking notifications;
- TikTok Shop;
- Screen time;
- Other, including People you may know, Customized updates and more, and Notifications from your other TikTok accounts.
You can also set up a schedule for receiving push notifications at a time that is convenient for you:
- Go to the Profile tab;
- Tap the three horizontal lines in the upper right corner of the screen;
- Select Settings and privacy;
- Open Notifications;
- Tap Push notification schedule;
- Toggle on Set a schedule;
- Set a period during which TikTok will be allowed to send you push notifications by specifying a Start and End;
- Click Done.
What for: To temporarily get rid of intrusive or irrelevant ads from specific companies.
On TikTok, you can manage what ads you see. Sometimes ads from certain companies may feel too intrusive or irrelevant to you. In this case, you can hide them.
To hide an advertiser:
- Go to the Profile tab;
- Tap the three horizontal lines in the upper right corner of the screen;
- Select Settings and privacy;
- Go to the Ads section;
- Click Mute Advertisers;
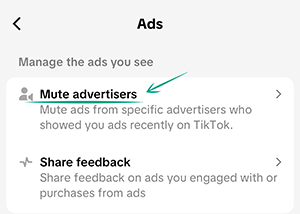
- Select the advertiser from the list;
- Tap Hide.
To view a list of advertisers you've hidden, under Mute advertisers, tap Advertisers you have hidden.
Note: It is not possible to hide an advertiser permanently. Ads from hidden advertisers will stop appearing for only 28 days, and then ads from these companies may reappear.
What for: To go to bed on time.
Sleep mode helps you reduce TikTok usage at night. This feature mutes push notifications and reminds you when it's time to stop watching videos.
To turn on sleep mode:
- Go to the Profile tab;
- Tap the three horizontal lines in the upper right corner of the screen;
- Select Settings and privacy;
- Tap Activity center or Time and wellbeing;
- Select Screen time;
- Click Sleep hours;
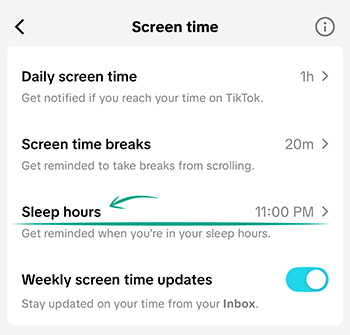
- Toggle on Sleep hours;
- Under Set your sleep hours, set Start time as the time when you want sleep mode to kick in. The End time will be set automatically 8 hours after the start time.
What for: To keep track of the time you spend on TikTok.
You can enable weekly updates on TikTok to receive notifications about your time spent in the app. This tool helps you monitor your habits and reduce your overall screen time on TikTok.
- Go to the Profile tab;
- Tap the three horizontal lines in the upper right corner of the screen;
- Select Settings and privacy;
- Tap Activity center or Time and wellbeing;
- Select Screen time;
- Turn on Weekly screen time updates.
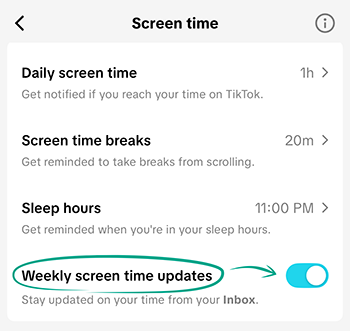
Note: You will receive a weekly notification with your statistics in your TikTok Inbox. You can check your TikTok screen time statistics at any time in Screen time.
You can also get weekly summaries in the form of TikTok push notifications.
To enable weekly summaries in the form of push notifications:
- Go to the Profile tab;
- Tap the three horizontal lines in the upper right corner of the screen;
- Select Settings and privacy;
- Open Notifications;
- Under Screen time, toggle on Weekly screen time updates.

Downside: This option is only available as long as push notifications are enabled.
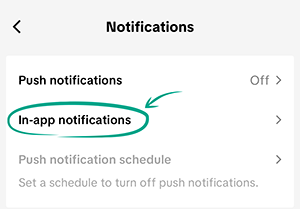
What for: Less distraction.
By default, TikTok will send you in-app notifications if anyone liked your video or commented on it, and for recommendations, live broadcasts, and your friends' new posts. Constant notifications can be really annoying and distracting. In addition, certain notifications are even displayed on the phone lock screen, which means that they might be seen by strangers.
To disable in-app notifications:
- Go to the Profile tab;
- Tap the three horizontal lines in the upper right corner of the screen;
- Select Settings and privacy;
- Select Notifications;
- Click In-app notifications;
- Toggle off the unwanted options under Interactions, Messages, Post suggestions, LIVE, and Other:
- Likes;
- Comments;
- New followers;
- Mentions and tags;
- Activity status;
- Profile views;
- Streaks;
- Direct messages;
- Seller messages;
- New posts;
- LIVE;
- Vibrate for LIVE guest invitations;
- Customized updates and more.
To disable all e-mail notifications at once:
- Go to the Profile tab;
- Tap the three horizontal lines in the upper right corner of the screen;
- Select Settings and privacy;
- Select Notifications;
- Tap Email notifications;
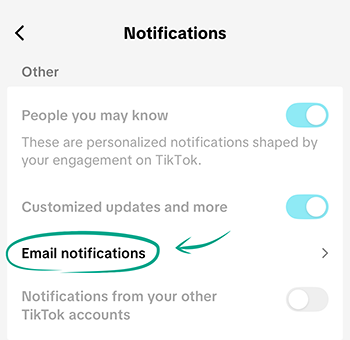
- Toggle off All email notifications.
If you'd like to keep getting certain notifications, the TikTok app lets you choose which notifications it sends you by e-mail.
- Go to the Profile tab;
- Tap the three horizontal lines in the upper right corner of the screen;
- Select Settings and privacy;
- Select Notifications;
- Tap Email notifications;
- Disable notifications that you do not want:
- News bulletins;
- Discover;
- Account updates;
- Suggested accounts;
- Promotions;
- Product updates;
- Feedback.
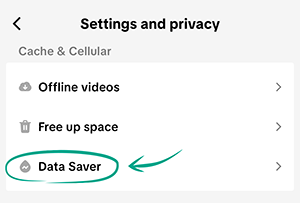
What for: To reduce mobile data usage.
TikTok consumes a lot of internet data by loading high-resolution video, playing them back automatically, and downloading effects and stickers in the background. If you have a limited data plan or want to reduce mobile data usage, you can enable Data Saver. This will cause the app to load videos in lower resolution to reduce the amount of data it consumes.
To enable Data Saver:
- Go to the Profile tab;
- Tap the three horizontal lines in the upper right corner of the screen;
- Select Settings and privacy;
- Go to Data Saver;
- Toggle on Data Saver.
Downside: Videos will play in lower resolution while Data Saver is on.
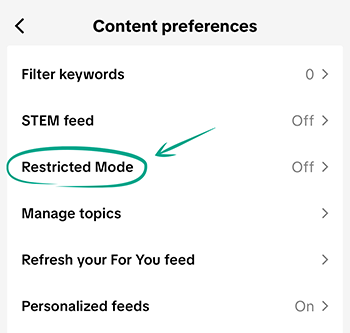
What for: Peace of mind.
Videos that have received a lot of likes and views may appear in your TikTok feed. Sometimes these videos contain adult content, such as scenes of violence, obscene language, or nudity. If you'd rather not see posts like that, you can enable Restricted Mode:
- Go to the Profile tab;
- Tap the three horizontal lines in the upper right corner of the screen;
- Select Settings and privacy;
- Go to Content preferences;
- Tap Restricted Mode;
- Tap Turn on;
- The app may ask why you want to enable Restricted Mode. Select the appropriate option and tap Submit.
To keep anyone but you from disabling Restricted Mode, TikTok lets you set a passcode. This is especially helpful if you share your device with a child. Your kid won't be able to turn off content filtering.
To set a passcode:
- Go to the Profile tab;
- Tap the three horizontal lines in the upper right corner of the screen;
- Select Settings and privacy;
- Go to Content preferences;
- Tap Restricted Mode;
- Tap Add passcode;
- Enter a passcode;
- Enter it again to confirm.
Note that you'll have to enter the passcode to log out of your account.
You can change or remove the passcode if you need to.
- Go to the Profile tab;
- Tap the three horizontal lines in the upper right corner of the screen;
- Select Settings and privacy;
- Go to Content preferences;
- Tap Restricted Mode;
- Tap Manage passcode;
- Select the appropriate option:
- Change passcode;
- Delete passcode.
- Follow the on-screen instructions.