


How to configure your Google account
If you use Chrome with a Google account, the safety of your data in the browser depends directly on your account's security. Therefore, check your Google account settings in addition to your browser settings.
How to protect yourself from malicious websites and programs
What for: To keep your protection up to date.
Chrome developers consistently add new features and fix vulnerabilities, so it is important to always use the latest version of the app. Make sure you have automatic update installation enabled on your smartphone:
- Open Google Play;
- Tap your avatar in the right part of the search field;
- Go to the Settings section and select Network preferences;
- Tap Auto-update apps.

- Choose if updates should be downloaded: while connected to any network or over Wi-Fi only;
- Tap OK.
Downside: All apps, not just Chrome, will be updated automatically. This may use a lot of traffic.
Besides, you have the option to check for and install updates manually any time.
- Launch Chrome;
- Tap the three dots in the upper right corner of the screen;
- Select Settings;
- Select Safety check.
- Tap Check now.
The system will offer to install a new update if it finds one.
What for: To leave no tracks.
The browser usually saves information about the pages you visit, the passwords you enter, the permissions you give, and some website data. If you want to hide these — for example, when using someone else's phone — switch to incognito mode. While in this mode, Chrome will delete the passwords you've entered, browser history, and site data immediately after you close all program windows launched in incognito mode.
To enter incognito mode:
- Tap the three dots in the upper right corner of the screen;
- Select New Incognito tab.

What for: To keep your protection up to date.
Chrome developers consistently add new features and fix vulnerabilities, so it is important to always use the latest version of the app. Make sure you have automatic update installation enabled on your smartphone:
- Open Google Play;
- Tap your avatar in the right part of the search field;
- Go to the Settings section and select Network preferences;
- Tap Auto-update apps;

- Choose if updates should be downloaded: while connected to any network or over Wi-Fi only;
- Tap OK.
Downside: All apps, not just Chrome, will be updated automatically. This may use a lot of traffic.
You have the option to check for and install updates manually any time.
- Tap the three dots in the upper right corner of the screen;
- Select Settings;
- Select Safety Check;
- Tap Check Now.
The system will offer to install a new update if it finds one.
How to keep corporations out of your business
What for: To stop Google from storing information about your Internet activity on its servers.
Chrome allows you to sync your browsing history, passwords, and other account data across all devices signed in to your Google account. For example, when you bookmark a website on your smartphone, you'll be able to find it in the bookmarks section on your PC. To enable this, Google saves your personal information on its servers, including the pages you visit, the tabs you have open, URLs, and other information. If you don't want to share your information, disable syncing.
To turn off syncing in your current browser:
- Tap the three dots in the upper right corner of the screen;
- Select Settings;
- Go to the Sync section;
- Disable Sync everything. Now you can choose the types of data to sync by enabling or disabling corresponding options in the list below;
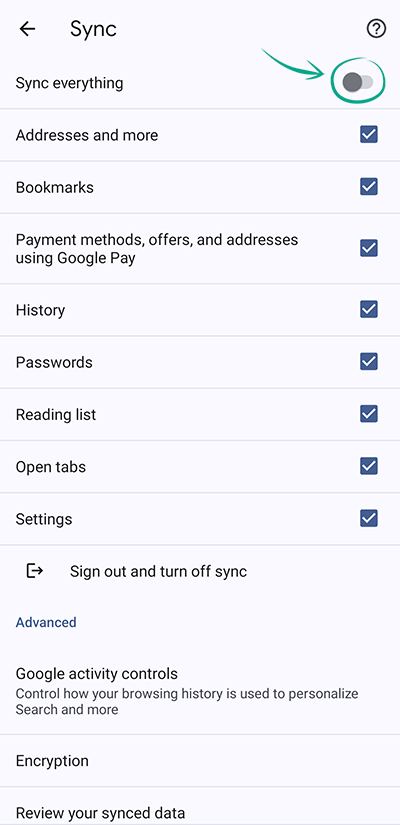
- To delete all account data from a device (for example, if you signed in to your account on someone else's smartphone), select Sign out and turn off sync. In the window that opens, check the box next to Also clear your Chrome data from this device and tap Continue.
Sync may still continue to work on other devices — for instance, if you have it enabled in Chrome on your computer.
To completely disable this feature and delete all saved data:
- Open the Data from Chrome sync page;
- Sign in to your account;
- Scroll down, tap Clear Data, and confirm your choice.
Google will delete your account information from its servers and sync will be disabled on all devices.
Downside: You won't be able to access passwords, bookmarks, and other Google account data from other devices.
What for: To keep information about how you use the browser away from Google.
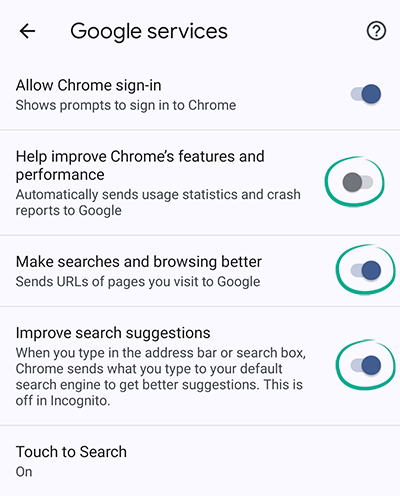
Chrome can automatically send website addresses you visit, your search queries, browser error logs, and other data to the developers. Developers claim that this helps them improve app performance and fix bugs. However, in that case, your browser activity will be stored on Google servers. If you don't want to share this information, disable Google Services syncing:
- Tap the three dots in the upper right corner of the screen;
- Select Settings;
- Go to the Google services section;
- Disable the following:
- Help improve Chrome's features and performance;
- Make searches and browsing better;
- Improve search suggestions.
What for: To prevent Google from knowing where you go.
The browser can access your phone's location services to use the information for more precise searches and add choices. For example, if you want to book a table at a restaurant, the top search results will be of places near you. To enable this, Chrome transmits your location to Google servers, which puts you at risk of a data breach. To stop the browser from accessing this information:
- Go to your smartphone's Settings;
- Go to the Location section;
- Select App location permissions;
- Find Chrome in the list of apps;
- Select Deny and confirm your decision.
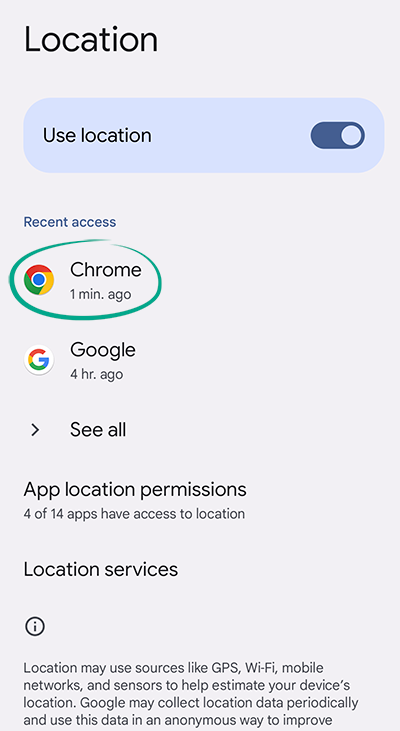
Downside: Search results may become less accurate.
How to protect your personal information
What for: To protect against leaks.
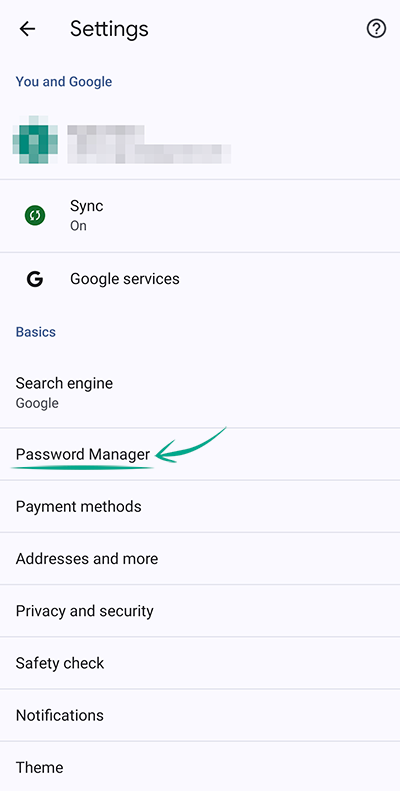
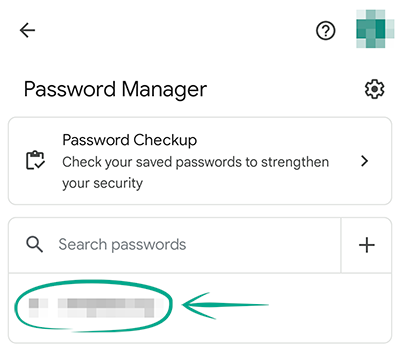
When you sign in to a website, Chrome prompts you to save your password. This allows it to fill in your login credentials for you next time. The browser can check whether your passwords have been exposed in a data leak. To start a scan:
- Tap the three dots in the upper right corner of the screen;
- Select Settings;
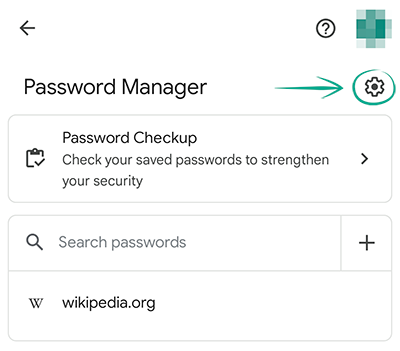
- Go to the Password Manager section;

- Tap Password Checkup.
Or:
- Tap the three dots in the upper right corner of the screen;
- Select Settings;
- Go to Safety check;
- Tap Check now.
If your passwords have been leaked, you'll see a message about it. If so, change the vulnerable passwords as soon as possible.
Set up notifications, so that the system alerts you immediately if your passwords are compromised:
- Tap the three dots in the upper right corner of the screen;
- Select Settings;
- Open Password Manager;
- Tap the cogwheel in the upper right corner of the screen;
- Enable Warn you if passwords are exposed in a data breach.
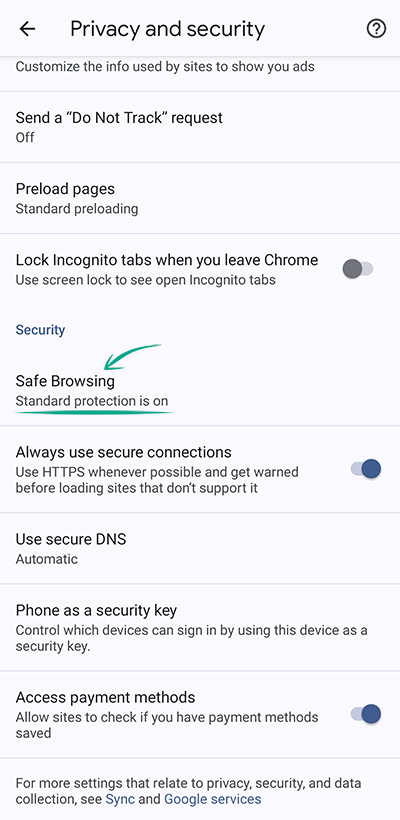
What for: To prevent Chrome from downloading threats.
Google Chrome has built-in protections against dangerous files, extensions, and sites. The browser uses standard protection by default, but you can switch to an enhanced option if you wish to:
- Tap the three dots in the upper right corner of the screen;
- Go to Settings;
- Select Privacy and security;
- Tap Safe Browsing;
- Choose the right level of protection and added features:

- Enhanced Protection. An advanced version of Safe Browsing that warns about dangers and password leaks. It can be used by other Google applications too. Keep in mind that Enhanced Protection always uses browsing and system data and sends them for analysis;
- Standard Protection. By tapping the arrow on the right, you can enable or disable the following features:
- Help Improve Security on the Web for Everyone (this sends your data to Google for analysis);
- Warn you if passwords are exposed in a data breach.
Downside: Enhanced Protection requests and sends information about websites you visit and system information to Google, which creates a risk of a leak.
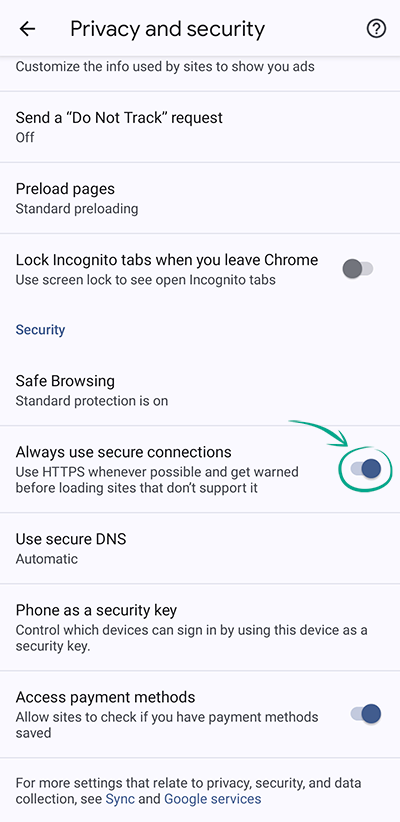
What for: To avoid hitting a fake website.
You can enable a feature in Chrome that uses the secure HTTPS protocol whenever possible and warns you if the website does not use it. This tells you on what websites you should not enter passwords, payment and other confidential details.
- Tap the three dots in the upper right corner of the screen;
- Go to Settings;
- Select Privacy and security;
- Enable Always Use Secure Connections.

How to protect your data
What for: To protect against leaks.
When you sign in to a website, Chrome prompts you to save your password. This allows it to fill in your login credentials for you next time. The browser can check whether your passwords have been exposed in a data leak. To start a scan:
- Tap the three dots in the upper right corner of the screen;
- Open Settings;
- Go to the Password Manager section;
- Tap Password Checkup.
Or:
- Tap the three dots in the upper right corner of the screen;
- Select Settings;
- Go to Safety check;
- Tap Check now.
If your passwords have been leaked, you'll see a message about it. If so, change the vulnerable passwords as soon as possible.
Set up notifications, so that the system alerts you immediately if your passwords are compromised:
- Tap the three dots in the upper right corner of the screen;
- Select Settings;
- Open Password Manager;
- Tap the cogwheel in the upper right corner of the screen;
- Enable Warn you if passwords are exposed in a data breach.
What for: To prevent an intruder from intercepting your saved passwords.
Google's Password Manager, built into Chrome, lets you set up data encryption on the device. This means all passwords that it stores will be encrypted with a unique key stored with you, not on Google servers.
To get access to your saved passwords on another device, you will need to enter your Google account password.
Note that once enabled, password encryption cannot be disabled. Google is planning to eventually enforce password encryption on all devices that support it.
Besides, Google does not use zero-knowledge encryption methods that give access to your passwords to you and you only. You are free to use third-party password managers, such as Kaspersky Password Manager, which securely stores not just account credentials but also confidential documents, such as passport scans. This application follows the principle of zero knowledge: no one, not even the developer, can find out your password.
To set up password encryption:
- Tap the three dots in the upper right corner of the screen;
- Select Settings;
- Go to Password Manager;
- Tap the cogwheel in the upper right corner of the screen;
- Scroll down and tap Set up on-device encryption;
- Tap Next;
- Tap Set up;
- Enter your Google account password and tap Next;
- Tap Done.
Downside: Once enabled, password encryption cannot be disabled. Besides, Google warns that automatic sign-in will cease to be supported on certain sites and in certain applications.
What for: So that no one can get to your top-secret data.
You may decide to restrict Google's Password Manager, built into Chrome, from storing credentials for certain accounts, such as online banking. This will reduce the likelihood of malicious actors getting access to your passwords and accounts as a result of a data breach and such. To restrict the system from remembering some of your passwords:
- Tap the three dots in the upper right corner of the screen;
- Go to Settings;
- Open Password Manager;
- Tap the cogwheel in the upper right corner of the screen;
- Scroll down to (N) declined sites and apps and tap Add more;
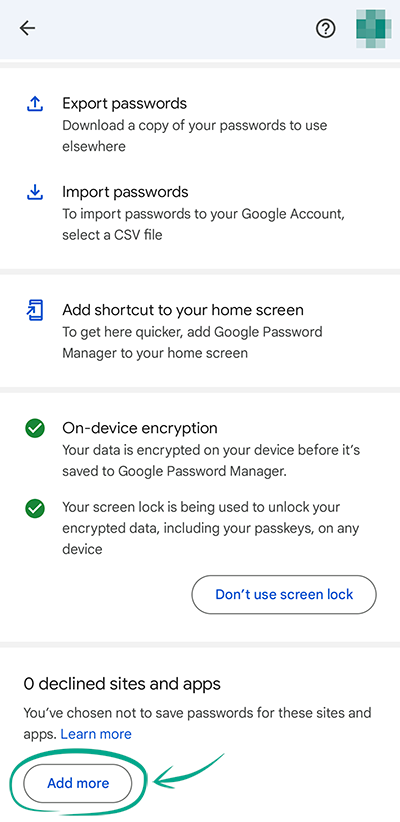
- The system will offer to select accounts to turn off password saving for. Tap the relevant accounts, so Google adds them to Password Manager exceptions.
Downside: You will have to type in passwords to these accounts by hand, and Chrome will not tell you if they get leaked.
What for: To avoid exposing your contact information in case of a leak.
The browser can remember your address, place of work, phone number, and other contact details. These are used for autofill on websites and in apps — for instance, when planning routes in Google Maps. If you turn on sync, Google servers will store your contact information, which increases the risk of data leak. Delete this information from Chrome:
- Tap the three dots in the upper right corner of the screen;
- Select Settings;
- Go to the Addresses and more section;
- Tap the address you want to delete;
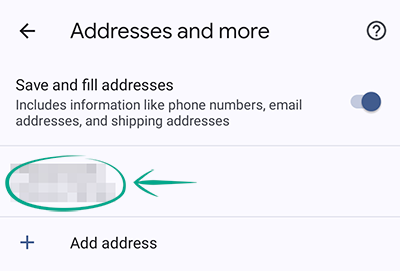
- Tap the trash can icon in the upper right corner of the screen.
Downside: You will have to enter your address and other contact details manually.
To disable automatic address saving:
- Tap the three dots in the upper right corner of the screen;
- Select Settings;
- Go to the Addresses and more section;
- Disable Save and fill addresses.
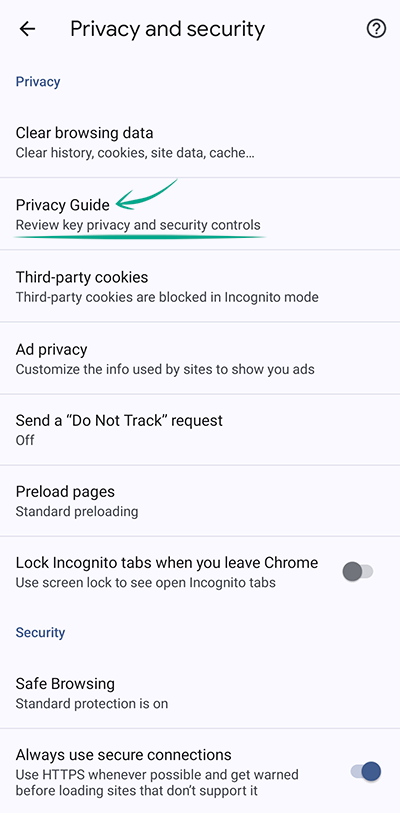
What for: Not to miss new data protection features.
Google improves the privacy protection features in its products on a regular basis. To make the best of them, we recommend reviewing your privacy settings with the help of the Privacy Guide:
- Tap the three dots in the upper right corner of the screen;
- Go to Settings;
- Select Privacy and security;
- Open Privacy Guide and follow the steps.
What for: To avoid sharing your data with advertisers.
Websites and advertisers may use various types of data, such as your browsing history or activity on the website, to customize ads to your interests. You can opt out of ad personalization to avoid sharing data with companies:
- Tap the three dots in the upper right corner of the screen;
- Go to Settings;
- Select Privacy and security;
- Tap Ad privacy;
- You will see a list with three options:
- Ad topics;
- Site-suggested ads;
- Ad measurement.
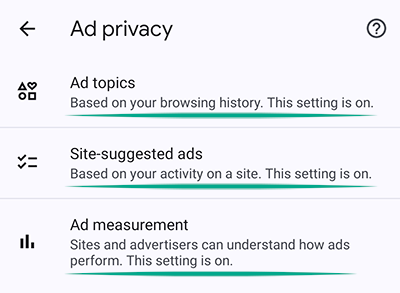
You have to open each item and disable the feature.
Downside: Websites you visit will no longer be able to show you personalized ads.
What for: To prevent Chrome from downloading threats.
Google Chrome has built-in protections against dangerous files, extensions, and sites. The browser uses standard protection by default, but you can switch to an enhanced option if you wish to:
- Tap the three dots in the upper right corner of the screen;
- Go to Settings;
- Select Privacy and security;
- Tap Safe Browsing;
- Choose the right level of protection and added features:
- Enhanced Protection. An advanced version of Safe Browsing that warns about dangers and password leaks. It can be used by other Google applications too. Keep in mind that Enhanced Protection always uses browsing and system data and sends them for analysis;
- Standard Protection. By tapping the arrow on the right, you can enable or disable the following features:
- Help Improve Security on the Web for Everyone (this sends your data to Google for analysis);
- Warn you if passwords are exposed in a data breach.
Downside: Enhanced Protection requests and sends information about websites you visit and system information to Google, which creates a risk of a leak.
What for: To avoid hitting a fake website.
You can enable a feature in Chrome that uses the secure HTTPS protocol whenever possible and warns you if the website does not use it. This tells you on what websites you should not enter passwords, payment and other confidential details.
- Tap the three dots in the upper right corner of the screen;
- Go to Settings;
- Select Privacy and security;
- Enable Always Use Secure Connections.
What for: To prevent websites from using your device without you knowing.
Chrome lets you configure browser behavior when visiting websites. Thus, you can manage microphone, camera, and other permissions:
- Tap the three dots in the upper right corner of the screen;
- Go to Settings;
- Select Site settings. In the upper part of the screen, you will see a list of permissions that websites have;
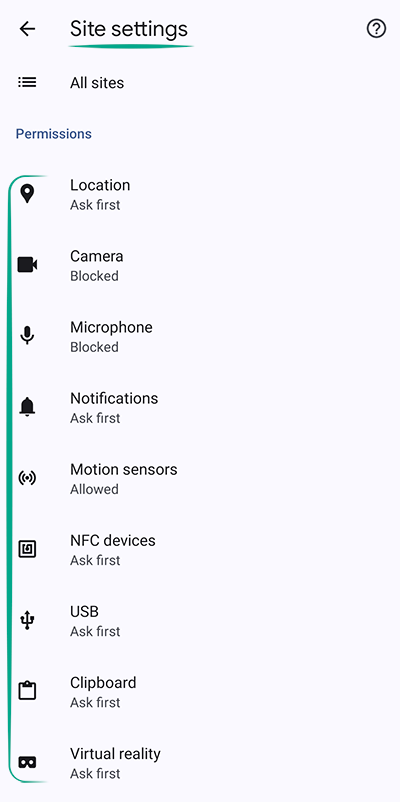
- For each permission:
- Tap the permission name;
- You will see a toggle switch in the upper part of the screen. Turn it on to make websites request permission to use features on your device.
You can revoke a permission for a specific website if you wish to:
- Tap the three dots in the upper right corner of the screen;
- Go to Settings;
- Select Site settings;
- Open All sites.
Choose the relevant site from the list. You will see a list of permissions that it is using. You can turn them off individually — or all at ones — by tapping Delete data and reset permissions.
What for: So strangers can't access your accounts.
When you sign in to a website, the browser prompts you to save your password. This allows it to fill in your login credentials for you next time. However, if someone gets their hands on your phone, they'll be able to sign in to any of your accounts that has a password saved in Chrome. To rule out this possibility, disable autofill and delete your passwords from the browser.
- Tap the three dots in the upper right corner of the screen;
- Select Settings;
- Open Password Manager;
- Tap the cogwheel in the upper right corner of the screen;
- Turn off Offer to save passwords;
- Disable Auto sign-in.
To delete all saved passwords:
- Tap the three dots in the upper right corner of the screen;
- Select Settings;
- Go to the Privacy and security section;
- Tap Clear browsing data;
- Go to the Advanced tab;
- Select a time range — the period for which the data shall be erased;
- Select Saved passwords and tap Clear data at the bottom of the screen.

We recommend deleting all saved passwords. If you want to keep some of them, such as passwords for accounts that contain no personal data, you can delete passwords one at a time:
- In Password Manager, you will see a list of passwords you have saved. Tap the name of the website that you want to delete the password for. The system may prompt you to unlock the device;
- Tap Remove and confirm your selection.
Downside: You will have to manually enter logins and passwords every time you sign in.
Avoid the inconvenience and improve the security of your accounts using a reliable password manager. Unlike a browser, it does not access third-party resources on the Web, which means it is protected from malicious websites. Moreover, it cannot be hacked through a vulnerable extension or plug-in, while browsers can. Kaspersky Password Manager stores confidential data on the device, following the principle of zero knowledge: no one, not even the developer, has access to your password.
What for: To prevent it from leaking.
When you enter bank card details to make a purchase online, Chrome can offer to save them in your Google account.If you visit the same online retailer in the future, the browser will automatically fill in the payment form. This may be convenient, but it gives Google the right to store your payment information on its servers and pass it on to third parties along with your personal details — for example, inform a bank of your location. To delete your payment details:
- Tap the three dots in the upper right corner of the screen;
- Select Settings;
- Go to the Payment methods section;
- Select the card you want to remove;
- On the page that opens, tap the recycle bin icon in the upper-right corner.
Downside: You'll have to manually enter your card details every time you buy something.
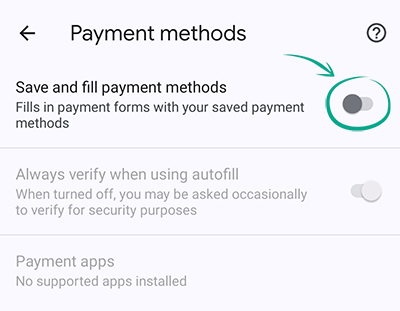
To stop the browser from saving your card details automatically:
- Tap the three dots in the upper right corner of the screen;
- Select Settings;
- Go to the Payment methods section;
- Disable Save and fill payment methods.
If you would rather not disable payment form autofill completely, you can store card details on your device without sending them to Google servers. In that case, before adding your payment information, make sure sync is turned off in your Google account, or else the information will end up on Google servers.
To save payment details on your device:
- Disable Google account sync;
- Tap the three dots in the upper right corner of the screen;
- Select Settings;
- Go to the Payment methods section;
- Tap Add card and enter your card details.

For greater security, we recommend turning on authentication prior to autofilling payment details.
- Tap the three dots in the upper right corner of the screen;
- Select Settings;
- Go to the Payment methods section;
- Enable Always verify when using autofill. The system may then ask you to prove your identity by entering the device unlock code or in some other way.
What for: So Chrome tells sites that you do not want them to track your activity.
Chrome can send websites that you visit a request not to collect your browsing data. This feature is disabled by default. To enable it:
1. Tap the three dots in the upper right corner of the screen;
2. Go to Settings;
3. Select Privacy and security;
4. Tap Send a "Do Not Track" request;
5. Tap the toggle switch at the top of the screen.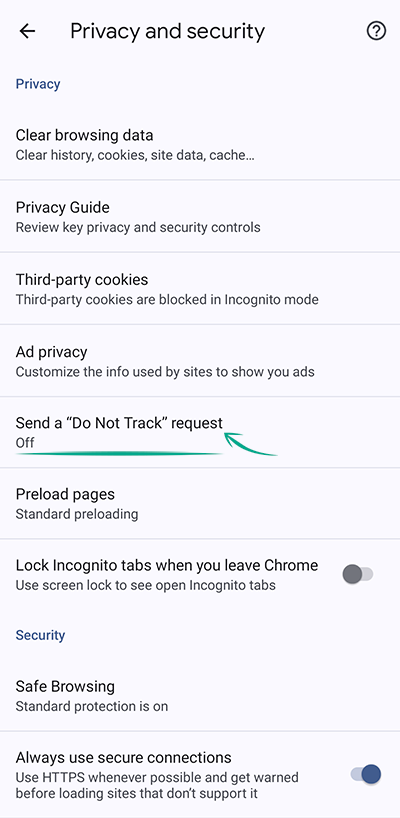
Note that a Do Not Track request does not oblige sites not to track you.
Many sites and services including Google itself ignore requests like that. Chrome does not inform the user how a certain website responded to the request.
Configure security for websites you visit
What for: To avoid ending up in places you did not intend to go.
Blocking pop-ups and redirects can make your browsing experience safer and more comfortable. No more interrupting your flow to close a window with intrusive ads or return from the advertising site to the page you are interested in. To do that:
- Tap the three dots in the upper right corner of the screen;
- Go to Settings;
- Select Site settings;
- Scroll down to Content and tap Pop-ups and redirects;
- Turn off the Pop-ups and redirects toggle switch.

Downside: In rare cases, disabling this feature may interfere with the website's functionality, for example, if it uses pop-ups for confirming orders.
What for: To keep away annoying and misleading ads.
Chrome can automatically block ads on websites that display intrusive or misleading ads.
- Tap the three dots in the upper right corner of the screen;
- Go to Settings;
- Select Site settings;
- Scroll down to Content and select Intrusive ads;
- Turn off the Intrusive ads toggle.

What for: To prevent websites from sharing information about you.
In Site settings, you can define exactly how websites you visit will display content and use data. For example, you can define the way the browser displays embedded content from other websites and stores third-party cookies. Cookies are small objects containing information about your system and page settings that the website saves on your device. The cookies we refer to here are not from the website you are browsing but from the site whose content is being displayed on the page you have opened.
- Tap the three dots in the upper right corner of the screen;
- Go to Settings;
- Select Site settings;
- Scroll down to Content and tap Third-party cookies;
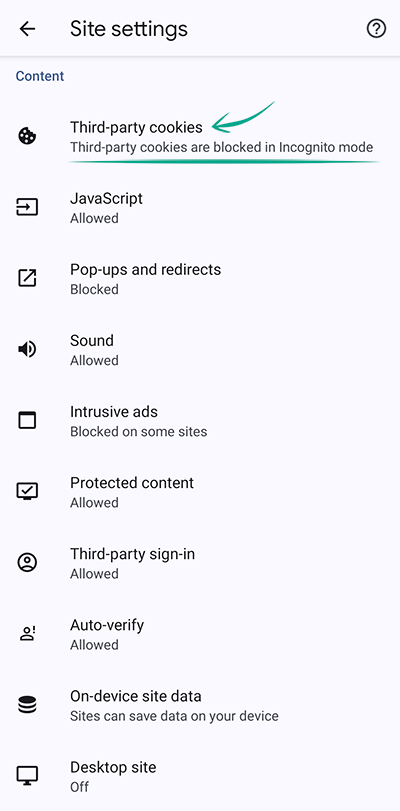
- Select an option:
- Allow third-party cookies;
- Block third-party cookies in Incognito. Websites will not be able to use cookies for tracking your activity on other sites. This may disable some features on certain websites;
- Block third-party cookies. When this is enabled, websites cannot track your browser activity. This may disable some features on certain websites.
Downside: Blocking third-party cookies can break certain website features.
You can also restrict websites from storing information about your activity on your device:
- Tap the three dots in the upper right corner of the screen;
- Go to Settings;
- Select Site settings;
- Scroll down to Content and tap On-device site data;
- Turn off On-device site data.
Downside: You will have to repeat certain steps next time you visit the website, such as signing in or adding items to the shopping basket.
What for: To block malicious scripts.
You can enhance your security by restricting websites from using JavaScript, as this prevents them from running malicious scripts embedded into their code:
- Tap the three dots in the upper right corner of the screen;
- Go to Settings;
- Select Site settings;
- Scroll down to Content and tap JavaScript;
- Disable JavaScript.

Downside: Disabling JavaScript may result in issues with how many websites are displayed or work in your browser, and cause certain websites to stop working altogether.