

Settings may differ on an iPad
The following instructions are applicable to iOS, which is used on iPhones. The interface of iPadOS differs from iOS. For example, the menu may contain more or fewer menu items, they may be named differently, or they may be missing entirely. You can find the relevant settings on an iPad by using the approximate names in equivalent sections of the menu.
How to hide your data from prying eyes
What for: So that only you can unlock your phone.
The safest way to lock your iPhone is to use an alphanumeric password. A four- or six-digit PIN code is easy to crack, and in some cases a Face ID can be spoofed by a photo or 3D mask. Older iPhone models could be unlocked with a fingerprint — this is a reliable and handy way. Unfortunately, Apple has since abandoned that technology.
A strong password complies with the following requirements:
- Is at least 8 characters long;
- Contains lowercase and uppercase letters, numbers, and special characters ($, @, etc.);
- Is not too simple, such as 12345678 or qwerty;
- Is not the same as for any other account, including your Apple ID password;
- Is not an actual word or easy-to-guess phrase;
- Does not consist of information that strangers could easily find out (your name, date of birth, pet's name, and so forth — or those of your friends or relatives).
To set a password:
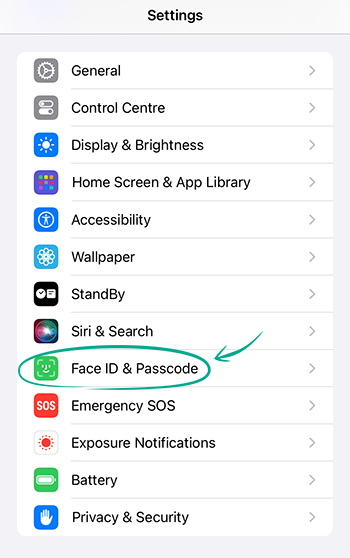
- Open Settings;
- Go to Face ID & Passcode menu;

- Select Turn Passcode On;
- Tap Passcode Options;
- From the available options, select Custom Alphanumeric Code;
- Enter your new password twice;
- Confirm with your AppleID password and tap Done.
We recommend using a strong password even if you decide to sign in with your Face ID. This strong combination will remain a backup method for unlocking your phone.
What for: To use applications and features that require Face ID
We recommend using Face ID only where this cannot be avoided: for example, some applications may have security settings that require you to enable it. In other cases, it is better to use password unlock as a more reliable option.
To configure sign in by Face ID:
- Open Settings;
- Go to Face ID & Passcode;
- Enter your password;
- Tap Set Up Face ID;

- The system then needs to scan your face. Tap Get Started and follow the on-screen instructions;
- While in the same menu, turn on Require Attention for Face ID. This makes unlocking possible only while you are looking at the screen.
If you often wear sunglasses or a mask, use Set Up an Alternative Appearance. This lets you add another image of your face to Face ID or give access to someone you trust, such as your spouse or a kid. We do not recommend this, though, as it makes your device less secure.
What for: To prevent strangers from accessing the system if you leave your device unattended.
The system independently can lock your iPhone when you are not using it. This will prevent strangers from accessing your confidential information in your absence.
To select the amount of time to wait before the device is locked:
- Open Settings;
- Go to Display & Brightness;
- Select Auto-Lock and select a length of time that is convenient for you.

It is not recommended to select the Never option; otherwise anyone will be able to access your personal information on the smartphone if you ever lose your device.
Auto-lock tracks your gaze, keeping the screen unlocked as long as you are reading or watching video.
What for: To not expose your private data.
By default, all notifications are displayed on your device screen even if it is locked. For example, strangers could see text messages containing a one-time code from your bank, or a private message in a social network. To prevent this, disable the display of notifications on your locked screen:
- Open Settings;
- Go to the Notifications menu;
- Tap Show Previews;
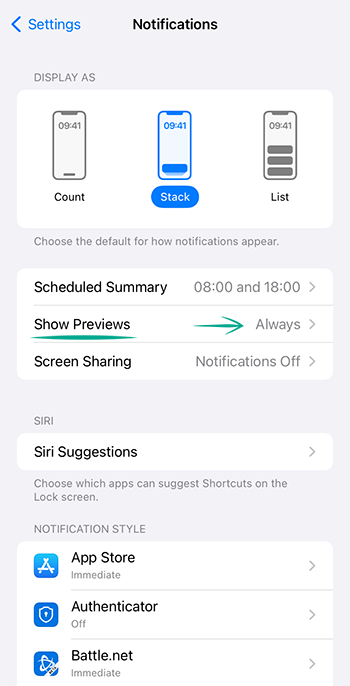
- Select When Unlocked (this turns off previews while the screen is locked) or Never (turns off preview display completely).
You can also configure the appearance of notifications on the lock screen and in the Notification Center for specific apps:
- Open Settings;
- Go to the Notifications menu;
- In the Notification style section, select the app for which you want to change the appearance of notifications;
- Clear the Lock Screen and Notification Center check boxes;
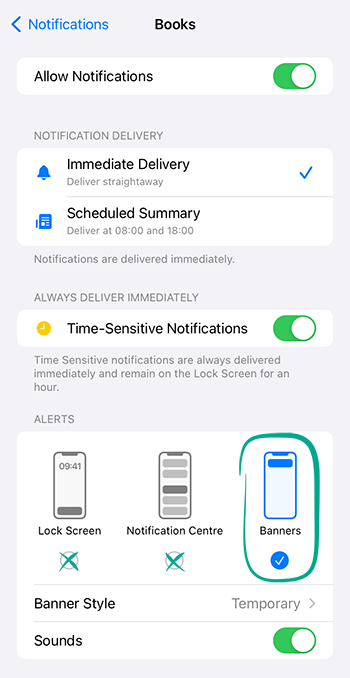
- Tap Banner Style and make sure that the parameter is set to Temporary. Otherwise, notifications will be permanently displayed in the upper part of the screen;
- Make sure that Show Previews is set to When Unlocked or Never.
Downside: If you turn off previews on the lock screen, you will have to unlock your phone every time you want to read a notification. If you turn off previews completely, you might miss important information from apps.
What for: To prevent your private information from being obtained from a locked device.
Some iOS apps and services allow you to work with the device even while the screen is locked. For example, the Today screen displays activities in your calendar, missed calls, and notifications — very convenient. However, if your phone ends up in the wrong hands, strangers will be able to see the data.
In addition, a skilled hacker can take control of your device or find your hidden information by using specific Siri commands, for example.
To prevent others from interacting with your locked device:
- Open Settings;
- Go to Face ID & Passcode;
- Enter your iPhone password;
- Turn off all options in the Allow Access When Locked section.

Downside: You will not be able to view notifications or use Siri or other features until you unlock your device.
How to protect your data
What for: To safeguard your data.
You can configure your iPhone to automatically save important information in iCloud. If you do so and your device is lost or stolen, you can easily restore your passwords, settings, documents, and photos.
To enable iCloud Backup:
- Open Settings;
- Tap your Apple ID;
- Select the iCloud menu;
- Go to iCloud Backup;

- Turn on Back Up This iPhone;
- If you want to immediately save data on the server, tap Back Up Now.
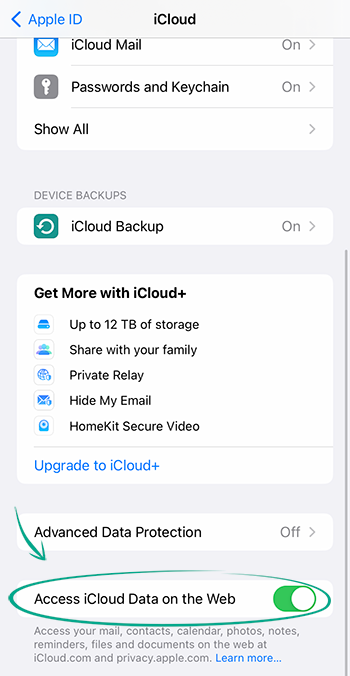
We recommend turning off access to your iCloud data on Apple websites. This would ensure that you can view it on trusted devices only.
- Open Settings;
- Tap your Apple ID;
- Select the iCloud menu;
- Turn off Access iCloud Data on the Web.
Downside: With a free account, you cannot upload more than 5GB of data to iCloud.
What for: To find your iPhone if it is lost or stolen.
The Find My service will help you find your smartphone in case it is lost. You can use it to determine the location of your device and sound its alarm, and remotely lock it or wipe its memory. This will protect your data from prying eyes even if you are unable to find your iPhone. Even if you have to resort to this option, you can still locate your device with Find My provided it runs on iOS15 or a later version of the operating system.
The device search feature works even without Internet access and if location services are turned off. In this case, your lost phone sends a special signal over Bluetooth that is received by other nearby Apple devices. After receiving the signal, these devices send their location to Apple and the company forwards this data to your account. Using this feature, you will be able to see the approximate location of your iPhone in the Find My app.
To turn on the search service:
- Open Settings;
- Tap your Apple ID;
- Go to the Find My menu;

- Go to Find My iPhone;
- Turn on the following features:
- Find My iPhone;
- Find My network;
- Send Last Location.
You can find or lock a lost device by using the Find My app on any Apple device or at iCloud.com.
Activation Lock is also enabled when the Find My service is turned on. This feature prevents someone from signing in to your system with a different Apple ID, turning off the Find My feature, or wiping the memory without password confirmation.
What for: To protect your iMessage chats.
For those who use iMessage, Contact Key Verification helps to add more protection to chats and personal data. This feature helps to make sure that you are talking to the right person. If key verification finishes with an error, you will be alerted during the conversation.
Please note: The error alert will only appear if both you and the other party have Contact Key Verification turned on.
To enable feature:
- Open Settings;
- Tap your Apple ID;
- Tap Contact Key Verification;

- Turn on Verification in iMessage.
What for: So that no one can read it even if there is a data breach.
Apple offers enhanced protection for your data in iCloud with end-to-end encryption. This means your data can be decrypted on your trusted devices only, and no one, not even Apple, can read it. Some types of data, such as your information in the Maps app, is end-to-end encrypted by default.
Please note: To use Advanced Data Protection in iCloud, you have to set up an account recovery method first.
To enable data encryption in the iCloud:
- Open Settings;
- Tap your Apple ID;
- Select the iCloud menu;
- Scroll down the page and tap Advanced Data Protection;
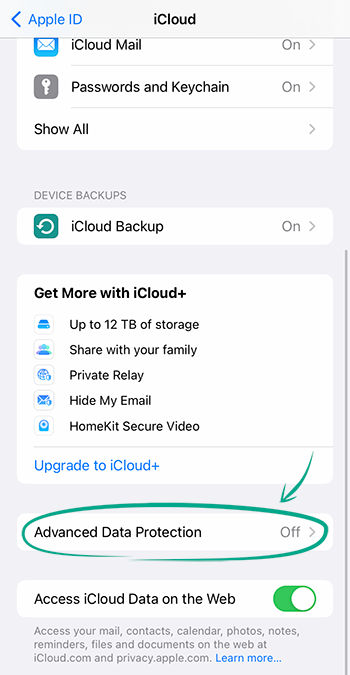
- Tap Turn On Advanced Data Protection;
- Tap Set Up Account recovery;
- Follow the on-screen instructions to verify that the method you have chosen works;
- Verify your identity with your chosen login method;
- Tap Done.
Should you change your mind and decide to turn off data encryption:
- Open Settings;
- Tap your Apple ID;
- Select the iCloud menu;
- Scroll down the page and tap Advanced Data Protection;
- Tap Turn Off Advanced Data Protection;
- Tap Turn Off;
- Verify your identity with your chosen login method.
Downside: If you lose access to your account and cannot use an account recovery option, Apple will not be able to help you to get back your data, as it does not have the recovery key.
What for: To keep your account credentials and payment information safe.
The Apple Pay service lets you use your phone's NFC module to pay for purchases. This is very convenient. However, if you link a card to the service, Apple obtains the right to share your location information with the bank, transmit your payment details to third parties, and in some cases transmit your private information. Apple also collects information about transactions and your account, including your card numbers and the approximate totals of purchases and transfers.
To erase this data:
- Open Settings;
- Go to Wallet & Apple Pay menu;
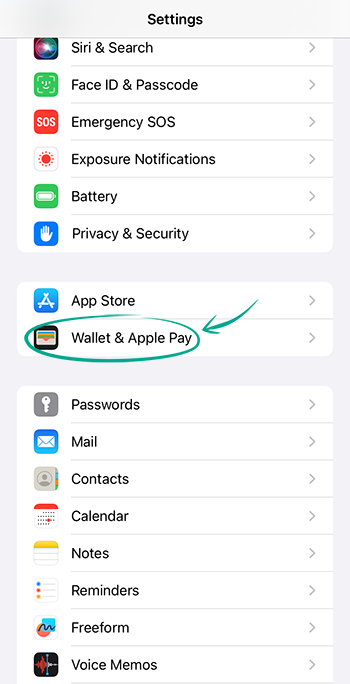
- Select the card you want to delete;
- Scroll down and tap Remove card;
- Tap Remove to confirm your decision.
Downside: You will not be able to use Apple Pay.
Please note that data deleted from Apple Pay may remain in other storage, such as Safari's AutoFill list.
How to protect your Apple ID and other accounts
What for: To prevent your data and devices from being hacked.
An Apple ID account lets you synchronize music, photos, and other data across devices. However, if your account is hacked, criminals will gain access to all this data. In addition, access to your Apple ID will enable someone to remotely lock your device and format its hard drive.
Make sure that your account is protected by a strong password that complies with the following requirements:
- Is at least 8 characters long;
- Contains lowercase and uppercase letters, numbers, and special characters ($, @, etc.);
- Is not an actual word or easy-to-guess phrase;
- Is not the same as your passwords for any other accounts;
- Does not consist of information that strangers could easily find out (your name, date of birth, pet's name, and so forth — or those of your friends or relatives).
To change your Apple ID password on your iPhone:
- Open Settings;
- Tap your Apple ID;
- Go to the Sign-In & Security menu;
- Enter your current password;
- Tap Change Password;

- Enter your passcode;
- Create a new password and confirm it;
- Tap Change.
What for: To prevent your account from being hacked.
You should enable two-factor authentication to improve the protection of your Apple ID. When this is enabled, the system will additionally require a one-time code any time you or someone else attempts to sign in to your account from a new device. Both the code and the new sign-in alert go to your trusted device. If a different person has entered your user name and password, you can block the sign-in.
If you have already signed in to your Apple ID from a device and then signed out, you will not be prompted for a code the next time you sign in. In iOS 13.4 and later versions, two-factor authentication is automatically enabled when an Apple ID is created. Otherwise you can manually enable it as follows:
- Open Settings;
- Tap your Apple ID;
- Go to the Sign-In & Security menu;
- Locate Two-Factor Authentication and tap On;

- Enter your Apple ID password;
- Specify the phone number where you want to receive a text message or phone call. This can be your primary number or a backup number. This number is required in case you do not have a trusted device nearby or if it is broken;
- Enter the verification code you received.
There are two ways you can receive a code on a trusted device. View it in a notification (after you tap Allow) or request it. To do that:
- Open Settings;
- Tap your Apple ID;
- Open Sign-In & Security;
- Go to Two-Factor Authentication;
- Tap Get Verification Code.
What for: To avoid losing access to your account.
In case you forget your Apple ID password with no way to recover it, Apple provides a way for you to recover access to your account.
- Open Settings;
- Tap your Apple ID;
- Go to the Sign-In & Security menu;
- Select Account Recovery.

Next, set up a method that suits you by choosing a recovery contact or creating a recovery key.
To choose a person to help you with recovering access:
- Select Add Recovery Contact;
- Tap Add Recovery Contact;
- Verify your identity with your chosen login method;
- Type in the contact name in the search bar;
- Tap the contact name;
- Tap Add. You can add up to five trusted contacts.
Please note: The person you choose must have an Apple device running iOS15 or later, iPadOS 15 or later, or macOS 12 or later. They must be 13 or older and have two-factor authentication and iMessage activated on their device as well as screen lock turned on.
To set up a recovery key:
- Select Recovery Key;
- Turn on Recovery Key;
- Tap Use Recovery Key to confirm;
- Verify your identity with your chosen login method;
- The system will display a 28-character recovery key. Write it down or make a screenshot and print it, and then store it somewhere safe;
- Tap Continue;
- The system will ask you to verify your recovery key. Enter it manually or scan text;
- Tap Next.
To turn off the ability to recover access to your account with the key:
- Tap Recovery Key;
- Turn off Recovery Key;
- Tap Turn Off;
- Verify your identity using your selected login method.
Should you lose your recovery key or suspect that a stranger has found it out, reset it:
- Select Recovery Key;
- Tap Create New Recovery Key;
- Tap Replace Recovery Key to confirm;
- Verify your identity using your selected login method;
- Follow the steps above to create a new recovery key.
What for: To ensure all your accounts are securely protected.
The built-in iCloud Keychain app lets you store and automatically insert account credentials and payment card details in forms. Because of synchronization, this data is available on Mac, iPhone and iPad.
If you are using identical passwords on different websites, theft or leak of one of them may result in several of your accounts being hacked. You can use the iCloud Keychain service to check whether your passwords match:
- Open Settings;
- Select Passwords menu;

- Enter iPhone password;
- Select Security Recommendations;
- Make sure that Detect Compromised Passwords is enabled;
- You will see a list of resources with duplicate, weak or leaked passwords and will be able to change these passwords;
If you store your data digitally, there is always a risk of it being leaked, even if the service you store it in is considered a reliable one. To reduce the risk, delete your passwords from your account. To do that:
- Open Settings;
- Tap your Apple ID;
- Go to the iCloud menu;
- Select Passwords and Keychain;
- Turn off Sync this iPhone.
Please note that data deleted from iCloud Keychain may remain in other storage, such as the Safari AutoFill list.
Downside: You will have to manually enter your password on websites and in apps each time. You can eliminate this downside by installing a password manager with a reliable data encryption and security system.
What for: To prevent strangers from using your accounts, subscriptions, or money.
iOS lets you create groups to share subscriptions and passwords with, and to allow others to use your payment methods.
If you use Family Sharing, and you are the organiser, you can share your location and many other types of data with the members. To make sure your family group includes only people you trust:
- Open Settings;
- Tap your Apple ID;
- Go to the Family Sharing menu;

- You will see a list of the family members.
To remove a contact from the family group:
- Tap the member you want to remove;
- Tap Remove [contact name] from Family.
Family Sharing also lets you configure the shared services and options that the members are allowed to use.
- Open Settings;
- Tap your Apple ID;
- Go to Family Sharing;
- Open the Subscriptions menu;
- Tap Manage Your Subscriptions.
Select subscription you want to share.
Please note: To stop sharing a subscription, you would have to cancel it, leave the family sharing group, or remove the family member.
If you keep your passwords in Keychain, and you are a member of a group with shared access to logins and passwords, we recommend leaving the group or deleting it if you are the organizer, and resetting the compromised passwords. To leave a group:
- Open Settings;
- Go to the Passwords menu;
- Verify your identity with your chosen unlock method;
- Tap the name of the group with shared access;
- Tap Leave Group.
If you are the organizer, and you want to delete the group:
- Open Settings;
- Go to the Passwords menu;
- Verify your identity with your chosen unlock method;
- Tap the name of the group with shared access;
- Tap Manage;
- Tap Delete Group.
If you would rather remain a member or the group, and you trust the other members, check what passwords are shared:
- Open Settings;
- Go to the Passwords menu;
- Verify your identity with your chosen unlock method;
- Tap the group name;
- You will see a list of passwords you are sharing with the group. Tap the password you want to stop sharing;
- Tap Group;
- Move the password to My Passwords;
- Tap Move to My Passwords to confirm.
Please note: Make sure you reset the password after removing it from the shared group.
What for: To make sure someone will always look after your data.
Apple iOS 15.2 or later lets users choose a digital heir. In the event of the user's death, the digital heir will get access to the data in the user's account with the exception of Keychain information, such as payments, passwords, or digital products purchased with the Apple ID.
To receive access to the account owner's data, the digital heir will have to submit a request that includes not just the access key sent to them when they were added as a digital heir, but also a death certificate or some other document depending on the country and region. Requests go to Apple, and the company grants access only after checking the information provided, which reduces the likelihood of abuse. The access permission remains valid for three years, after which the account is deleted.
Please note: Any person regardless of their age can be a digital heir, but you cannot request access until you turn 13 or another age depending on the country and region. A digital heir need not own an Apple device or have an Apple ID. You can appoint more than one digital heir.
If you decide to add a digital heir to your account, think about who you would be willing to entrust your personal data to.
Please note: To appoint a digital heir, you need to be 13 or older depending on the country and region, and to turn on two-factor authentication for your Apple ID.
To appoint a digital heir:
- Open Settings;
- Tap your Apple ID;
- Go to the Sign-In & Security menu;
- Select Legacy Contact;
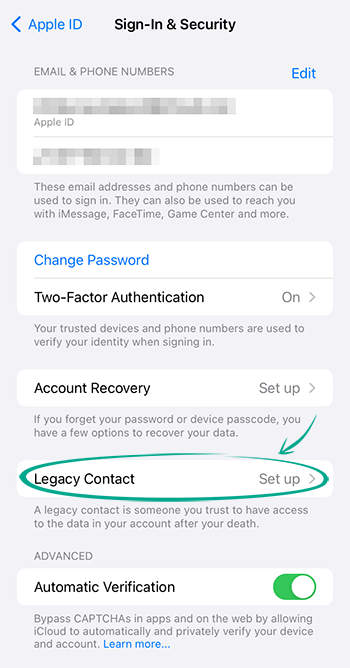
- Select Add Legacy Contact;
- Tap Add Legacy Contact;
- Verify your identity with your chosen login method;
- Select someone you want to appoint as your digital heir from your contact list or family sharing group;
- Tap Continue;
- If you have a printer handy, tap Print Access Key, set up the printer, and tap Print. If you do not have access to a printer, tap Next. You will be able to view and print out the key later;
- Tap Done.
To view or print out the access key:
- Open Settings;
- Tap your Apple ID;
- Go to the Sign-In & Security menu;
- Select Legacy Contact;
- Tap the name of the digital heir whose access key you want to view;
- Select View Access Key;
- Verify your identity with your chosen login method.
To remove a digital heir:
- Open Settings;
- Tap your Apple ID;
- Go to the Sign-In & Security menu;
- Select Legacy Contact;
- Tap the digital heir you want to remove;
- Select Remove Contact;
- Tap Remove Contact to confirm.
How to keep your account from getting hacked
What for: To keep your protection up to date.
Even the most advanced system may contain flaws that enable it to be hacked. iOS developers regularly fix vulnerabilities and add new security functions, so it is important to install the latest patches as soon as possible.
You can configure your system to automatically install updates as they are released:
- Open Settings;
- Go to the General menu;
- Select Software update;

- Tap Automatic Updates;
- Turn on the following under AUTOMATICALLY INSTALL:
- iOS Updates;
- Security Responses & System Files;
- Turn on iOS Updates under AUTOMATICALLY DOWNLOAD.
Please note that the device will be updated only if it is connected to Wi-Fi and its battery has at least a 50% charge (or above 30% if the device plugged in to a power source).
What for: To not be spied on.
You can replace the standard iOS keyboard with a third-party app. By default, a third-party keyboard has no Internet access. This is to prevent the information you enter from being intercepted. However, many apps prompt you to grant them this permission to improve their operation.
You can check whether your keyboard app has permission to access the Internet and revoke permission:
- Open Settings;
- Go to the General menu;
- Select Keyboard;
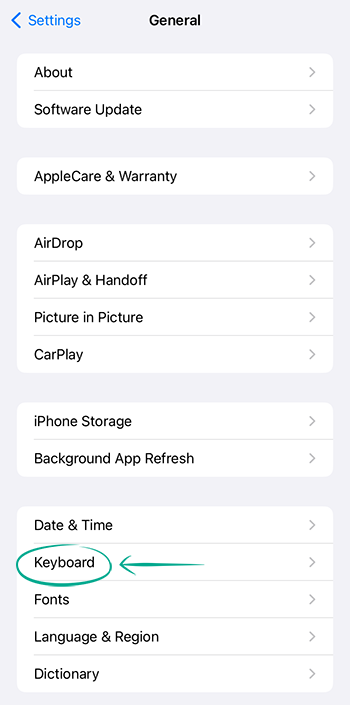
- Go to Keyboards;
- Select a third-party keyboard;
- Turn off Allow Full Access;
- Repeat this with all third-party keyboards.
What for: To protect yourself against a brute-force hack.
If your phone ends up in the hands of criminals, they may attempt to figure out your password by trying all possible variants with the aid of special programs.
To help protect you against such attacks, iOS has a built-in feature for deleting your data after 10 unsuccessful attempts to enter your password. To enable this feature:
- Open Settings;
- Go to Face ID & Passcode menu;
- Enter the password;
- Scroll down and enable Erase Data.
To back up your data in case it is deleted from your device, we recommend regularly saving backups in your iCloud storage or on a trusted device.
How to avoid irritation
What for: To avoid communicating with unpleasant people.
You can block any contact: a useful reaction to spam calls or phone fraud, or in case you simply want to restrict calls and messages from a specific person:
- Open the Phone app;
- Find the relevant number or name on the Recent or Contacts tab;
- Tap the "i" next to the entry on the Recents tab, or tap on the contact name on the Contacts tab;
- Tap Block Caller at the bottom of the screen;

- In the opened window, tap Block Contact.
The blocked caller will not receive any notifications about being added to your denylist. You will no longer receive notifications regarding the person's messages, phone calls, or FaceTime.
To unblock a user:
- Open Settings;
- Go to the Phone menu;
- Select Blocked Contacts;
- Swipe left the name of the caller that you want to remove from the denylist.
What for: To avoid distractions from mass messaging and spam.
To avoid distractions from messages and calls from spammers without having to block each number individually, you can enable a special filter. This helps filter messages from senders who are not in your contact list and store them separately. In addition, you will not be able to follow a link from a person's message until you add the sender to your contact list. That helps protect you from phishing scams.
To enable the filter for messages:
- Open Settings;
- Go to the Messages menu;
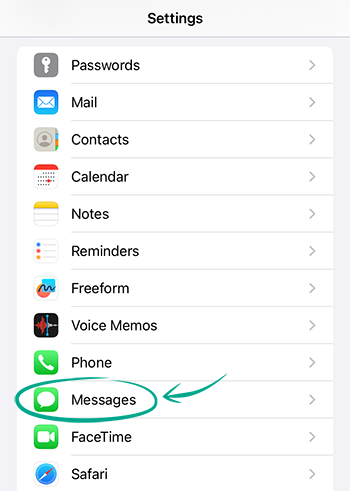
- Turn on Filter Unknown Senders.
To not receive calls from unknown numbers:
- Open Settings;
- Go to the Phone menu;
- Open Silence Unknown Callers;
- Turn on Silence Unknown Callers.
After you do so, only people in your contacts will be able to call you. Note that this feature will be disabled for 24 hours if you make an emergency call, so that rescue services can reach you.
Downside: You may miss an important message or call from people who you did not add to your contacts, such as courier. In addition, if a friend changes their phone number and tries to notify you from a new SIM card, their messages and calls will also be blocked.
What for: To block out notifications.
If notifications tend to ruin your concentration, you can enable Do Not Disturb mode. In this mode, you will not receive sound notifications.
To turn on Do Not Disturb:
- Swipe down from the top-right edge;
- Tap and hold the Focus button;
- Tap Do Not Disturb.
Please note: After you manually enable Do Not Disturb mode, you will not receive sound notifications until you disable it in the settings.
You can configure the system to turn on Do Not Disturb automatically, for example, when you are sleeping. To do that:
- Open Settings;
- Select Focus menu;
- Open the Do Not Disturb menu;
- Tap Add Schedule;
- Select and configure the settings for activating Do Not Disturb:
- Time: choose days of the week and set a time;
- Location: choose a place, such as work, to activate Do Not Disturb automatically;
- App: choose apps from list to keep calls and notifications from disturbing you while you use these apps;
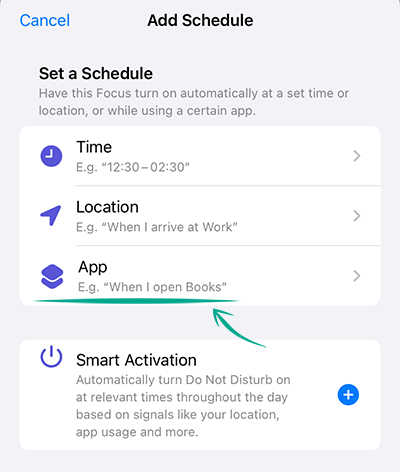
There is an option to turn on Smart Activation to let the app automatically guess when it should activate Do Not Disturb.
In Do Not Disturb, you can also configure ALLOW NOTIFICATIONS. This provides flexible options for customizing lists of people and apps you want to receive or silence notifications from when Do Not Disturb is activated. To configure Allow Notifications From for your contacts:
- Open Settings;
- Select Focus menu;
- Open the Do Not Disturb menu;
- Go to People;
- Select Silence Notifications From;
- Tap the Add button;
- Select contacts from the list that you want to silence notifications from, and tap Done;
- Turn on Allow Calls from Silenced People if you want to still receive calls from the contacts you selected earlier;
- Select Allow Notifications From;
- Tap the Add button;
- Select contacts from the list that you want to always receive notifications from and tap Done;
- Tap Allow Calls From and choose the option that suits you:
- Everybody;
- Allowed People Only;
- Favorites;
- Contacts Only.
- Turn on Allow Repeated Calls if needed. This allows a repeated call from the same person within three minutes so you do not miss important calls.
To configure Allow Notifications From for apps:
- Open Settings;
- Select Focus menu;
- Open the Do Not Disturb menu;
- Go to the Apps menu;
- Select Silence Notifications From;
- Tap the Add button;
- Select from the list the app notifications from which you want to mute and tap Done;
- Select Allow Notifications From;
- Tap the Add button;
- Select from the list those apps you want to always receive notifications from and tap Done;
- Turn on Time-Sensitive Notifications if needed. This lets you always receive notifications from certain apps, such as taxi. See below for how to turn on time-sensitive notifications in the app.
There are other options to configure as well:
- Open Settings;
- Select Focus menu;
- Open the Do Not Disturb menu;
- Tap Options;
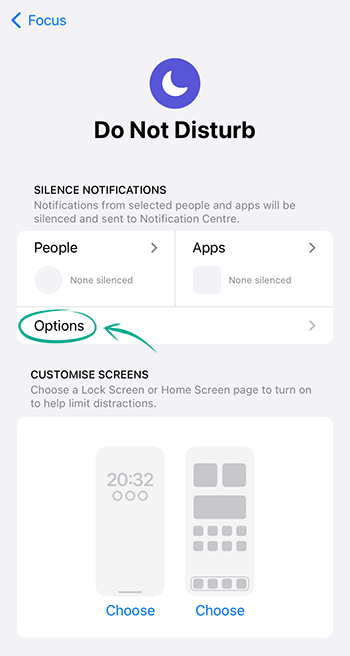
- Turn off Show On Lock Screen to keep others from reading your notifications;
- To hide the notification badges on Home screen apps, turn on Hide Notification Badges;
- Tap the list next to Silence Notifications and select the option that suits you:
- Always;
- While Locked.
- Turn on Dim Lock Screen if you want to reduce display brightness while Do Not Disturb is on.
To allow an app to send you urgent notifications even while Do Not Disturb is on:
- Open Settings;
- Go to the Notifications menu;
- Select the app from the list under NOTIFICATION STYLE;
- Turn on Time-Sensitive Notifications;
- Please note: Some apps, such as the built-in Notes app, may lack that option.
What for: To make sure you do not miss anything.
You can set up non-urgent notifications to be displayed as a summary at a time that suits you:
- Open Settings;
- Go to the Notifications menu;
- Go to Scheduled Summary;
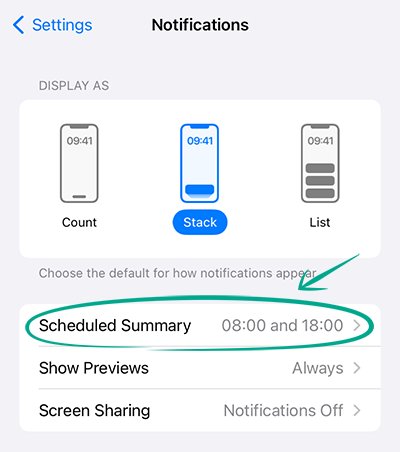
- Turn on Scheduled Summary;
- Tap Continue;
- Select from the list those apps whose notifications you want delivered as a summary;
- Tap Add [number] Apps;
- Select from the list or enter a time for receiving the notifications;
- Tap Turn on Notification Summary.
When opening Scheduled Summary later, you will be able to adjust the list of apps whose notifications you want to receive at a time that suits you.
How to protect yourself from snooping
What for: To keep developers from collecting or sharing your data.
Apps and services on Apple devices can track your activity on websites and in other developers' apps. For instance, Facebook can find out your Google search queries and then use that information for displaying targeted ads.
To provide users with greater control over their data, Apple has introduced the App Tracking Transparency policy. It enables you to stop developers from collecting information about your activities in other apps.
If your device is running iOS, iPadOS or tvOS 14.5 or above, each application, when launched for the first time, should request permission for collecting this data. You can decline by tapping Ask Not to Track. You can also block tracking in the system settings:
- Open Settings;
- Go to Privacy & Security;

- Select Tracking;
- Find the app in the list and slide the toggle off;
- To automatically deny requests from apps to track your activity, turn off Allow Apps to Request to Track.
The restriction will not affect the performance of the application. You will keep seeing ads in the app, but they will not be based on your interests any longer.
What for: To prevent Apple and apps from knowing where you go.
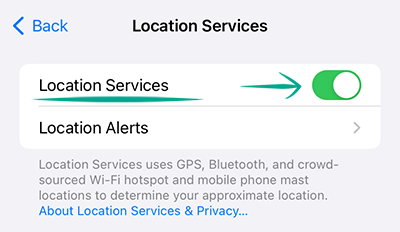
Mobile Apple devices continually collect information about your location. The information is used to improve their operation and for targeted ads. You can check which apps have access to your location, and block all services or individual services.
If you want to block access for all services:
- Open Settings;
- Go to the Privacy & Security menu;
- Open Location Services menu;
- To block all apps from accessing your device location information, disable the Location Services option.
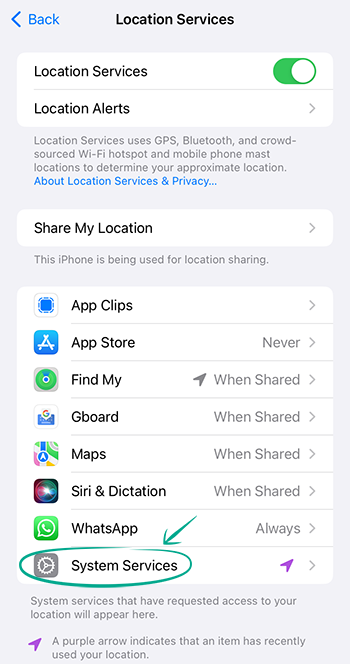
If you want to block individual apps from working with GPS:
- Open Settings;
- Go to the Privacy & Security menu;
- Open Location Services menu;
- Find and select the relevant application in the overall list;
- Select Never;
- Go back to Location Services, scroll down and select System Services;
- Disable the services that you want to block from accessing your location, such as Share My Location.
To prevent Apple from remembering locations that you frequently visit:
- Open Settings;
- Go to the Privacy & Security menu;
- Open Location Services menu;
- Tap System Services;
- Tap Significant Locations;
- Verify your identity with your chosen login method;
- Turn off Significant Locations;
- To delete the data that was collected by the system, tap Clear History. This will also delete the entire location history on other devices where you signed in with this Apple ID.
If you rarely use a specific app, you can grant it one-time access if necessary. When you open the app and see a request to access your location, tap Allow Once.
Downside: By preventing all apps and services from accessing your location, you will not be able to use Navigation and some other features. For example, the Photos app will not group photos by location in Memories.
What for: To not get spied on.
Apps for iOS may obtain access to your device camera and microphone. Some malicious applications exploit this access to track users. You can check which services and apps have this access, and revoke it if necessary:
- Open Settings;
- Go to the Privacy & Security menu;
- Select Microphone;
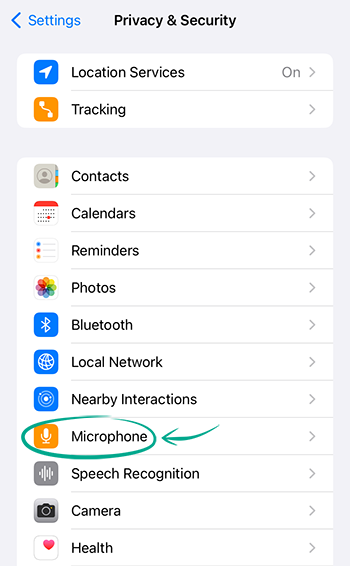
- Revoke the access permission for apps that do not need it;
- Go back to the Privacy & Security menu;
- Select Camera.
Revoke the access permission for apps that do not need it.
If you mistakenly block access to the camera or microphone for an app that requires it to work properly, you can return the permission in the same menu.
You can also grant one-time access to the app. When you open the app and see a request to access your camera or microphone, tap Allow Once.
What for: To prevent advertisers from knowing too much about you.
Apple collects information about your behavior to fine-tune the ads you see in the App Store and Apple News. Although you cannot completely disable the collection of this information, you can limit it.
To limit the collection of marketing information:
- Open Settings;
- Go to the Privacy & Security menu;
- Select Apple Advertising;

- Turn off Personalised Ads.
Note that location-based ads are turned off in a different section of the iOS settings.
What for: To prevent apps from tracking your location.
Apps can obtain access to your Bluetooth. This access is required for the correct operation of some services, such as Google Home. However, hackers can use it to identify your location. If you do not want to share this information, check the list of apps that have Bluetooth access and revoke it from the apps that you do not trust:
- Open Settings;
- Go to the Privacy & Security menu;
- Select Bluetooth;
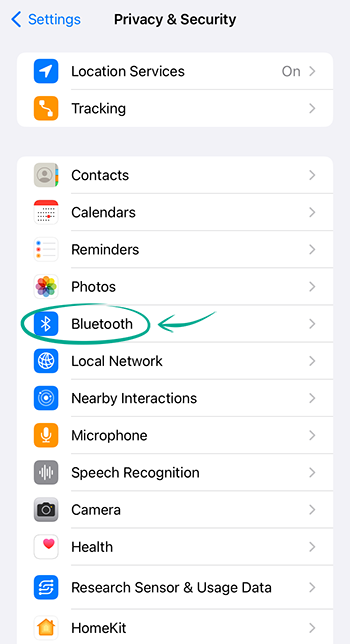
- View the list and revoke the permission from apps that you deem suspicious.
If you rarely use a specific app, you can grant it one-time access if necessary. When you open the app and see a request to access Bluetooth, tap Allow Once.
What for: To prevent Apple from knowing too much about you.
Apple devices regularly send device usage information to iOS and app developers. This information includes data regarding errors, your activity and exercise, and your iCloud account. Apple asserts that it does not collect users' private information. However, if you do not want to share your data with the developers of your device, you can turn this off:
- Open Settings;
- Go to the Privacy & Security menu;
- Scroll down the page and tap Analytics & Improvements;
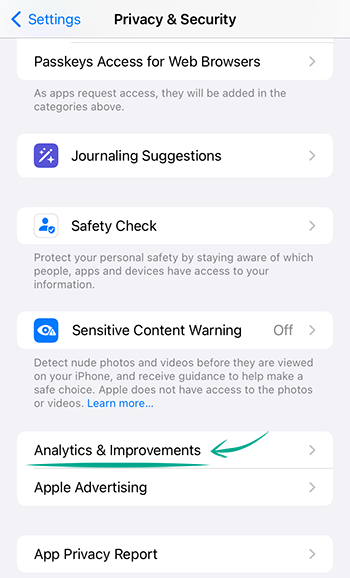
- Turn off the following options:
- Share iPhone Analytics;
- Share iCloud Analytics;
- Improve Safety;
- Improve Siri & Dictation;
- Improve AR Location Accuracy.