
Check your Google account settings
If you use Chrome with a Google account, privacy and safety of your data in the browser depends directly on your account’s security. Therefore, check your Google account settings in addition to your Chrome settings.
How to protect yourself from malicious websites and programs
What for: To detect and solve security problems.
Chrome can run a special check to detect password breaches and unsafe extensions, search for latest updates, and enable warnings about malicious websites:
- Click the three dots in the upper right corner of the screen;
- Select Settings;
- Go to the Safety check section;
- Click Check now.

Keep in mind that Chrome only runs a basic safety check and does not scan your macOS device for malware. Use an antivirus to protect your device.
What for: To find a balance between privacy and security.
Chrome can automatically detect phishing sites, monitor password breaches, and use other security mechanisms. However, a stricter security policy means that Google will get more data about your system and Internet use, which can affect your privacy. For instance, Google may learn which sites you visit, get samples of the files you download, data about your system, and other important information. To choose a security level:
- Click the three dots in the upper right corner of the screen;
- Select Settings;
- Go to the Privacy and security section;
- Select Security;
- If you do not want to share extra information with Google, click Standard protection. Chrome will then check the URLs of the pages you visit against a list of malicious resources and warn you about hazards. A site’s address and samples of its content will only be sent to Google if you download a malicious file or the site tries to steal your login credentials. You can turn on enhanced data collection if you wish, or decline it for greater privacy:
- Click Help improve security on the web for everyone option to let Chrome send the URL and a portion of the content for both malicious sites and other potentially suspicious resources you view to Google. If Chrome discovers unsafe software on your computer, it will send file samples and system registry entries to Google. This information is used for improving security so Chrome learns to identify threats more accurately.
- Click Warn you if passwords are exposed in a data breach option and Chrome will check the passwords you save in the browser against a list of stolen ones from time to time. In order to perform the check, the browser encrypts your login credentials and sends them to Google.

- If you prefer safety to privacy, you may want to share all the data Google needs to enhance security. Then choose Enhanced protection, and the browser will monitor password breaches and send some items to be checked, such as the addresses of some of the pages you visit, samples of content and downloaded files, information about extension activity, and system data.
You can also completely turn off Chrome protection for greater privacy, but we do not recommend deactivating the browser’s built-in security features.
What for: To protect Chrome from threats.
Chrome can scan your Apple products for malware and riskware, such as advertising software that secretly changes your startup page. By default, the browser automatically checks your computer once every few days, but you can launch a scan manually at any time for greater security.
- Click the three dots in the upper right corner of the screen;
- Select Settings;
- In the menu on the left, go to Advanced and click Reset Settings;
- Select Restore settings to their original defaults.
- If you do not want to share scan results and your macOS device information with Google, clear the box next to Report details to Google about harmful software, system settings, and processes that were found on your computer during this cleanup;
- Click the Find button and wait for the scan to be completed.
Keep in mind that Chrome only detects the programs which negatively affect its performance, for example, by changing your home page to a website with ads. Chrome is not designed to protect against ransomware, banking trojans, and many other forms of malware, so it cannot be used instead of an antivirus.
What for: So attackers cannot redirect you to a malicious website.
To load a site, the browser needs its IP address, for example, 172.217.18.100. However, for users remembering a sequence of numbers like this is inconvenient, so the Internet uses a domain name system (DNS). This allows to identify website IP addresses by their alphabetic names. So instead of 172.217.18.100, you can type google.com and end up on the same page. When you type a site name, the browser sends a DNS request to a special server, and it send back the corresponding IP address.
Attackers might intercept this request and replace the server’s response with another IP address, for instance, that of a malicious website. Attacks like this are often used to redirect the victim to a fake page and steal their account password or bank card details. Chrome allows you to encrypt DNS requests, which prevents scammers from intercepting them. To turn on the encryption for greater privacy and security:
- Click the three dots in the upper right corner of the screen;
- Select Settings;
- Go to the Privacy and security section;
- Select Security;
- Scroll down and enable Use secure DNS.

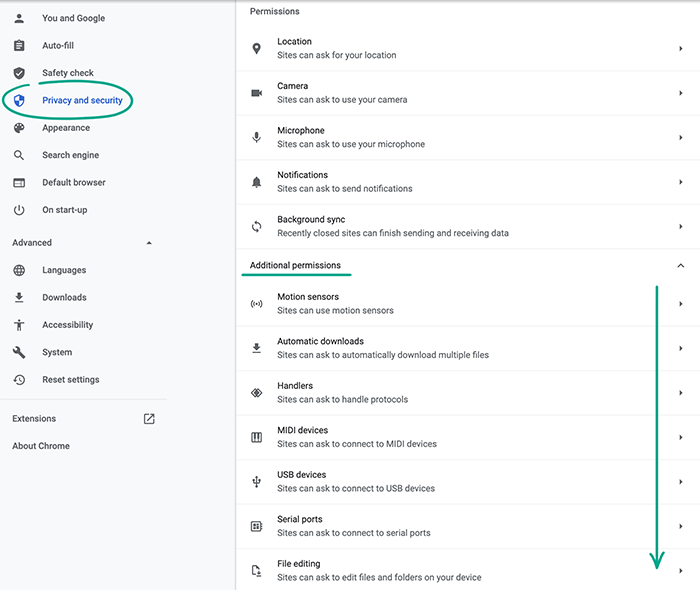
What for: To revoke unwanted website permissions
Website developers need your permission to access some of your browser’s and computer’s capabilities. For example, a technical support page can request access to your microphone to enable voice chat with an expert. However, attackers might use that maliciously, for example, to bombard you with notifications featuring ads. Check your list of permissions and revoke unnecessary ones from suspicious websites.
- Click the three dots in the upper right corner of the screen;
- Select Settings;
- Go to the Privacy and security section;
- Select Site Settings;
- In the Permissions list, click Additional permissions to see all the options;
- Select each permission one by one, and click the trash can icon to the right of the website name;
- If you do not want any website to ask for a particular permission, turn off Ask before accessing.
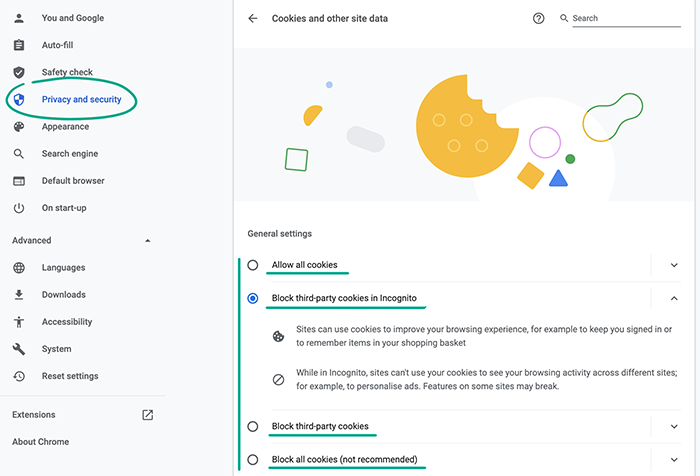
What for: So that site developers do not know too much about you.
When you visit a website, a small file gets saved on your macOS device. This file called cookies and it contains information about the system and your actions on the page. Cookies are used by website developers to identify visitors and display personalized ads. They may contain your username or a list of items in your cart, for example. In the browser settings there is an option to restrict how websites use cookies.
- Click the three dots in the upper right corner of the screen;
- Select Settings;
- Go to the Privacy and security section;
- Click Cookies and other site data;
- Choose the kind of cookies available for websites:
- Allow all cookies — sites will be able to use any cookies without restrictions;
- Block third-party cookies in Incognito — when you open a page in incognito mode, advertisers that have banners there will not be able to track your activity; However, website developers will still receive this information;
- Block third-party cookies — advertisers that have banners on a page will never be allowed to track your activity;
- Block all cookies — stop all sites from using cookies.
Downside: Having to manually enter your credentials and configure the settings each time you visit a website.
What for: To protect against vulnerabilities.
JavaScript is used to display interactive objects and animations, such as buttons and drop-down menus, on websites. Even though built into nearly all Web pages, this programming language contains plenty of well-known vulnerabilities. These are often abused by cybercriminals to steal personal data and infect computers with malware. Disable JavaScript to eliminate the risk.
- Click the three dots in the upper right corner of the screen;
- Select Settings;
- Go to the Privacy and security section;
- Click Site Settings.
- Scroll down the page, select JavaScript, and deactivate it.
Downside: Some website features will become unavailable, and some pages may work incorrectly.
How to hide your data from prying eyes
What for: To leave no tracks.
Google Chrome usually saves information about the pages you visit, the passwords you enter, the permissions you give, cookie, and some other website data. If you want to hide these — for example, when using someone else's computer — browse in incognito mode. Google Chrome will delete all login credentials, browser history, and site data immediately after you close all program windows launched in incognito mode.
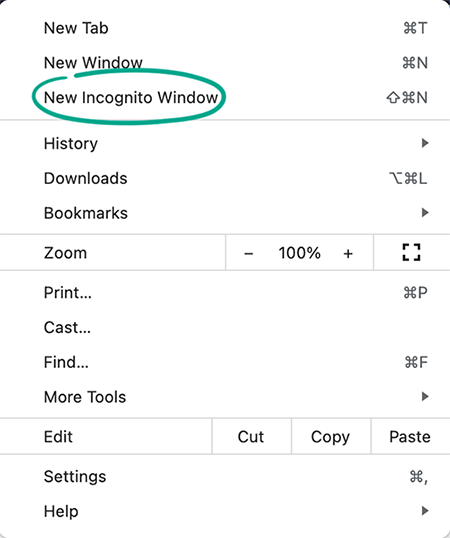
To turn on incognito mode:
- Click the three dots in the upper right corner of the screen;
- Select New Incognito Window.
What for: To keep the websites you have visited private.
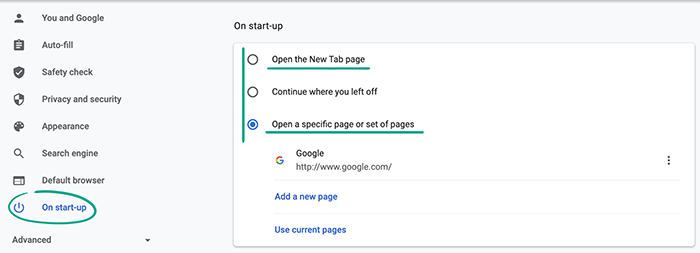
When you start Chrome, it can automatically restore the websites from your previous session. This may be convenient, but if you are in a public place, other people might see sensitive information that you prefer to keep private. To avoid awkward situations, disable this feature:
- Click the three dots in the upper right corner of the screen;
- Select Settings;
- Go to the On startup section.
- Select Open the New Tab page if you want to start with an empty page.
- Select Open a specific page or set of pages to manually enter the addresses of the websites you want to see when the browser starts.
Downside: You will have to manually open the websites you were visiting before closing the browser if you want to go on using them.
How to keep corporations out of your business
What for: To get rid of intrusive notifications and protect yourself from malicious extensions.
By default, some Chrome background services keep running even if you have closed the browser. For example, websites can send you notifications even if you have not launched the program. However, some plug-ins may abuse this feature to spy on you, secretly open malicious pages, or send you spam. To stop Chrome from running in the background:
- Click the three dots in the upper right corner of the screen;
- Select Settings;
- In the menu on the left, click Advanced and go to the System section;
- If Continue running background apps when Google Chrome is closed is active, turn it off.
Downside: You will not receive notifications when Chrome is closed.
What for: To stop Google from storing information about your Internet activity on its servers.
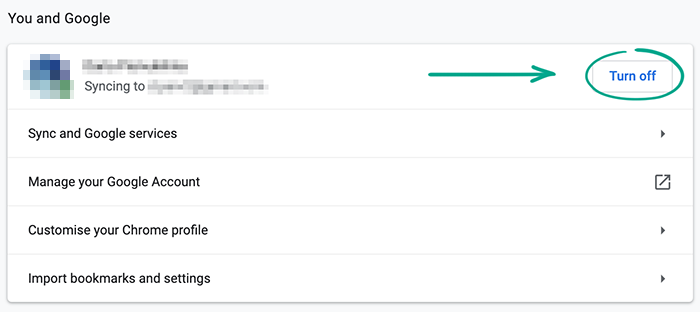
Chrome allows you to sync and manage your browsing history, extension, PWA, credentials, and other profile data across all devices signed in to your Google account. For example, when you bookmark a website on your macOS device, you’ll be able to find it in the bookmarks section on your smartphone. To enable this, Google saves your personal information on its servers, including the pages you visit, content you watch, the tabs you have open, URLs, and other information. If you want to increase your privacy, there is an option to disable syncing and avoid sending information to Google.
To turn off syncing in Google Chromer:
- Click the three dots in the upper right corner of the screen;
- Select Settings;
- Click the Turn off button to the right of your name;
- To delete all account data from a device (for example, if you signed in to your account on someone else’s computer), check the box next to Clear bookmarks, history, passwords, and more from this device.
Sync may still continue to work on other devices — for instance, if you have it enabled in Chrome on your smartphone.
To completely disable this feature and delete all saved data:
- Open the Data from Google Chrome sync page;
- Sign in to your account;
- Scroll down, tap Stop sync, and confirm your choice.
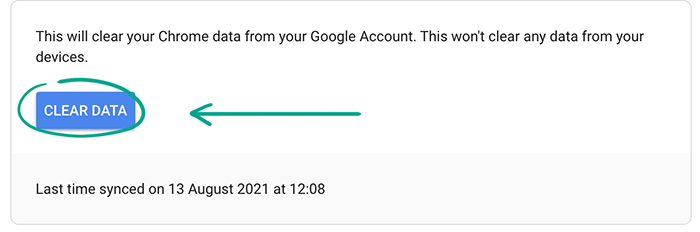
After this, syncing will be disabled on all devices. Google will delete your account information from its servers.
Downside: You won’t be able to access passwords, bookmarks, and other Google account data from other devices.
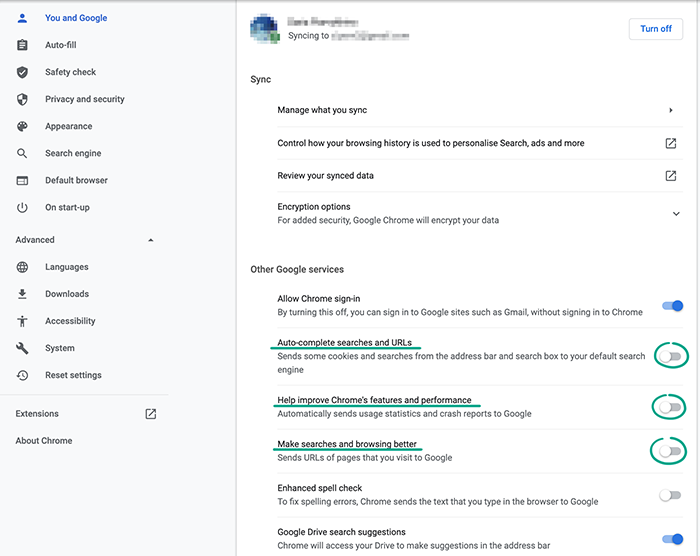
What for: To keep information about how you use the browser away from Google.
Users can automatically send Google the URLs they visit, the content they see, search queries, browser error reports, and other data. Google claims that this helps them improve app performance, fix bugs, and increase security. However, it means that data about your browsing will be stored on the company’s servers. If you don’t want to share this information, disable Google Services syncing.
Click the three dots in the upper right corner of the screen;
- Select Settings;
- Tap Sync and Google services;
- Disable the following:
- Autocomplete searches and URLs;
- Help improve Chrome’s features and performance;
- Make searches and browsing better.
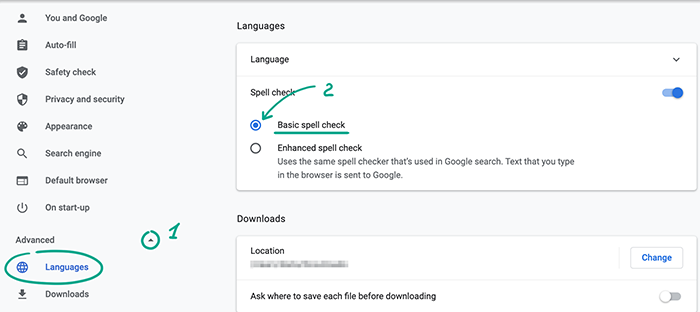
What for: To stop Google from learning what you type in Chrome.
Chrome can check the text you enter on websites, using basic or enhanced checks. The latter is based on the database of words and phrases used in search engine queries. To check typed words, the browser sends them to Google. If you do not want that, turn off the enhanced spell check.
- Click the three dots in the upper right corner of the screen;
- Select Settings;
- In the menu on the left, click Advanced and go to the Languages section.
- Select Basic spell check.
Downside: Chrome will use a less extensive vocabulary and might miss some errors.
How to protect your data
What for: To protect against leaks.
When you sign in to a website, Google Chrome prompts you to save your password. This allows it to fill in your login credentials for you next time. Chrome can check whether your passwords have been exposed in a data leak. How to start a scan:
- Click the three dots in the upper right corner of the screen;
- Select Settings;
- Go to the Autofill section;
- Select Passwords;
- Click Check passwords.

If your login credentials have been leaked, you’ll see a message about it. If so, change the vulnerable passwords to something unique and secure as soon as possible.
For better security and specifically to get notifications if your passwords are discovered in public sources, turn on advanced protection mode.
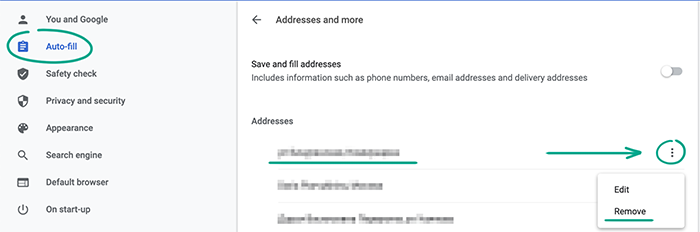
What for: To avoid exposing your contact information in case of a leak.
Chrome can remember your address, place of work, phone number, and other contact details. These are used for autofill on websites and in apps — for instance, when planning routes in Google Maps. If you turn on sync, Google servers will store your contact information, which reduces security and privacy, as it increases the risk of data leak. You can improve your privacy by deleting this information from Chrome:
- Click the three dots in the upper right corner of the screen;
- Select Settings;
- Go to the Autofill section;
- Select Addresses and more;
- Click the three dots to the right of the address and select Remove.
Downside: You will have to enter your address and other contact details manually.
What for: So strangers can’t access your accounts.
When you sign in to a website, Google Chrome prompts you to save your password. This allows it to fill in your login credentials for you next time. However, if someone gains access to your computer, they’ll be able to sign in to any of your accounts that has a password saved in Chrome. To rule out this possibility, disable autofill and delete your passwords from the browser.
- Click the three dots in the upper right corner of the screen;
- Select Settings;
- Go to the Autofill section;
- Select Passwords;
- Disable Offer to save passwords and Auto Sign-in;
- In the Saved Passwords list, click the three dots to the right of each website name and select Remove.
Downside: You will have to manually enter logins and passwords every time you sign in.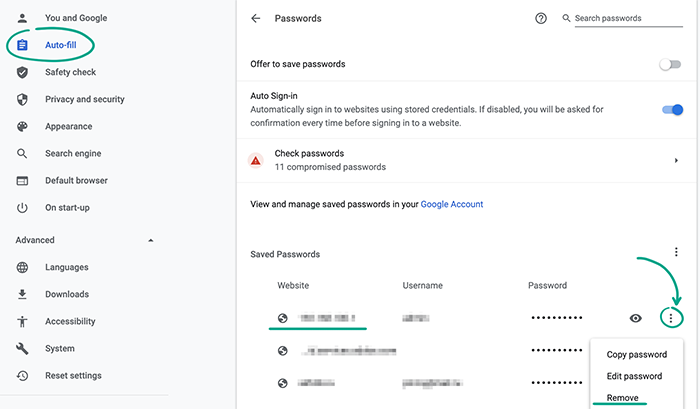
You can avoid the inconvenience and improve the security of your accounts using a password manager. Unlike a browser, it does not access third-party resources on the Web, which means it is protected from malicious websites. Neither can it be hacked via a vulnerable extension or plug-in.
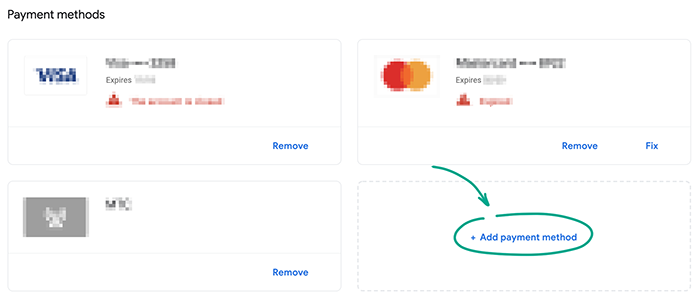
What for: To prevent it from leaking.
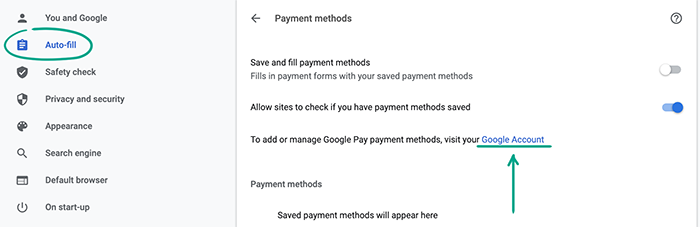
When you enter your card details in order to buy something on the Internet, Chrome may offer to save them in your Google account. If you visit the same online retailer in the future, the browser will automatically fill in the payment form. This may be convenient, but it gives Google the right to store your payment information on its servers and pass it on to third parties along with your personal details — for example, inform a bank of your location. To delete your payment details:
- Click the three dots in the upper right corner of the screen;
- Select Settings;
- Go to the Autofill section;
- Select Payment methods;
- Click the Google Account link;
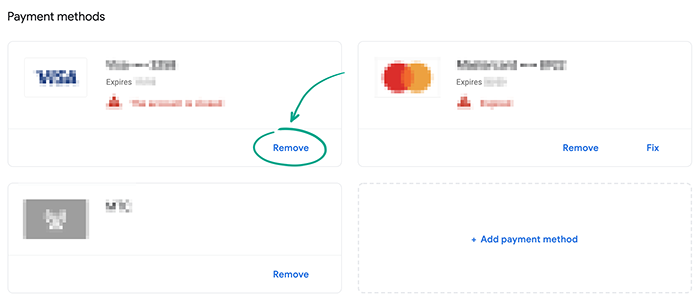
- Go to the Payment methods tab;
- Click Remove under the bank card that you want to delete and confirm your choice.
Downside: You’ll have to manually enter your card details every time you buy something.
If you don’t want to disable payment form autofill completely, you can store card details on your device. Before adding your payment information, make sure your Google account syncing is turned off, or else this information will end up on Google servers.
To save payment details on your device:
- Click the three dots in the upper right corner of the screen;
- Select Settings;
- Go to the Autofill section;
- Select Payment methods;
- Click Add and enter your card details.